1988 Cobia Sunskiff 200 restoration

52FordF2

Petty Officer 1st Class
Joined
May 31, 2013
Messages
372
You do need to add the (At Least 1/4 inch) long csm to the mix with cabosil. The CSM is a binder with the resin. Resin with just cabosil doesn't work too well.

Keep up the good work.
 

Woodonglass

Supreme Mariner
Joined
Dec 29, 2009
Messages
25,930
^^^I agree Use some fibers with your Poly PB. Make sure to be NEAT cuz this stuff does NOT sand smooth very well and cures hard as IRON.
 

Dbrown_rn

Seaman Apprentice
Joined
Jul 4, 2019
Messages
38
As always, thank you for the advice and encouragement.

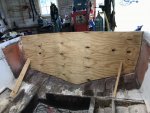
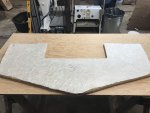
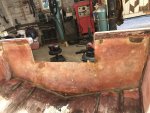
Despite work and lots of unexpected interruptions, I was able to make some headway on the transom. I ripped some scrap stock on the table saw to make an outline/template of the transom using snips for shaping and a hot glue gun to take everything in place. Can’t remember where exactly I saw this tip, but it worked pretty well.

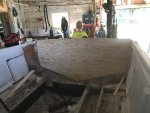
I still had quite a bit a bit of fine tuning after my first cutout on a scrap piece of old underpayment I had, but I finally got it to what I believe is “close enough” so that I have a nice even amount of space that I can fill with thickened resin.

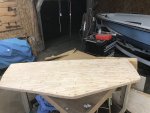
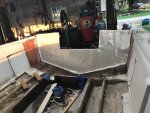
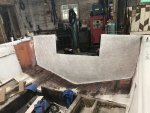
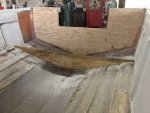
After all all my adjustments I decided to go for it and cut out my two pieces of 3/4” plywood. I test fit them both, before pulling the trigger and laminating them together outside of the boat on my assembly table. I don’t have many have items for weighting, so I opted to pre-drill strategically placed holes and screw the panels together. I got nice squeeze out all around.

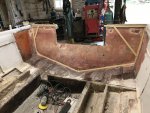
I am am still debating whether or not I am going to back the drywall screws out and replace with stainless screws permanently, or just take them out and fill holes with thickened resin when I start to glass everything.

On on a side note, I opted to not notch the cutout for the splashwell and motor until after all my final adjustments have been made now that the two pieces are laminated together...but boy is it tempting to think about how cool it would be to close in the transom right now!..I need to keep telling myself not to get side tracked, this is a fishing boat that is a quick and dirty turnaround to water ready.
 

Attachments

  • photo320199.jpg
    photo320199.jpg
    929.1 KB · Views: 1
  • photo320200.jpg
    photo320200.jpg
    897.8 KB · Views: 1
  • photo320201.jpg
    photo320201.jpg
    1.2 MB · Views: 1
  • photo320202.jpg
    photo320202.jpg
    999.8 KB · Views: 1

Dbrown_rn

Seaman Apprentice
Joined
Jul 4, 2019
Messages
38
^^^I agree Use some fibers with your Poly PB. Make sure to be NEAT cuz this stuff does NOT sand smooth very well and cures hard as IRON.

Well, I tried to make them as neat as possible... overall I am happy with how the fillets turned out but I do have a few high spots.

They setup nicely. I’m planning to go out this morning and start to lay in my full glass and transom

am I safe to hit the high spots down with my flap disc and clean with acetone as I did with other prep work?

just not sure if this will mess anything up with the laminating resin or not?
 

Dbrown_rn

Seaman Apprentice
Joined
Jul 4, 2019
Messages
38
I kind of answered my own question.

Went out this morning and everything was hardened nicely....but really didn't have much if any "tackiness" to it.
This surprised me because it is laminating resin. I knocked everything down easily with a flap disc and I am happy with the turn out.

Vacuumed and acetoned everything. Cut my three layers of glass and dry fit. I am thinking about laminating the third layer of CSM on the transom before installing, versus laminating all three layers of glass together in the boat and the installing the wood.

My thinking is to use regular resin with the csm on the transom, let it start to setup, and then smear my peanut butter on the boat and install the transom wood and clamp up.
 

Attachments

  • photo320313.jpg
    photo320313.jpg
    1.1 MB · Views: 1
  • photo320314.jpg
    photo320314.jpg
    1.1 MB · Views: 1
  • photo320314.jpg
    photo320314.jpg
    1.1 MB · Views: 1
  • photo320315.jpg
    photo320315.jpg
    1.1 MB · Views: 1
  • photo320316.jpg
    photo320316.jpg
    1.1 MB · Views: 1
  • photo320316.jpg
    photo320316.jpg
    1.1 MB · Views: 1
  • photo320317.jpg
    photo320317.jpg
    1.1 MB · Views: 1

Dbrown_rn

Seaman Apprentice
Joined
Jul 4, 2019
Messages
38
Ok, got up at 5 this morning. Out to the shop and put the finish cut on my transom wood, followed by rounding over the edges that will be glassed, and final sanding.
I followed that with vacuuming the back of the boat and wiping outer transom skin with acetone. Did this process a total of 4 times.

Getting everything laid out to do the glass work and sandwich in the new transom. A bit nervous because I am doing this alone. Trying to plan as best as possible.

Hopefully all all goes well and I will have some pics to post later today.
 

kcassells

Fleet Admiral
Joined
Oct 16, 2012
Messages
8,739
When the wood got that big I put handles on it to make it easy to lift. Then just lift in place and muck over the holes when removed.
Also buy a case of beer and call some friends over.
Make some practice runs.!:joyous:
 

Dbrown_rn

Seaman Apprentice
Joined
Jul 4, 2019
Messages
38
When the wood got that big I put handles on it to make it easy to lift. Then just lift in place and muck over the holes when removed.
Also buy a case of beer and call some friends over.
Make some practice runs.!:joyous:

I like the handle idea. Too bad i saw this just a little too late:facepalm:

I guess only time will tell. Transom is in and clamped up. I believe I had a pretty good squeeze out. ...boy was i rushing around, but I believe the humidity here today helped me out. Never felt like I was letting it gel up too much. Fingers crossed.
 

emoney

Commander
Joined
Jul 19, 2010
Messages
2,551
You’re doing great so far. She’s gonna be tough and sturdy when you get her splashed
 

Dbrown_rn

Seaman Apprentice
Joined
Jul 4, 2019
Messages
38
For some reason I started having trouble uploading photos with my phone. I still need to figure out what I did and I’ll try and get some update pictures posted.
I haven’t made too much progress on the boat because I have been slammed at work. The new transom is laminated to the back skin, all that is left is to put in my fillets and tab the new transom to the hull and gunnels.

After that I would like to move on to chipping away at the stringers and bulkheads. There in lies a big moral dilemma I am struggling with and it is keeping me from proceeding cause I can’t make up my mind for the best route.

1. Should I just demo all stringers and bulkheads to get a good clean hull in one fell swoop to start installing the new material

2. Should I cut out one stringer at a time, clean that up and install a new one, and chip away at them one at a time?
 

Dbrown_rn

Seaman Apprentice
Joined
Jul 4, 2019
Messages
38
I decided to stop pussyfooting around and get everything out of there and start to clean the hull up and prepare to bed the new stringers and bulkheads. I was hoping the demo process would have gone faster but oh well. I am running out of warm air to do my glasswork on the new wood, but I don’t want to rush the prep.
 

Attachments

  • photo321461.jpg
    photo321461.jpg
    99.7 KB · Views: 1
  • photo321462.jpg
    photo321462.jpg
    126.5 KB · Views: 1
  • photo321463.jpg
    photo321463.jpg
    115.6 KB · Views: 1

Dbrown_rn

Seaman Apprentice
Joined
Jul 4, 2019
Messages
38
What exactly does it mean to grind down to good glass? I seem to be removing a lot of material and I’m concerned that I am spending too much time grinding. Do I need to completely remove the old tabbing that is still on the hull from old stringers transom and bulkheads, or can I scuff that up and glass over
 

cbs440

Recruit
Joined
Oct 1, 2019
Messages
1
My son and I finished reviving the same boat last year, just short of stringers and transom. I can’t get my pics to load on here. I guess they are too large of a file size. We are fishing out of her now!
 
Last edited:

AShipShow

Lieutenant Commander
Joined
Jul 8, 2016
Messages
1,803
A good rule of thumb is, when you think your finished grinding, you're about 75%... lol
really tho, you need to remove all old tabbing, dry glass, nasty looking glass, etc...
I probably had 20 hours of grinding on my hull. Most of it during original demo and some later that I found had to go.
 

Dbrown_rn

Seaman Apprentice
Joined
Jul 4, 2019
Messages
38
My son and I finished reviving the same boat last year, just short of stringers and transom. I can’t get my pics to load on here. I guess they are too large of a file size. We are fishing out of her now!

Nice!
 

Dbrown_rn

Seaman Apprentice
Joined
Jul 4, 2019
Messages
38
For those of you following this thread,I have not completely lost hope with this project. I had some important family things to take care of and than cold weather came and put a stop to any fiberglass workin my shop...but that’s about to change (Hopefully)!:joyous:
I picked up this 165,000 btu Reznor Natural gas shop heater from a local welding shop that closed up. Hopefully going to have it almost complete by this weekend. Than I can get hack to the gla
 

Attachments

  • photo323092.jpg
    photo323092.jpg
    104.8 KB · Views: 0
  • photo323093.jpg
    photo323093.jpg
    93.6 KB · Views: 0

kcassells

Fleet Admiral
Joined
Oct 16, 2012
Messages
8,739
Smack it up and get going back at it! Lucky you!
It's nice to use the mos. that most people consider dead for work when the temps bump.
 
Top