Bravo lower shift cable adjustment tool specs

Status
Not open for further replies.

eric102

Seaman
Joined
Aug 28, 2018
Messages
60
I'm prepping to replace the lower shift cable, its 28 years old and getting a bit stiff. I don't have core wire locating tool 91-17263 so I searched online for some specs to make one and was somewhat shocked to see its suppose to be 1/4" thick. My existing wire is sticking out 3/4" and the drive has been shifting fine, I guess that 1/4" measurement isn't that critical?

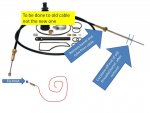
I already have the Bravo shop manual, an anchor adjustment tool 91-17262, lower shift cable kit and bellows adhesive are on the way. Anything else besides some sealant? Whats the best way to get the cable back in on the same route as the old one? I saw one video where a tech slid what looked like weed whacker line up through the old cable to use as a guide for the new one, seems like that would be difficult in an old crusty cable unless the line was pretty stiff.
 

alldodge

Moderator
Staff member
Joined
Mar 8, 2009
Messages
43,238
In most all cases you don't need the anchor adjustment tool anymore, but its just a 1/4 plate with a slot in it to hold neutral position. The tool was used before the factory started adjusting the length and penned the barrel nut fixed.

You also don't need core wire, you use a piece of the old shift cable and a good nylon string.

Do notice how the old cable is routed around the exhaust

Remove both ends of the cable from bell housing and shaft bracket. Remove the plastic shift bracket end, and then the barrel and threaded portion off the cable. Cut a 1/2 to 1 inch piece off the end of the old threaded outer jacket with a hacksaw.

Insert a piece of good string thru the center and tie a knot large enough so it will not pull thru but not so large it will not thread back into the new cable jacket.

Remove the bell housing end and remove the center core from the old jacket. Now the old cable jacket is free, thread the piece of rod you made with the string into the old jacket. Go into the boat and pull the old jacket out until there is nothing but string left

Remove threaded end from old jacket and thread into new jacket. Now pull it back thru. If you didn't move the old jacket much, the new will come back into the same location. Not start the reassembly process

Bravo shift adjust.jpg
 

Attachments

  • Bravo replace.jpg
    Bravo replace.jpg
    43.5 KB · Views: 27

eric102

Seaman
Joined
Aug 28, 2018
Messages
60
Thanks, great info! The new Quicksilver cable kit (815471T-1) showed up today with a manufacturing date of 3/12/19 and the barrel isn't pinned but oddly the old 1991 barrel is. Got the old core wire out, cable disconnected from the bell housing and the old bellows pulled back and was happy to see no evidence of water intrusion. The 28 year old bellows was still pliable with no cracks or cuts, should have left it on :).

Will attempt the cable pull on another day but got it mapped out just in case something goes haywire and also removed the spiral wrap and noted its location.
 

eric102

Seaman
Joined
Aug 28, 2018
Messages
60
The string attached to a cut off piece of the old threaded barrel worked great for snaking the new cable back into the boat, thanks for the idea! Only issue was having to climb in and out of the boat a dozen times since I was doing it solo. Push the cable in a little ways then climb into the boat to guide the cable with the string, then repeat.
 

Hossboat

Cadet
Joined
Sep 9, 2021
Messages
13
Thanks, great info! The new Quicksilver cable kit (815471T-1) showed up today with a manufacturing date of 3/12/19 and the barrel isn't pinned but oddly the old 1991 barrel is. Got the old core wire out, cable disconnected from the bell housing and the old bellows pulled back and was happy to see no evidence of water intrusion. The 28 year old bellows was still pliable with no cracks or cuts, should have left it on :).

Will attempt the cable pull on another day but got it mapped out just in case something goes haywire and also removed the spiral wrap and noted its location.
Hey I'm having to adjust my cable. Do you have measurements of the pinned barrel to the center hole to hole? Is it 7 or 7 and half inch?
 

Hossboat

Cadet
Joined
Sep 9, 2021
Messages
13
In most all cases you don't need the anchor adjustment tool anymore, but its just a 1/4 plate with a slot in it to hold neutral position. The tool was used before the factory started adjusting the length and penned the barrel nut fixed.

You also don't need core wire, you use a piece of the old shift cable and a good nylon string.

Do notice how the old cable is routed around the exhaust

Remove both ends of the cable from bell housing and shaft bracket. Remove the plastic shift bracket end, and then the barrel and threaded portion off the cable. Cut a 1/2 to 1 inch piece off the end of the old threaded outer jacket with a hacksaw.

Insert a piece of good string thru the center and tie a knot large enough so it will not pull thru but not so large it will not thread back into the new cable jacket.

Remove the bell housing end and remove the center core from the old jacket. Now the old cable jacket is free, thread the piece of rod you made with the string into the old jacket. Go into the boat and pull the old jacket out until there is nothing but string left

Remove threaded end from old jacket and thread into new jacket. Now pull it back thru. If you didn't move the old jacket much, the new will come back into the same location. Not start the reassembly process

View attachment 274007
Hi I don't understand what you mean about the upper cable not shown in picture how do you adjust the upper cable. Steps to follow. Thank you
 
Status
Not open for further replies.
Top