Time to re-upholster - Formula 330 SS

Lowlysubaruguy

Chief Petty Officer
Joined
Dec 3, 2012
Messages
514
Looks great. The best upholstery people are really good at hiding there mistakes ;)

i must not have mentioned this. A tool I wish I had bought in the last century is and edge binding guide there between $60 and $159 depending in the size binding kind of universal Salerite sells them they feed edge binding onto the edge if what ever your trying to put a finished edge. Priceless.

perfect fit is one of the best places to buy Sunbrella pre made binding. I put edges on stuff that doesn’t even need it any more. If you buy the tool you’ll love it.

I hate sewing with basting tape instead I pre fit each piece and cut tiny Vs every so often to keep my pieces in the right place after a while this will work better. A few really complex seat covers headrest things like that and you’ll learn to overcome puckering and panel missalignment.

I have been sewing so long it’s natural for me to always check thread tension it’s like looking in a rear view mirror when driving however watching a lot of sewing videos new sewers seem to struggle with thread tension, for every new seam thickness check it on a a sample piece of the same amount of materials and then check it every few feet until you like the position your threads join.

tips to get your machine through thick work pieces always start sewing with the needle just into the up stroke or at its highest point it will develop more power before its has to break through the material.

large flat pieces when aligning them for your pre fit get one edge in position and put a couple of staples in that end just remember to pull them after you start sewing. Some people like pins to hold cloth before sewing My machine will sew through pins so a couple of staples are fine. It really helps if your trying to get a few pieces in the exact spot. Tape rarely works when your combining three or four pieces. Pins are always wounding me. I only use them on really light slippery material. But a few staples are pretty effective at holding your starting edges in place.

it’s funny you mentioned you don’t really like canvas work. After all the sewing I’ve done I like canvas and covers the most. A great fitting awning or cover is something not every one has.

your going to make trailer tire covers to match the cover right? Or is your boat never on a trailer?

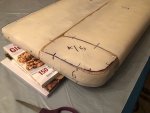
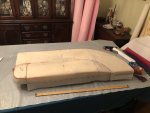
as far as plywood goes I coat everything in marine grade epoxy made for wood. Pre drill any holes that you can a little larger than the fastener and work the epoxy into the holes. But I live in a wet area. Make sure you bore a few vent holes so when fat people sit or fall onto the seat air can escape quickly it will keep air pressure from pulling your seams and any staples holding the material to the wood. And yet another topic use stainless steel staples.

congrats.
 

tpenfield

Moderator
Staff member
Joined
Jul 18, 2011
Messages
18,285
Thanks, Lowlysubaruguy

I am struggling a bit on the sharp corners, but I suppose that will get better with time. I have a box of SS staples and a pneumatic staple gun.

I made the matching seat for the back rest that I made the other day. It came out fairly well . . . a bit of a struggle at the sharp curve/corners, as I mentioned.

Here are some pics . . .

Drawing out the patterns.
.
Click image for larger version  Name:	IMG_3709 2.JPG Views:	1 Size:	127.9 KB ID:	10818706
.
Patterns cut out. . .
.
Click image for larger version  Name:	IMG_3710 2.JPG Views:	1 Size:	121.5 KB ID:	10818708
.
Click image for larger version  Name:	IMG_3717.JPG Views:	1 Size:	119.9 KB ID:	10818710
.
I think I am going to abandon the water-based adhesive and go with the solved-based spray. Too much trouble getting the water-based to adhere the vinyl to the sew foam.
 

Attachments

  • IMG_3710 2.JPG
    IMG_3710 2.JPG
    121.5 KB · Views: 2
  • IMG_3711.JPG
    IMG_3711.JPG
    107.5 KB · Views: 2

tpenfield

Moderator
Staff member
Joined
Jul 18, 2011
Messages
18,285
Here are a couple of pics with the seat back and seat base together.
.
IMG_3718.JPG
.
 

Attachments

  • IMG_3719.JPG
    IMG_3719.JPG
    161.5 KB · Views: 0

bruceb58

Supreme Mariner
Joined
Mar 5, 2006
Messages
30,610
Heat gun and being very careful gets rid of wrinkles.

Aren't you glad you bought a real walking foot machine?

Where do you use the plastic anchoring strip?
 

tpenfield

Moderator
Staff member
Joined
Jul 18, 2011
Messages
18,285
Heat gun and being very careful gets rid of wrinkles.

Aren't you glad you bought a real walking foot machine?

Where do you use the plastic anchoring strip?

Yes. I am glad I bought the walking foot machine.

The plastic strips get stapled in the middle of the cushion to hold down the center section where the 2 main panels meet.

They are called 'tack strips' and allow the staples to provide some positive anchoring.
 

bruceb58

Supreme Mariner
Joined
Mar 5, 2006
Messages
30,610
Yes. I am glad I bought the walking foot machine.

The plastic strips get stapled in the middle of the cushion to hold down the center section where the 2 main panels meet.

They are called 'tack strips' and allow the staples to provide some positive anchoring.

I have never used them on the little bit of upholstery I have done but may on my next one which will be soon.
 

bruceb58

Supreme Mariner
Joined
Mar 5, 2006
Messages
30,610
i must not have mentioned this. A tool I wish I had bought in the last century is and edge binding guide there between $60 and $159 depending in the size binding kind of universal Salerite sells them they feed edge binding onto the edge if what ever your trying to put a finished edge. Priceless.thickness check it on a a sample piece of the same amount of materials and then check it every few feet until you like the position your threads join.
I use that Sailrite binder. I went through a few other ones before I bought it.

IMG_20140201_160807.jpg
 

bruceb58

Supreme Mariner
Joined
Mar 5, 2006
Messages
30,610
Yes, I tried it today . . . AWFUL :rolleyes:

I think I'll use up the Weldwood stuff that I have and then maybe try the 3M 77

Interesting...I have read that the 90 is the stronger of the two.

I have used 77 before and it worked well.

You let it get tacky and spray both sides right?
 

tpenfield

Moderator
Staff member
Joined
Jul 18, 2011
Messages
18,285
Interesting...I have read that the 90 is the stronger of the two.

I have used 77 before and it worked well.

You let it get tacky and spray both sides right?

Yes, did both sides, etc., etc. I've had good luck with the 3M 77 . . . sticks almost too good.
 

Corjen1

Lieutenant Junior Grade
Joined
Aug 24, 2013
Messages
1,237
Ted, great work. Seems like every one has answered your questions. I thought I would offer some of the things I've picked up...

- on puckering - I do what the others have mentioned, but I will also staple the seams together as well. I mostly do this on corners and long runs

- I almost always trim the excess on the selvage off. It will help on the "bunching" your seeing on your curved corners. (post 123, first pix, rh forward)

- when stapeling, I work the corners first, pulling and stapeling the center of the material/corner first . will give youe a better finished look.

Anyway, good luck on the rest of the bits!
 

tpenfield

Moderator
Staff member
Joined
Jul 18, 2011
Messages
18,285
Thanks Corjen1 . . . I am finding the corners a bit challenging and I seem to be getting 1-2 stitches of 'bunching' in most of the corner areas.

I think your tips will come in handy as I progress.

I thought that these seat skins would be fairly easy, given that they are not too elaborate. . . but I am finding the shape and techniques used by the boat manufacturer are a bit more challenging that I has anticipated.

I'm working on a third skin, which is the seat base to the forward part or the "U" shaped seating assembly. (see picture)
.
IMG_2605-copy.jpg
.
It has 2 main pieces to the seat skin with a seam joining them that follows the curve of the U-shape seating. The center seam also has a tack strip attached that pulls the center of the skin down tight to the foam. A bit more tricky that I was originally thinking :rolleyes:


Not sure if you have encountered anything with a tack strip to hold the vinyl to the contour of the foam.
 

tpenfield

Moderator
Staff member
Joined
Jul 18, 2011
Messages
18,285
Seat Base Update . . .

I tried making the aforementioned seat base from the existing vinyl as the patterns for the new vinyl. It was a total fail :facepalm: :rolleyes: It came up about 2" short and not something that I could stretch to fit. Scratch 1 yard of white vinyl :rolleyes:

So, I am going back to basics with making new patterns from the foam and base board itself, rather than using the old vinyl. Here is my work using 6 mil clear plastic for making the templates.
.
Click image for larger version  Name:	IMG_3721.JPG Views:	1 Size:	121.3 KB ID:	10819059 .

Push pins do nicely in holding the pieces of plastic in place.

I did notice 1 area where the original design of the templates does not quite fit the contour of the foam. Formula (boat manufacturer) uses some stretching to get it all to fit.

Click image for larger version  Name:	IMG_3721A.jpg Views:	1 Size:	121.8 KB ID:	10819058
.
I plan on making that area a separate piece to better fit the contour.
.
Click image for larger version  Name:	IMG_3721B.jpg Views:	1 Size:	107.6 KB ID:	10819060
.
Note the angle of the foam contour in that area (red lines). The separate piece that I plan on making is outlined in the blue lines.

Hopefully this will all work out better than my prior attempt. I guess I will be making all of the patterns going forward from the foam and bases rather than the old vinyl.
 

Attachments

  • IMG_3721.JPG
    IMG_3721.JPG
    121.3 KB · Views: 2

tpenfield

Moderator
Staff member
Joined
Jul 18, 2011
Messages
18,285
Template Update . . .

I finished the seat base template today.
.
IMG_3729.JPG
.
IMG_3728.JPG
.
IMG_3731.JPG
.
 

Attachments

  • IMG_3730.JPG
    IMG_3730.JPG
    127.5 KB · Views: 2
  • IMG_3725.JPG
    IMG_3725.JPG
    146.4 KB · Views: 0

tpenfield

Moderator
Staff member
Joined
Jul 18, 2011
Messages
18,285
I've got the pieces all cut out and ready to go. I should be stitching this evening after work.
.
IMG_3733.JPG
.
I did find out where I came up short on my previous attempt. . . . the piece in the middle was about 2 inches shorter than it should have been :noidea:

I am adding a dash of the pink on the corners of the seat bases for the u-shaped seating, as you can see the pink piece in the picture.

Hopefully, this second attempt will fit properly :)
 

Lowlysubaruguy

Chief Petty Officer
Joined
Dec 3, 2012
Messages
514
Remember to add allowances for seams usually 1/2” is the norm but each person and fabric has there own sweat spot so to say. I always walk out each seam before sewing with my finger tips trying to create the exact width they my seam allowances will take up. Its not perfect but it will help prevent sewing something thats off a lot. Also on corners you can cut a slit int he seam allowance portion of the material that is 2/3rds the amount your seam allowance is to help the materials not only feed through your machine but lay flatter after your done. The tighter the corner the more often you should make these cuts. A very tight corner may need them every 3/8” larger ones an inch or two apart may be enough. Ive sewn some tricky car seat covers up something I did when working with leather was to buy cheap canvas and actually sew up a practice cover it allowed me to work out the kinks before using a very expensive piece of material. Especially with curves. Might be worth a shot.

Its kind of normal for one to make them to tight far to often the opposite is the case. I made a lot of things to small or overly tight in the early days. And like the material that came off your old seats often they are all but useless as a pattern.
 

tpenfield

Moderator
Staff member
Joined
Jul 18, 2011
Messages
18,285
Yes, I am using 1/2” seam (selvage). Not sure how I goofed up on my previous attempt. This one should come out better ( I hope). I have been checking dimensions along the way.
 

tpenfield

Moderator
Staff member
Joined
Jul 18, 2011
Messages
18,285
Thanks guys for the pointers along the way.

This one turned out much better . . .
.
IMG_3743.JPG
.
IMG_3745.JPG
.
IMG_3744.JPG
.
The vinyl skin is just tacked in place . . . the center 'tack strip' is not adhered to the base, etc. I need to make a new plywood backing for this seat, because it is cracked.

Onward . . . I think I will finish off all of the seat bases, then move to the curved backrests.
 

tpenfield

Moderator
Staff member
Joined
Jul 18, 2011
Messages
18,285
Progress Update . . .

I made the seat 'pull straps' for the 3 hinged seat sections.
.
IMG_3783.JPG
.
I am now working on the port side settee. This seat base is a bit different than the 'U' shaped seating bases.
.
IMG_3784.JPG
.
IMG_3785.JPG
.
Next steps are to lay out the templates on a sheet of vinyl and markup the pieces for cut-out.
 

tpenfield

Moderator
Staff member
Joined
Jul 18, 2011
Messages
18,285
BTW - I tried the 3M 77 spray adhesive and that worked out fine. :thumb: Probably should have used that from the outset.
 
Top