Evinrude Etec 2012 150HP motor power tilt and trim stuck in down position

pinetree

Cadet
Joined
Nov 13, 2021
Messages
6
Hi,
I have an Evinrude Etec E150DPXAAB 2012 150HP motor with power tilt and trim hydraulic unit.
The motor is tilted in the down position and I cannot get the power tilt and trim unit hydraulic pump motor to run. I have checked
  • that there is 12V coming out of the relay to the motor blue and green wires
  • I have even connected 12V directly to the motor plug in both polarities but the motor will not turn
  • The resistance of the motor seems very high > 130kohms i.e. seems open circuit
  • I have checked that the limit switch circuit is closed
The main issue I am having is that I cannot get the manual release screw to turn. I have sprayed several types of anti-corrosion sprays like Corrosion X and Shift Ya Bastard and also tried heating the screw and / or case or the hydraulic pack around the manual release screw and then using a manual impact driver but it just isn't turning. The head is getting pretty stuffed up too (see pic).

At this point, I'm just keen to get the engine tilted so that I can replace the power tilt and trim unit or just the motor.

A mechanic I spoke to said that to move the boat he could take the propeller shaft / gearbox off - but I am thinking if I could just get the motor tilted so I could access the unit, would not need to do that.

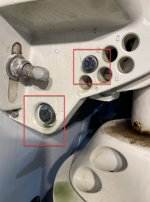
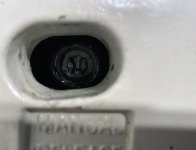
I was wondering whether anyone could tell me whether if I took the lower pin that goes through the hydraulic tilt unit out and also a smaller pin that looks like just there to restrain things if needed - is in a hole marked 1 in a group of 6 - whether I could then tilt the motor and hydraulic assembly up together or whether the power would clash with something else? I am not sure whether this would help too much but it might help me get better access to the manual release screw.

Also, am wondering how you get a pin like shown in position 1 out…. It has kind of a circlip but I have never seen one like it - it has no bits to pull apart - any advice appreciated.

I am open to any other suggestions that would help me get this unit fixed.
 

Attachments

  • etec tilt and trim issue - lower pins.jpg
    etec tilt and trim issue - lower pins.jpg
    156.9 KB · Views: 7
  • etec tilt and trim issue - manual release screw.jpg
    etec tilt and trim issue - manual release screw.jpg
    123.9 KB · Views: 9

Chris1956

Supreme Mariner
Joined
Mar 25, 2004
Messages
28,369
That motor looks to have a standard PTT unit on it. So it is held on by the upper and lower PTT pins. The lower one usually has a keeper holding it in place. Remove that and drive out the pin. Now you can tilt the motor by hand and block it up. Drive out the top pin and the unit will come off in your hand. You will likely need to remove the PTT wires from their connector, to get it past the hole in the lower cowling.
 

Crosbyman

Vice Admiral
Joined
Nov 5, 2006
Messages
5,797
maybe.. this may help
 

Attachments

  • E-Tec 150 T&T Repair.pdf
    567.3 KB · Views: 15

pinetree

Cadet
Joined
Nov 13, 2021
Messages
6
That motor looks to have a standard PTT unit on it. So it is held on by the upper and lower PTT pins. The lower one usually has a keeper holding it in place. Remove that and drive out the pin. Now you can tilt the motor by hand and block it up. Drive out the top pin and the unit will come off in your hand. You will likely need to remove the PTT wires from their connector, to get it past the hole in the lower cowling.
Thank you - in the pic I attached there is another pin circled in red in a position marked "1" - it just goes straight through to the other side and looks just like it would serve to retain the hydraulic pack if the lower pin fell out. I am not familiar with the type of retainer that is on this pin - it looks like it might be a "cap" that press-fits over the pin.... is this what you mean by "the lower pin usually has a keeper holding it in place"? I can see the large pin that goes through the bottom of the PTT unit just seems to have circlips on it and i can take them off ok. I am just unsure about that other pin.
 

pinetree

Cadet
Joined
Nov 13, 2021
Messages
6
maybe.. this may help
This helps a lot - thank you! I am hoping that if I take the lower pin(s) out, I will just be able to tilt the motor up with the upper cylinder in the current position enough that I can then access that top pin to remove it.
 

pinetree

Cadet
Joined
Nov 13, 2021
Messages
6
I am pleased to say that I thought I would try and apply enough force with a block and tackle to cause the collision relief to activate. This worked for me and I was able to raise the motor up. As it was coming up I think I could hear the hydraulic oil moving - either way it has worked. And, after doing that I tried turning the manual relief screw again with the impact driver. I was able to get it to do 1 full turn. I've now sprayed some more anti-corrosion in there and will see if I can get it loose enough after a few more whacks to turn it by hand.

Interestingly, once in the up position I thought I would try the up down buttons. The motor did turn in the down direction very briefly but then stopped again. I will try and measure the current and voltage from / on the battery when I do this. When I tried previously I convinced myself that the batteries were good and I did try a separate battery. I didn't see any dip of the voltage at any time. The wiring to the motor looks fine - not damaged in any obvious way.

I am just stoked that it is in the up position now. I think I will replace the whole unit just to be sure. Thanks.

1636888830766.jpeg
 

Crosbyman

Vice Admiral
Joined
Nov 5, 2006
Messages
5,797
great news ... if the motor (T&T) is not cooked it may be just in need of a rebuild. I had mine done 2-3 years ago I could not raise mine and it was just seals.

keep everything greased up with regular upkeep !
 

pinetree

Cadet
Joined
Nov 13, 2021
Messages
6
Well, I got the PTT unit out. For the top pin, I used a ball joint press - made it extremely easy. Unfortunately for the lower pin, I could not source a large enough one locally. I did find one on the web but shipping was going to cost a lot. So I tried a bigger hammer and that got the lower pin. I used small screwdriver to remove the retainer on the other pin in position "1" and it came off nicely too.

One annoying thing that happened is that when I unclipped the motor connector from the plug that connects to the relay module, for some reason this time it kind of sprung down beyond where I could reach. I had disconnected it several times before and this didn't happen. I had wanted to tape some wire to each cable after I removed from connector it so I could just pull it back through when I re-installed the new / refurbed PTT. Anyway, I pulled it through to the other side and taped a pull-wire to each and then pulled them down through the wiring protector.

I did have to remove the trim sender to get the PTT out and it made pulling the cables through easier.

Motor still doesn't turn. I have sourced a replacement unit that I am going to pick up today hopefully.

I've put a few more pics in the dropbox link https://www.dropbox.com/sh/tmnhp4171h1d23a/AACWStPj48liUKkpqZS2TOj9a?dl=0


I was wondering if anyone has any suggestions on:

1. Cleaning the pins and the holes up - the pins look a bit corroded - not too bad - but was thinking there might be a good product that might be good to use or method of cleaning that works well?
2. Grease for the pins / holes - the manual I think recommends Triple Guard but I have some Marine Grease - are they same / similar?
3. Easy way to align the hole / pin during re-install - I know the concept sounds easy i.e. align holes, but given that I will be likely bashing that lower pin in and trying to hold / align at same time, was wondering if anyone had a tip / trick to make it easier?
4. When I go to pull the wires back around to the relay side under the rear of the motor, any advice for getting it through / under? The manual doesn't show exactly the route so I am assuming as long as I can poke something through to help pull the wires through, and that they can reach where they previously got to it should be OK?

Thanks to all the advice so far - it's been very appreciated.
 

dingbat

Supreme Mariner
Joined
Nov 20, 2001
Messages
16,595
I was wondering if anyone has any suggestions on:

1. Cleaning the pins and the holes up - the pins look a bit corroded - not too bad - but was thinking there might be a good product that might be good to use or method of cleaning that works well?
The pin is stainless. I used PB Blaster and the wire brush on a bench grinder. Followed up with 400 grit sand paper

For the holes, I sprayed PBB in the holes then took a pipe cleaning brush to them until they shined
2. Grease for the pins / holes - the manual I think recommends Triple Guard but I have some Marine Grease - are they same / similar?
Triple guard is a very sticky, waterproof grease. Yamaha “blue” grease is the only product I know with similar attributes and performance
3. Easy way to align the hole / pin during re-install - I know the concept sounds easy i.e. align holes, but given that I will be likely bashing that lower pin in and trying to hold / align at same time, was wondering if anyone had a tip / trick to make it easier?
Spend the time to clean the pins and holes as noted above. Both my pins when in with minimal effort after 15 years of Saltwater use
4. When I go to pull the wires back around to the relay side under the rear of the motor, any advice for getting it through / under?
Mine was routed in the same mesh wire cover as the trim sender
 

pinetree

Cadet
Joined
Nov 13, 2021
Messages
6
The pin is stainless. I used PB Blaster and the wire brush on a bench grinder. Followed up with 400 grit sand paper

For the holes, I sprayed PBB in the holes then took a pipe cleaning brush to them until they shined

Triple guard is a very sticky, waterproof grease. Yamaha “blue” grease is the only product I know with similar attributes and performance

Spend the time to clean the pins and holes as noted above. Both my pins when in with minimal effort after 15 years of Saltwater use

Mine was routed in the same mesh wire cover as the trim sender
Hi - yes once I cleaned the pins with wire brush on bench grinder and holes with small brush, followed by bit of 400 sandpaper they all slid in very very easily. I plugged the wires into the relay plug to test and the replacement unit works great.

I now just need to route them into the engine and around to the relay module plug.


Very close to getting this boat back on the water - so very glad. Cheers.
 

Crosbyman

Vice Admiral
Joined
Nov 5, 2006
Messages
5,797
some paint on the skeg and it will al look like new with some car wax :)
keep away from sandy bottoms ! no good for the pump !
 
Top