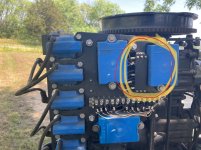
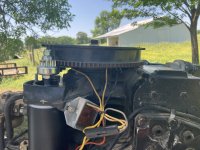
5 Cylinder Replace the original stator with the new one, matching wire colors (Some of these systems use brown/blue or brown/black/blue for blue and brown/yellow or brown/black/yellow for yellow). Install the supplied jumper wire from the #2 Brown/Yellow wire to the Brown/Yellow wire for the # 3 cylinder. If the original stator had a 2 pin plug on the battery charge wires, remove it from the old stator. Cut the ring terminals from the new stator and use butt splice connectors to connect the plug to the new stator's battery charge wires. Troubleshooting No fire on any cylinder: 1. Check the resistance from each blue to the yellow wires, you should read approximately 300 ohms. 2. Check the resistance from each blue and yellow wires to engine ground, you should read open circuit (Just like the leads were not touching anything). 3. Check DVA (Peak voltage) from blue to the yellow wires, you should read at least 180V. 4. Disconnect the stator wires and check the DVA (Peak voltage) from each blue and yellow wire to engine ground, you should read no voltage or extremely low voltage. No fire on one cylinder: 1. Check the resistance from the blue to the yellow wire on the pack not firing, you should read approximately 300 ohms. If the resistance is not right, check the other set of wires. If the other set is ok, gently pull on the wires close to the connector If the insulation stretches, the wire is broken inside the insulation and a new terminal needs to be put on. 2. Check DVA (Peak voltage) from the blue to the yellow wire, you should read at least 180V. NO FIRE ON TWO CYLINDERS: If two cylinders from the same CD unit will not fire, the problem is usually in the stator. Test per no fire any cylinder above. If the #1 and #3 cylinders are not firing, disconnect the Brown/Yellow wire from the pack #1 and retest. If you now get fire on #3, replace the #1 pack. If still no fire on #3, disconnect the Brown/Yellow wire from the pack #2 and retest. If you now get fire on #1, replace the #2 pack. If the #2 and #4 cylinders are not firing, disconnect the Brown/Blue wire from the pack #1 and retest. If you now get fire on #4, replace the #1 pack. If still no fire on #4, disconnect the Brown/Blue wire from the pack #2 and retest. If you now get fire on #2, replace the #2 pack. 2 Cylinder Using Combination Pack and Coil (2 per engine) Pack #1 (Firing #1 cylinder) Pack #2 (Firing #2 cylinder) Trigger: Orange Pack: Orange Trigger: Red Pack: Green Green Green White/Green Orange Stator: Brown/Yellow Stripe (2 wires) Pack: Blue Stator: Brown/Blue Stripe (2 wires) Pack: Blue 2 Cylinder Using a Single Ignition Pack and Two Coils & 3 Cylinder Connections: Color Code Cross Reference Color Code Cross Reference FUNCTION OLD NEW FUNCTION OLD NEW Trigger Orange White/Orange Stripe Stator Blue Brown/Blue Stripe Trigger Green White/Yellow Stripe Stator Yellow Brown/Yellow Stripe Trigger Red White/Red Stripe Ignition Coil White Orange/Blue Trigger White/Green Stripe White/Green Stripe Stop (Kill) Circuit White (Brown) Black/Yellow Installation and Troubleshooting Guide All rights reserved. Reproduction or use of content, in any manner, without express written permission by CDI Electronics, Inc., is prohibited. CDI Electronics • 111 Commerce Circle • Madison, AL 35758 • Fax 256-772-5701 •
www.cdielectronics.com Pack #1 (Firing #1 and #2 cylinders) Pack #2 (Firing #3 cylinder) Trigger: Orange (White/Orange) Pack: White/Orange Stripe Trigger: Orange (White/Orange) Pack: White/Orange Stripe Green (White/Yellow Stripe) White/Yellow Stripe Green (White/Yellow Stripe) White/Yellow Stripe Red (White/Red) White/Red stripe No Connection White/Red Stripe White/Green Stripe White/Green Stripe No Connection White/Green Stripe Stator: Yellow (Brown/Yellow Stripe) Pack: Brown/Yellow Stripe Stator: Yellow (Brown/Yellow Stripe) Pack: Brown/Yellow Stripe Blue (Brown/Blue Stripe) Pack: Brown/Blue Stripe Blue (must be connected to the Brown/Blue stripe on pack 1) Coil #1: White (Orange/Blue Stripe) Pack: Orange/Blue Stripe Coil #3: White (Orange/Blue Stripe) Pack: Orange/Blue Stripe Coil #2: White (Orange/Blue Stripe) Pack: Blue/Red stripe 4 Cylinder Connections: Pack #1 (Firing #1 and #2 cylinders) Pack #2 (Firing #3 and #4 cylinders) Trigger: Orange (White/Orange) Pack: White/Orange Stripe Trigger: Orange (White/Orange) Pack: White/Orange Stripe Green (White/Yellow Stripe) White/Yellow Stripe Green (White/Yellow Stripe) White/Yellow Stripe Red (White/Red) White/Red stripe Red (White/Red) White/Red Stripe White/Green Stripe White/Green Stripe White/Green Stripe White/Green Stripe Stator: Yellow (Brown/Yellow Stripe) Pack: Brown/Yellow Stripe Stator: Yellow (Brown/Yellow Stripe) Pack: Brown/Yellow Stripe Blue (Brown/Blue Stripe) Pack: Brown/Blue Stripe Blue (Brown/Blue Stripe) Pack: Brown/Blue Stripe Coil #1: White (Orange/Blue Stripe) Pack: Orange/Blue Stripe Coil #3: White (Orange/Blue Stripe) Pack: Orange/Blue Stripe Coil #2: White (Orange/Blue Stripe) Pack: Blue/Red stripe Coil #4: White (Orange/Blue Stripe) Pack: Blue/Red stripe 5 Cylinder Connections: Pack #1 (Firing #1 and #2 cylinders) Pack #2 (Firing #5 cylinder) Trigger: Orange (White/Orange) Pack: White/Orange Stripe Trigger: Orange (White/Orange) Pack: White/Orange Stripe Green (White/Yellow Stripe) White/Yellow Stripe Green (White/Yellow Stripe) White/Yellow Stripe Red (White/Red) White/Red stripe No Connection White/Red Stripe White/Green Stripe White/Green Stripe No Connection White/Green Stripe Stator: Yellow (Brown/Yellow Stripe) Pack: Brown/Yellow Stripe Stator: Yellow (Brown/Yellow Stripe) Pack: Brown/Yellow Stripe Blue (Brown/Blue Stripe) Pack: Brown/Blue Stripe Blue (must be connected to the Brown/Blue stripe on pack 1) Coil #1: White (Orange/Blue Stripe) Pack: Orange/Blue Stripe Coil #5: White (Orange/Blue Stripe) Pack: Orange/Blue Stripe Coil #2: White (Orange/Blue Stripe) Pack: Blue/Red stripe Pack #3 (Firing #3 and #4 cylinders) Trigger: Orange (White/Orange) Pack: White/Orange Stripe Green (White/Yellow Stripe) White/Yellow Stripe Red (White/Red) White/Red stripe White/Green Stripe White/Green Stripe Stator: Yellow (Brown/Yellow Stripe) Pack: Brown/Yellow Stripe Blue (Brown/Blue Stripe) Pack: Brown/Blue Stripe Coil #3: White (Orange/Blue Stripe) Pack: Orange/Blue Stripe Coil #4: White (Orange/Blue Stripe) Pack: Blue/Red stripe NOTICE: The color codes listed above may appear on the packs, stators or triggers. Some packs have solid colors and some triggers have striped wires. If you need further assistance, please call our technical support department.