Installing Bravo3 Sterndrive

Steve51

Cadet
Joined
Sep 26, 2009
Messages
19
Hi, I wondered if someone can help please.

This is the first time I have tried installing a Bravo 3 Sterndrive and it seems to be stuck at the point shown in the photo. I cannot seem to get it passed the threads although everything “appears” to be lined up and well greased.

This is a brand new installation with a new engine. The alignment checks o/k with the alignment bar with the “grooves” all around and the bar goes in and out with light finger force.

I am using a 1 ton engine hoist and the second black strap was used as an experiment to see if it was a hoist angle issue. I am limited by height on the hoist due to the boat stern platform, but the stud holes all line up. My guess is that the end of the drive shaft is not entering the flywheel splines? The U/J moves if I turn the prop shaft.

I have installed many Volvo Penta sterndrives over the years, but they were easier to manage weight-wise and you can manoeuvre the U/J reasonably easy, so what am I missing??

Any tips greatly appreciated.
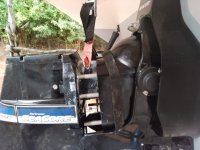
sterndrive.jpeg
Thank you
 

alldodge

Moderator
Staff member
Joined
Mar 8, 2009
Messages
42,937
The drive shaft isn't making it into the coupler

Does the alignment bar go in and out with 2 fingers, and does it go all the way in?
 

Jesse Walter

Cadet
Joined
Jul 11, 2011
Messages
27
Kinda had the same issue last week. I used almost the same set up. I was able to hook the drive very close to the engine hoist. I extended the boom so it was able to fit under the swim platform. This made the drive slide in very easy. Try lowering the front of your boat to raise the rear to make it more accessible with the hoist if that is possible.
 

Steve51

Cadet
Joined
Sep 26, 2009
Messages
19
The drive shaft isn't making it into the coupler

Does the alignment bar go in and out with 2 fingers, and does it go all the way in?
“The drive shaft isn't making it into the coupler” .. This was my initial thought. Forgive me as this is all new to me. The alignment goes in and out easily and I have the tell-tale spine marks all the way around. But.. I will need to recheck again as I am not sure now if the spline marks go all the way to the first shoulder. I certainly have about an 1 inch of marks maybe more along the tool and I wasn’t sure if that was what I should expect on the Bravo 3.

Thank you for your response.
 

Steve51

Cadet
Joined
Sep 26, 2009
Messages
19
Kinda had the same issue last week. I used almost the same set up. I was able to hook the drive very close to the engine hoist. I extended the boom so it was able to fit under the swim platform. This made the drive slide in very easy. Try lowering the front of your boat to raise the rear to make it more accessible with the hoist if that is possible.
 

CayugaCobalt

Petty Officer 2nd Class
Joined
May 6, 2008
Messages
138
I was recently in your shoes, in the coupler but couldnt get the last inch. There is good alignment and there is great alignment. You need great alignment. I put alignment tool into coupler and then gave tool a hit with a rubber mallet N,S,E and West. This improved alignment. As mentioned above achieving a horizontal coupler angle helps tremendously. I used 3 come along straps. One each on the trim cylinder bars and one up top going to gimble ring. This provides linear pull into coupler.
 

Steve51

Cadet
Joined
Sep 26, 2009
Messages
19
I was recently in your shoes, in the coupler but couldnt get the last inch. There is good alignment and there is great alignment. You need great alignment. I put alignment tool into coupler and then gave tool a hit with a rubber mallet N,S,E and West. This improved alignment. As mentioned above achieving a horizontal coupler angle helps tremendously. I used 3 come along straps. One each on the trim cylinder bars and one up top going to gimble ring. This provides linear pull into coupler.
The straps on the trim cylinder bars is a good idea, I will try that.

I have re-checked and the alignment is slightly off (engine too high) as the alignment tool is not going fully home. It looked o/k at the time but that was before I knew that it had to go to the first shoulder. So, with a little bit of adjustment I should be good.

Thank you for the responses.
 
Top