I/O (Sterndrive) Conversion to Outboards

tpenfield

Moderator
Staff member
Joined
Jul 18, 2011
Messages
18,588
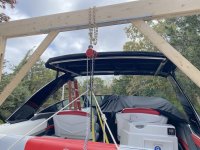
OMG . . . It fits :cool:

I jockeyed the boat over a bit and put the gantry in place. There is a couple of inches of clearance on each side as planned.
IMG_8636.JPG
The outdrives came off today. Tomorrow will be the seat assembly and then it will be time to pull the engines.
 

Lou C

Supreme Mariner
Joined
Nov 10, 2002
Messages
13,536
Great work Ted, love watching the progression of your projects!
And when you're done you will have the exact boat you wanted!
You got me to thinking, could I get a pod for my old F/W, and go with a 175-200 hp 4 stroke....nah....boat's too old....but would be nice.....and after all many of these bow riders that come with OBs now, that's exactly how they do it, you can tell it's really an I/O hull with the pod and OB tacked on, but I'm guessing it's wise to add knee walls to the transom due to the cantilevered weight on the transom....
 

tpenfield

Moderator
Staff member
Joined
Jul 18, 2011
Messages
18,588
Hi @Lou C, Your boat would be a fairly straight forward conversion IMO. You put a lot of work into saving it, IIRC. IF you like it, it may be less $$$ to convert vs. buying a new(ish) Outboard boat of similar size/style.
 

tpenfield

Moderator
Staff member
Joined
Jul 18, 2011
Messages
18,588
Update Du Jour . . .

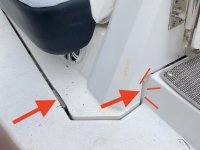
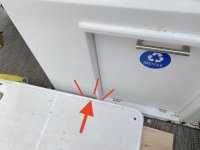
I'm into Day 2 taking the rear seat assembly out. IT weighs a lot . . . I'm guessing 500 lbs. Anyway, it is hinged at the rear with 2 hidden hinges. 4 bolts per hinge on the engine side, and I assume the same internal to the swim deck. The bolts are about 1-1/4", so to clear the bolts the seat assembly has to move forward. The only problem is that there in not clearance at the rear or the front to clear the seat assembly from the bolts. The best I can figure is that the front of the seat assembly would have to be raised up to a point where it can clear the obstructions. Not sure if the is 45˚ or more like 60˚.

So, I was planning to lift the thing more level than tilted. . . . got to re-think things.

Pictures below . . . Rear of assembly - hidden hinge
IMG_8642.JPG
.
Front edge of seat assembly, the wetbar prevents forward movement.
IMG_8643.JPG
.
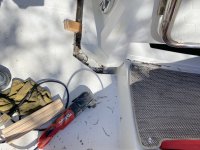
IMG_8644.JPG
.
My 'tip of the hat and a hearty handshake' to anyone with some ideas on how to get this thing free of the hinge bolts. I do plan to cut the bolts down upon re-installation so things won't be as difficult.

In other news, I finished the hardwood floor that I've been working on for the past month. So, the Honey-Do list is pretty short now. The boat is becoming Job 1.
 

Scott Danforth

Grumpy Vintage Moderator still playing with boats
Staff member
Joined
Jul 23, 2011
Messages
51,573
Can you drive the hinge pin out? Is the pin held with a tack weld or a punch dimple? Can't zoom in enough on your pic
 

tpenfield

Moderator
Staff member
Joined
Jul 18, 2011
Messages
18,588
All set . . .

A little bit of cutting, some prying, and some lifting and I was able to pull the seat assembly off the hinges.
IMG_8645.JPG
.
The bolts are welded to the hinges. I did not try the hinge pins, but thank you @Scott Danforth . . . that would be a good idea. Maybe on the re-assemble.

Here is the rear seat being lifted and the boat pulled away inch-by-inch.
IMG_8648.JPG
.
It was pretty windy today, so the rear seat kind of wandered in the breeze. I tied a couple of lines to keep it stable.
IMG_8655.JPG
I have a pallet and some dollies under it. I'll have to find a good place for it, as it will not be going back on for a while. Not sure if I should put it back on before the outboards are installed or after . . . :unsure:

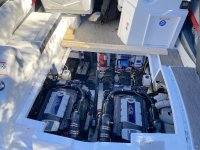
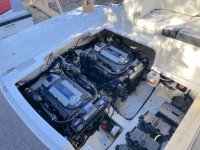
Here are the engines all accessible now. The port engine will need to come over a bit on the lift. Starboard will be first.
IMG_8650.JPG
.IMG_8651.JPG
.
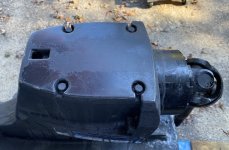
I'm also trying to clean up the outdrives and get the 10 years worth of AF paint off them. I had sort of forgotten that the outdrive is anodized. Here is the anodized finish on the top cover.
IMG_8654.JPG
.
Time for a beer 🍺or 2 . . . :D
 

Pmt133

Lieutenant Junior Grade
Joined
Jan 6, 2022
Messages
1,119
Well thats why it took so long, you need to have a beer or two while doing these sorts of things. :LOL:
 

tpenfield

Moderator
Staff member
Joined
Jul 18, 2011
Messages
18,588
Engine Pull . . . Day 1

For anyone considering an engine pull of the new-style Mercruisers . . . Don't :ROFLMAO:

It has been about 20 years since I pulled an engine out of a boat . . . (a 454 Mercruiser V8 in my 24 Formula.) Back then, I think it took maybe a couple of hours with a handful of things to disconnect.

Once I started in on these 2016 Merc 6.2L, it became obvious that this engine removal is on a different level and I needed to go through the service manual, which was actually quite helpful.

There are about 14 things to disconnect; some are unreachable without disassembling other stuff.

Anyway . . . here is my Day 1 disconnection 'score card'
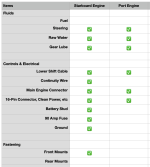
Screenshot 2025-10-18 at 3.48.37 PM.png
.
I ended up cutting the ground wires, since the bolt on the flywheel housing was mostly unreachable and once the nut was removed the wires refused to come off the stud.

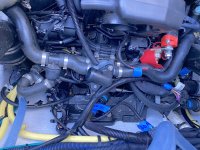
Somewhere beneath the hoses at the back of the engine there is a transom assembly and the rear mounting bolts. I noticed that many of the hoses have crimp-clamps, so I did not want to mess with them.
IMG_8667.JPG
.
I'm pretty close on the Starboard engine, but the rear mounts are pretty much un-reachable as you can see in the picture above. I may have to take all the plumbing off the rear portion of the engine and perhaps the steering actuator. I got to this point and figured it sounded like a 'tomorrow' project; I've done enough for today. :rolleyes:
 

Lou C

Supreme Mariner
Joined
Nov 10, 2002
Messages
13,536
Seeing as how they were closed cooled from the factory that also adds a lot in a saltwater environment! Looks like you're getting it done!
 

tpenfield

Moderator
Staff member
Joined
Jul 18, 2011
Messages
18,588
The Admiral is stretching the 'Honey Do' list as best she can . . . More stuff to do this AM, but I should be back at it at some point today.

Regardless of the troubles, I will say that some of the engine pull items are easier than before . . . There are quick disconnects on all of the fluid lines, except the fuel. The stainless steel front engine mounts loosened easily (SeaCore option). Still waiting to see if the rear mounts are as good.
 

Pmt133

Lieutenant Junior Grade
Joined
Jan 6, 2022
Messages
1,119
Are the rear mounts not just the bolts on the inner transom? Or did that change at some point?
 

tpenfield

Moderator
Staff member
Joined
Jul 18, 2011
Messages
18,588
Are the rear mounts not just the bolts on the inner transom? Or did that change at some point?
The rear mounts are not much different than older years. My challenge is getting to them. There is a lot more 'stuff' on the back of the engines, it seems these days.

I'll post up a picture for the benefit of anyone taking a similar engine out of their boat . . .

I disconnected the hoses from the risers (2 hoses each riser) and un-fastened the poppet valve from its mounting bracket. I was able to pivot the poppet and hoses up out of the way. It also looks like the steering actuator has to be removed as well as the water intake hose. All this adds an hour or 2 to the process of getting to the rear bolts.

I did find the water pressure sensor that I have been meaning to replace for the past few years. Just have to remember where I put the new part . . . :ROFLMAO:
.
IMG_8672.JPG
.
Anyway . . . getting there.
 

Pmt133

Lieutenant Junior Grade
Joined
Jan 6, 2022
Messages
1,119
The rear mounts are not much different than older years. My challenge is getting to them. There is a lot more 'stuff' on the back of the engines, it seems these days.

I'll post up a picture for the benefit of anyone taking a similar engine out of their boat . . .

I disconnected the hoses from the risers (2 hoses each riser) and un-fastened the poppet valve from its mounting bracket. I was able to pivot the poppet and hoses up out of the way. It also looks like the steering actuator has to be removed as well as the water intake hose. All this adds an hour or 2 to the process of getting to the rear bolts.

I did find the water pressure sensor that I have been meaning to replace for the past few years. Just have to remember where I put the new part . . . :ROFLMAO:
.
View attachment 412485
.
Anyway . . . getting there.
That's clearer than the other one. Looks like coils and most of the parts are back there. I guess the intakes face backward on those too. Yeah... cluttered for sure.
 

tpenfield

Moderator
Staff member
Joined
Jul 18, 2011
Messages
18,588
This is getting to be annoying . . .
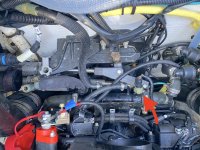
Apparently there is a bolt on the underside of this bolt location . . . (purple arrow) . . . the Mercruiser engineers must get a laugh out of where they put stuff. :rolleyes:

IMG_8672.JPG
 
Top