I didn't want to restore this 1997 Islander this summer

Fj40fiji

Petty Officer 2nd Class
Joined
Sep 13, 2024
Messages
118
Could happen to anyone!
I was a passenger in an Eliminator Daytona with about 1,200hp once. It had a brand new 572 with AFR heads and twin whipper super chargers; at about 110 mph it siphons beer right out of the can of you hold it level.
 

Gibbles

Commander
Joined
Nov 14, 2009
Messages
2,045
Also, picked this up after using my friend’s in his shop. Super convenient.

If you have a need to spray solvent or cleaners, the sureshot sprayer is handy.
I used it to spray acetone to prep for painting and cleaning of an engine block.

Amazon url,
https://a.co/d/1kkhV0C

It does require some method to add compressed air, and it can handle more psi than most single stage home units can dish out.

That was a selling point for me, i wanted to be able to add an unsafe pressure to mine if I so desired.

Default spray pattern is pretty fine.
Adding 150psi to it and it just made toxic clouds of acetone... lol

Easy to mod, and spare parts are easy.
So i modified mine to get more of a "wash" pattern like a can of brake clean.

If i could get gallon jugs of brake clean it would see more use around my garage.
 

Fj40fiji

Petty Officer 2nd Class
Joined
Sep 13, 2024
Messages
118
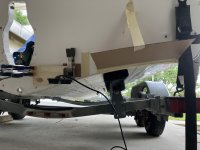
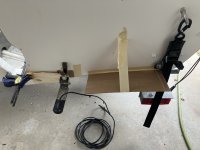
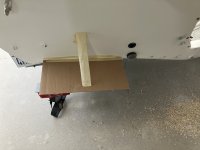
That’s an 18x9 “trim tab”, the tape in the middle is the anode location, but I can easily relocate it, and then my transducer. The plywood scrap it’s clipped to is 10” long. Everything I read says keep it 8” or more off set from the drive. I can also relocate or just space the trailer tab out board a little, in fact it might just take a whack with a hammer. The tab could also just be set in another half inch.
Bennett recommends this size tab for a 22’ boat but I see people mostly running 12” wide tabs. Is this too crowded?
 

Attachments

  • IMG_1496.jpeg
    IMG_1496.jpeg
    2.5 MB · Views: 4
  • IMG_1495.jpeg
    IMG_1495.jpeg
    3.1 MB · Views: 4

Fj40fiji

Petty Officer 2nd Class
Joined
Sep 13, 2024
Messages
118
That’s going to put the actuator close to the support for the swim step too. Probably only 1/2-3/4 inch clearance.
 

Fj40fiji

Petty Officer 2nd Class
Joined
Sep 13, 2024
Messages
118
Also, when I put trim tabs on, I can use 316 machine screws, fender washers, lock washers, and nylock nuts. My transom is already .10” plus .090” laminated. I have some 1/8” x 1-1/4” aluminum flat stock, probably 6061, and it’d only take an extra half hour to make backing plates. I could get some angle if I really needed it.
Should I back these up or good enough to just through bolt them?
 

Fj40fiji

Petty Officer 2nd Class
Joined
Sep 13, 2024
Messages
118
Port side. I don’t have my kicker on right now. The bracket stands off a foot in the up position I think. I’ll have to get it back on and mocked up before I order but pretty sure with the 9” chord they will get along. The 12” width wouldn’t really change it.
 

Attachments

  • image.jpg
    image.jpg
    3.1 MB · Views: 0

redneck joe

Supreme Mariner
Joined
Mar 18, 2009
Messages
12,716
Also, when I put trim tabs on, I can use 316 machine screws, fender washers, lock washers, and nylock nuts. My transom is already .10” plus .090” laminated. I have some 1/8” x 1-1/4” aluminum flat stock, probably 6061, and it’d only take an extra half hour to make backing plates. I could get some angle if I really needed it.
Should I back these up or good enough to just through bolt them?
I just screwed and 5200
 

Fj40fiji

Petty Officer 2nd Class
Joined
Sep 13, 2024
Messages
118
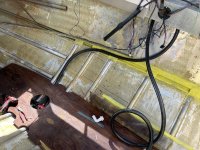
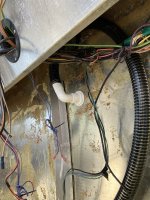
Mocking up front bilge pump, routing hose and locating discharge. It is tough to get the hose on and off. Hopefully I’ll be able to get the cartridge for this pump if I need one in the future, it won’t be easy to change the whole pump over.
 

Attachments

  • IMG_1497.jpeg
    IMG_1497.jpeg
    3.6 MB · Views: 4

Fj40fiji

Petty Officer 2nd Class
Joined
Sep 13, 2024
Messages
118
I keep reading to put a 1’ tall loop above the fitting, but matched the 9” of the factory location.
 

Attachments

  • IMG_1498.jpeg
    IMG_1498.jpeg
    2.1 MB · Views: 7

Fj40fiji

Petty Officer 2nd Class
Joined
Sep 13, 2024
Messages
118
I’ll shape it more when I make it permanent. This is really stiff hose, heavier than I should’ve gotten. I don’t think I can bend shorter than 4-5” radius. I’ll put some zip ties around it when I install it fully.
 

Scott Danforth

Grumpy Vintage Moderator still playing with boats
Staff member
Joined
Jul 23, 2011
Messages
51,273
clock the discharge fitting to about 2 oclock vs the 12 you have it at.
 

Fj40fiji

Petty Officer 2nd Class
Joined
Sep 13, 2024
Messages
118
clock the discharge fitting to about 2 oclock vs the 12 you have it at.
Why 2 o’clock rather than 12? Is that to resist the hose and get the radius tighter? My thinking is to make the loop as vertical as I can. There is plywood under the gunwhale I can screw a clamp to and support it so I don’t have a lot of stress on the fitting and I figured I’d strap the legs of the U with zip ties to hold the radius tighter and keep the stress off other things. The fitting isn’t sealed or tightened yet, I can clock it differently.
 

Fj40fiji

Petty Officer 2nd Class
Joined
Sep 13, 2024
Messages
118
That piece of angle running vertically is the mounting point for the starboard cuddy cabin bulkhead. There’s an interior panel that’ll hide the hose. It’ll have to come up through the floor and a shelf, so locating the notches will help me get it routed how I want. I’ll add a pic of the outside when I get home.
 
Last edited:

Scott Danforth

Grumpy Vintage Moderator still playing with boats
Staff member
Joined
Jul 23, 2011
Messages
51,273
its a bilge pump discharge fitting. doesnt really matter much on that, however the hose bends easier with the fitting clocked
 
Top