150 Johnson Flywheel removal

Macwrench

Seaman Apprentice
Joined
Jul 27, 2008
Messages
41
Re: 150 Johnson Flywheel removal

BTW, sorry for hi-jacking your thread Pike. :)
 

MMPikefork

Cadet
Joined
May 10, 2010
Messages
18
Re: 150 Johnson Flywheel removal

No problem, once I got me flywheel off it took 2 hours to remove the stator and replace the voltage regulator. Once done I was able to take the boot to the lake and she purred like a kitten. Engine ran fine pushing the 17.5 ft astroglass around 60 mph. This was bought as a father son project and needed the floor replacement and some minor engine work. Still have a long list of to do items. Wish you all the best with your project.:)
 

Macwrench

Seaman Apprentice
Joined
Jul 27, 2008
Messages
41
Re: 150 Johnson Flywheel removal

No problem, once I got me flywheel off it took 2 hours to remove the stator and replace the voltage regulator. Once done I was able to take the boot to the lake and she purred like a kitten. Engine ran fine pushing the 17.5 ft astroglass around 60 mph. This was bought as a father son project and needed the floor replacement and some minor engine work. Still have a long list of to do items. Wish you all the best with your project.:)

That's awesome! Good luck on the rest of the list. :D
 

Macwrench

Seaman Apprentice
Joined
Jul 27, 2008
Messages
41
Re: 150 Johnson Flywheel removal

Update:

Yes, still fighting this stupid flywheel! I have changed pullers and now have a borrowed one from a friend that is much beefier than the one I started with. I have beat, pried, banged, and heated until all the magnets are loose and the paint is bubbling... no luck! I will continue to tighten the puller (with a 4 foot pipe and breaker bar), heat, bang, and of course soak it in "p" oil. I shall not be defeated!!!!!

:D
 

nymack66

Petty Officer 1st Class
Joined
Aug 5, 2009
Messages
356
Re: 150 Johnson Flywheel removal

Update:

Yes, still fighting this stupid flywheel! I have changed pullers and now have a borrowed one from a friend that is much beefier than the one I started with. I have beat, pried, banged, and heated until all the magnets are loose and the paint is bubbling... no luck! I will continue to tighten the puller (with a 4 foot pipe and breaker bar), heat, bang, and of course soak it in "p" oil. I shall not be defeated!!!!!

:D
Soak with PB and tighten the puller, leave overnight if you can and you must use the pry bay method it will pop off...
Use a heave duty hammer and rap the top of the puller as someone press on the pry bar ...
 

Macwrench

Seaman Apprentice
Joined
Jul 27, 2008
Messages
41
Re: 150 Johnson Flywheel removal

Soak with PB and tighten the puller, leave overnight if you can and you must use the pry bay method it will pop off...
Use a heave duty hammer and rap the top of the puller as someone press on the pry bar ...

Been soaking for a month, been rapping it a lot! Pried with a 5 foot piece of pipe while someone beat the crap out of it. This has been going on for several weeks. BTW, I'm 6 foot and 250 lbs, I can put some persuasion on a pipe. The next step is oxy-acetalyne, but it's risky and I hate to do it. :cool:
 

Macwrench

Seaman Apprentice
Joined
Jul 27, 2008
Messages
41
Re: 150 Johnson Flywheel removal

Time to whip out the "rosebud"! LOL
 

Macwrench

Seaman Apprentice
Joined
Jul 27, 2008
Messages
41
Re: 150 Johnson Flywheel removal

Good news! I finally got my flywheel to pop off yesterday. After a long time soaking, heating, hitting, and prying, it finally came off Saturday morning with a little more tightening of the puller. I decided I was going to break something and slipped the 5 foot bar on my 24" MAC 1/2 inch breaker bar... again. Last time I broke the puller, this time it came off. YAY!

I couldn't find anyone to sandblast it, so I used various dremel and drill attachements to strip, clean, and prep it for magnet rebonding. All the magnets looked very good and the timer sender was bonded very well. I easily replaced my timer base (the reason for removal), and inspected everything underneath. I also rebonded all my magnets with Marine JB Weld as an experiment. I noticed the reason they came loose was that the last guy didn't rough up the backs of the magnets... smooth as glass! Next is to test the bonding of the epoxy, and then install, set timing, and test run. I will keep y'all posted.

GO TEXANS!
 

Macwrench

Seaman Apprentice
Joined
Jul 27, 2008
Messages
41
Re: 150 Johnson Flywheel removal

Another update:

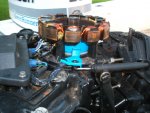
Put my flywheel on, torqued it, and reset TDC per the book. Went to start it, no spark! Wha...huh?! Started troubleshooting at step one, but back up a sec.

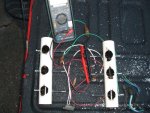
When I first started troubleshooting, I never could get it to consistantly fail. The timer base had some bad readings and appeared very old, so I decided that it must be it.

Back to today. I went through the steps. 1. Eliminate the kill circuit, no spark. 2. Eliminate the rectifier, still no spark. Wait a sec, connect the ground and back to step one. 1. Disconnect the kill switch at the pack, SPARK! Reconnect...NO SPARK! Disconnect, SPARK! Oh BELOVED SPARK! YAY!!!!

So I need a new ignition / kill switch. I don't regret changing the timer base, otherwise the magnets could have screwed up some stuff. I probably loosened them by banging on it, but they would have come out soon enough.

Off to buy a switch. Will post pics soon.

:D :D :D :D
 

jonesg

Admiral
Joined
Feb 22, 2008
Messages
7,198
Re: 150 Johnson Flywheel removal

Ignition switches seem to be achilles heel around here lately.
At least they're cheap.
 

Macwrench

Seaman Apprentice
Joined
Jul 27, 2008
Messages
41
Re: 150 Johnson Flywheel removal

Some pics of my handy work if I can get them to attach.


First one is of my meter and my homemade spark testers (screws and pvc work great. Painted the insides black for contrast)

Second, flywheel off (yay), magnets all fell out... but in good shape.

Third, new timer base installed.

Fourth, all put back together and painted ford blue. I hate blue... and fords, but when I was a kid my dad and I would always paint something this color when we were done. Must have been cheap back then. Lol I guess I'm a little nostalgic.


:D
 

Attachments

  • DSCF2668.jpg
    DSCF2668.jpg
    151.1 KB · Views: 0
  • DSCF2671.jpg
    DSCF2671.jpg
    154.5 KB · Views: 0
  • DSCF2678.jpg
    DSCF2678.jpg
    141.5 KB · Views: 0
  • DSCF2679.jpg
    DSCF2679.jpg
    142 KB · Views: 0

nymack66

Petty Officer 1st Class
Joined
Aug 5, 2009
Messages
356
Re: 150 Johnson Flywheel removal

Thanks for the update, nice pictures of your work. I notice your timing screw position, please verify you are not advance beyond the motor specification...
 

gspointer

Seaman Apprentice
Joined
Jul 15, 2010
Messages
34
Re: 150 Johnson Flywheel removal

I know heat is bad, but after 3 weeks of a puller, 1/2" impact, hammer and penetrating oil, I heated it till I could only touch it for a 1/2 second or so, chucked some icewater on it, and mine popped with no damage. Man those things get stuck.
 

Macwrench

Seaman Apprentice
Joined
Jul 27, 2008
Messages
41
Re: 150 Johnson Flywheel removal

Well here's where I stand now. Got everything back together with the new ignition switch. Still no spark with the Blk/yel and Blk/orange wire plugged into the pack. With the plug out, I got spark. Isolated the ignition switch harness, no change. Isolated the engine end, it's good. So... it is in the harness between the engine and switch. :( I will pull the plugs apart this week, it's just got to be in the deutsch connectors.

BTW, it fluctuates between 9 and 20 ohms to ground. This would/could/did make my ignition system magically work and magically fail. hahaha It's not magic ... it's Mother Nature trying to reclaim some elements somewhere! :D

Wish me luck! (if I have to I'll pull a new black/yellow wire front to back!)
 

Macwrench

Seaman Apprentice
Joined
Jul 27, 2008
Messages
41
Re: 150 Johnson Flywheel removal

Here are some links to videos of what I found and how I fixed it. In the video there is a real good picture of what carbon arching looks like in a connector.

First Video

Second Video
 
Top