1967 14ft. Starcraft Sea Scamp Restoration

richierider

Seaman Apprentice
Joined
Apr 29, 2013
Messages
47
Re: 1967 14ft. Starcraft Sea Scamp Restoration

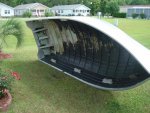
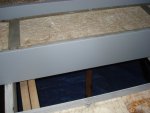
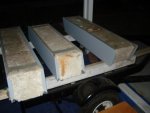
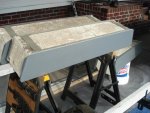
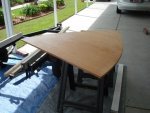
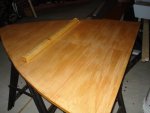
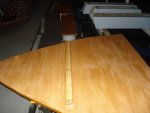
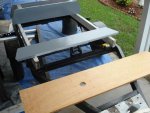
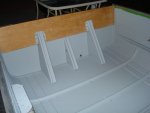
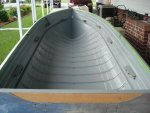
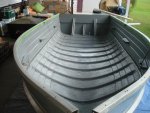
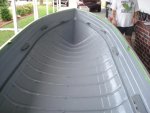
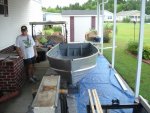
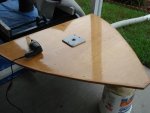
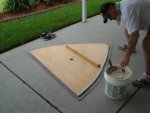
Thanks dozerll, Today I drilled holes and epoxied my new transom...I finished painting a few more pieces of trailer and power washed the inside of boat out.. I also began to take measurements for new seats and front deck. I had a hard time with the v-hull and the angles..I started out taking measurements every couple inches, but realized there was just to much variations going on...I ended up going the paper template route, which tomorrow will be traced on cardboard...I will add or subtract any cardboard as needed until I get a good fit...

Any better ideas anyone....Please share...

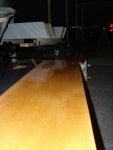
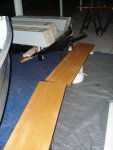
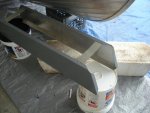
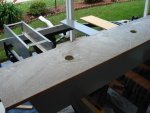
The seats will be some work, I plan to utilize the aluminum and foam supports from original seats. However, the custom plywood that came with boat were starting to rot, and moldy, so they will be replaced...8 small bolts to each bench. The aluminum/foam support assemblies must be taking apart to get foam out in order to re attach to new plywood. The front bench will be one piece extending to the bow to make the front deck.... I plan to epoxy all wood and then carpet.... Pics will come with more progress.
 

richierider

Seaman Apprentice
Joined
Apr 29, 2013
Messages
47
Re: 1967 14ft. Starcraft Sea Scamp Restoration

[URL="http://www.youtube.com/watch?v=9L6irGUUKUE"/URL]

thanks Jbcurt00, was unaware of this technique, although I had come up with a similar method to draw line on boat, these irregular shaped sticks should be much more accurate and I will be giving the technique a try later today....thanks again....
 
Last edited:

richierider

Seaman Apprentice
Joined
Apr 29, 2013
Messages
47
Re: 1967 14ft. Starcraft Sea Scamp Restoration

so I have another question regarding rivets....Do you have to use closed end rivets? Or can you just use regular aluminum rivets and epoxy over them, especially if the boat is going to be epoxy primed and painted...any thoughts??/
 

jbcurt00

Moderator
Staff member
Joined
Oct 25, 2011
Messages
25,143
Re: 1967 14ft. Starcraft Sea Scamp Restoration

Closed end would be better and you'd never have to worry about a possible epoxy 'plug' from ever falling out.

But they are harder to find locally
 

jigngrub

Fleet Admiral
Joined
Mar 19, 2011
Messages
8,155
Re: 1967 14ft. Starcraft Sea Scamp Restoration

so I have another question regarding rivets....Do you have to use closed end rivets? Or can you just use regular aluminum rivets and epoxy over them, especially if the boat is going to be epoxy primed and painted...any thoughts??/

Open end rivets can be used on the interior of the boat for fastening down decking and such.

Any through hull riveting should be done with closed end rivets, the closed end form a water and vapor proof seal when set and they're much much stronger than the open end rivets. You can really tell the difference between the 2 with the amount of force you need to exert on the setting tool.

Closed end rivets can be found online easily, I buy mine from here:
closed end blind rivets
 

richierider

Seaman Apprentice
Joined
Apr 29, 2013
Messages
47
Re: 1967 14ft. Starcraft Sea Scamp Restoration

So I finally got some decent weather after about of week of rain. Over the last couple weeks I scraped, primed and painted the inside of boat..I also sanded the aluminum bench supports, primed and painted. I added additional front deck supports through hull to match the original bench "through hull" support brackets.

Which brings me to one sad fact that I really need more patience or more time.. I have received excellent ideas and comments thus far yet I seem to be one step ahead of everything. And I really would have done some things different. ... the joggle sticks,the front deck from the middle bench all the way to the front, and closed end rivets. Although time is a serious matter which effected judgement, I still just hate the feeling of not doing something the way I would have liked too. Well its not a total loss, the front deck cut out almost perfect, I can always add to the front deck in the future and the rivets are way above the waterline so I'm quite confident in there capabilities. I will be adding liquid weld to fill in before the the epoxy prime coat...

I epoxied all wood twice with sides getting 4 coats. Each time sanded in between with 100g. Flashed with DE-nature d alcohol. (not sure if that was OK, but it seemed to be fine; last coated came out like glass). For the front deck, I added 2"x2" braces epoxied between and screwed every 2-3 inches. Then epoxied everything twice more...I hope it is enough,,we will see...Seems strong, tested on 2x4's on ground today , didn't flex a bit...but we'll see when its in the boat. The two benches were marked, drilled for supports and seat mounts, sanded, bolted with sealant, glued and carpeted. The front deck is drilled for supports, and seat mounts, glued and carpeted. Just need to pick up another seat mount to install into it..

This is my next hurdle (besides painting the outside of boat) I have to slide in the front deck into the through hull support brackets. However If I install the original bench supports I may not have enough room under it to reach and and hold the nut to attach to the bolts on the additional brackets I added. So If I don't have enough room I will try to build the bench support from the inside out.

I have to say I'm so thankful for having such a great dad, who helped me all day today, we got a lot accomplished and it was a really good time working with him....I'm so happy to have him.


So really the next things on the agenda are, painting the outside of boat, flipping it back over and installing the benches and front deck, and then figure out floors between benches, was just outside looking at it and now I think I'm gonna make a hatch in the front floor to accommodate the gas tank. Then wiring, and still gotta do a few things to trailer and tune up motor.

As I'm making some progress, I have learned so much on this; my first boat and boat restoration..Although frustrated at times and tired as hell, working 13 hour days , 7 days a week (including regular job) as the results are starting to show and the hardest grunt work behind me; I am enjoying the installations and what I see as the fun stuff starting to arise...

So for now I bid you all farewell and good boating.....
 

Attachments

  • 28 (2) (640x480).jpg
    28 (2) (640x480).jpg
    55.8 KB · Views: 0
  • 29 (640x480).jpg
    29 (640x480).jpg
    48.1 KB · Views: 0
  • 30 (640x480).jpg
    30 (640x480).jpg
    39 KB · Views: 0
  • 31 (640x480).jpg
    31 (640x480).jpg
    144.7 KB · Views: 0
  • 32 (640x480).jpg
    32 (640x480).jpg
    121.9 KB · Views: 0

richierider

Seaman Apprentice
Joined
Apr 29, 2013
Messages
47
Re: 1967 14ft. Starcraft Sea Scamp Restoration

more pics...
 

Attachments

  • 32-1 (640x480).jpg
    32-1 (640x480).jpg
    47 KB · Views: 1
  • 33 (640x480).jpg
    33 (640x480).jpg
    42.7 KB · Views: 1
  • 34 (640x480).jpg
    34 (640x480).jpg
    145.7 KB · Views: 1
  • 35 (640x480).jpg
    35 (640x480).jpg
    140.6 KB · Views: 1
  • 36 (480x640).jpg
    36 (480x640).jpg
    117.8 KB · Views: 1

richierider

Seaman Apprentice
Joined
Apr 29, 2013
Messages
47
Re: 1967 14ft. Starcraft Sea Scamp Restoration

and more.......
 

Attachments

  • 38 (480x640).jpg
    38 (480x640).jpg
    36.9 KB · Views: 1
  • 38-1 (640x480).jpg
    38-1 (640x480).jpg
    47.7 KB · Views: 1
  • 39 (640x480).jpg
    39 (640x480).jpg
    117.8 KB · Views: 1
  • 41 (640x480).jpg
    41 (640x480).jpg
    43.9 KB · Views: 1
  • 42 (640x480).jpg
    42 (640x480).jpg
    47.8 KB · Views: 1

richierider

Seaman Apprentice
Joined
Apr 29, 2013
Messages
47
Re: 1967 14ft. Starcraft Sea Scamp Restoration

and more.... its such a shame what someone had done to the original corner brackets...drilled so many holes in them....oh well i shined them up and I'm gonna just live with it unless anyone knows anybody that has these for sale or may know where I can find them...I would love to find some decent ones......
 

Attachments

  • 45 (640x480).jpg
    45 (640x480).jpg
    36.7 KB · Views: 1
  • 47 (640x480).jpg
    47 (640x480).jpg
    55.1 KB · Views: 1
  • 50 (640x480).jpg
    50 (640x480).jpg
    54 KB · Views: 1
  • 51 (640x480).jpg
    51 (640x480).jpg
    25.9 KB · Views: 1
  • 52 (640x480).jpg
    52 (640x480).jpg
    38.6 KB · Views: 1

richierider

Seaman Apprentice
Joined
Apr 29, 2013
Messages
47
Re: 1967 14ft. Starcraft Sea Scamp Restoration

more pics...
 

Attachments

  • 53 (640x480).jpg
    53 (640x480).jpg
    38.4 KB · Views: 0
  • 54 (640x480).jpg
    54 (640x480).jpg
    27.2 KB · Views: 0
  • 55 (640x480).jpg
    55 (640x480).jpg
    33.2 KB · Views: 0

richierider

Seaman Apprentice
Joined
Apr 29, 2013
Messages
47
Re: 1967 14ft. Starcraft Sea Scamp Restoration

one more time, and now I'm all caught up with pics...
 

Attachments

  • 56 (640x480).jpg
    56 (640x480).jpg
    38.9 KB · Views: 0
  • 57 (640x480).jpg
    57 (640x480).jpg
    48.2 KB · Views: 0
  • 58 (640x480).jpg
    58 (640x480).jpg
    41.2 KB · Views: 0
  • 59 (640x480).jpg
    59 (640x480).jpg
    46.1 KB · Views: 0

richierider

Seaman Apprentice
Joined
Apr 29, 2013
Messages
47
Re: 1967 14ft. Starcraft Sea Scamp Restoration

Yeah and so I've been told you don't need anti-fouling paint if your boat is on trailer most of the time. Anyone have any advice in this area. They (wes marine) keep trying to tell me that I have to use different paint on bottom then on top...I want to use Interlux 3000e primer on whole boat...but there telling me I would need different primer on topside....I'm looking for the easiest cheapest paint system that will still be durable and long lasting...Are there one coat primer and one coat paint systems that would work, sand-less systems perhaps? Or is it really gonna be 2-3 coats of primer sanding in-between with another 3-4 coats of paint, sanding in-between..??? Just curious to see what others have done on a cheap budget and the results.....I would like to use the epoxy primer and paint, just to get a good seal on her....
 
Last edited:

1stgenbird

Petty Officer 1st Class
Joined
Aug 5, 2009
Messages
397
Re: 1967 14ft. Starcraft Sea Scamp Restoration

This is the same as my boat and is a seafarer not a sea scamp. Sea scamps are lighter duty boats.
 

jbcurt00

Moderator
Staff member
Joined
Oct 25, 2011
Messages
25,143
Re: 1967 14ft. Starcraft Sea Scamp Restoration

1967 Brochure page

1st may be right........ But it doesn't matter which it actually is, because now it's great either way ;)

Can't really help w/ the paint specifics
 

richierider

Seaman Apprentice
Joined
Apr 29, 2013
Messages
47
Re: 1967 14ft. Starcraft Sea Scamp Restoration

I know its hard to make anything out on this original boat id plate, but with this and other research I'm pretty sure its a Sea Scamp, looks just like the one in the original Starcraft ad too.....although I'm not saying its not possible someone may have pulled some funny stuff with this tag. especially since its says 18hp , which I'm not sure but did they not have them back then. something tells me no.....
 

Attachments

  • DSC00005 (640x480).jpg
    DSC00005 (640x480).jpg
    39.6 KB · Views: 0
  • 1962seascampStarcrft14.jpg
    1962seascampStarcrft14.jpg
    144.5 KB · Views: 0

richierider

Seaman Apprentice
Joined
Apr 29, 2013
Messages
47
Re: 1967 14ft. Starcraft Sea Scamp Restoration

ahh NH huh....Love it...used to vaca there often...Parents had a place right up the street from Weirs beach. Gotta love Winnipesaukee. My friend has a condo right in weirs too, was up there last summer to do some boating , oh what a great place....
 

jigngrub

Fleet Admiral
Joined
Mar 19, 2011
Messages
8,155
Re: 1967 14ft. Starcraft Sea Scamp Restoration

That's some excellent work you and your dad are doing there Rich!

The paint and epoxy look great as well as the carpet, all the work looks top notch.

You can paint your boat any way you want... it's your boat!:D ... but from what I've seen on the forum here most folks do go with about 3 coats of primer and 2 or 3 top coats. The topside and below the waterline paints are supposed to be different, but I've seen quite a few folks on the forum use the topside paint below the waterline if they're going to keep their boat trailered... this doesn't mean it's right, but I've seen it done more than once here.

I'm not sure why you couldn't use below the waterline paint on the topside if it isn't antifouling and just plain ol' below the waterline paint.

I personally would use a below the water
 

richierider

Seaman Apprentice
Joined
Apr 29, 2013
Messages
47
Re: 1967 14ft. Starcraft Sea Scamp Restoration

so i need some advice as far as sanding between coats and , what chemicals are OK to use.....

After much research on the forums; I decided to listen to my budget and go the Rustoleum paint route.... I couldn't find any self etch primmer in quarts so I went with Rustoleum Clean Metal primer (latex, yuck) made specifically for aluminum. I was weary of using latex but it is made to be covered with the Rustoleum enamal over it so I'm hoping it will be OK because I am using the Rustoleum Pro industrial enamel for top coats.. I spent about 6 hours yesterday sanding the oxidation off the hull...was not bad just a little darker...it was sitting outside (myrtle beach area) for about 3 weeks after it was initially stripped of all paint to bare metal.. The metal was surprisingly clean underneath all the old coats of paint...It was actually smooth and shiny, you could even see the original manufacturing marker marks used to build the hull. Anyway, so after sitting outside you for that long unprotected you could see the oxidation starting because when i started sanding you could see the difference right away...So I sanded the entire hull with 80 then 100 grit paper. I then painted primer on and it well real well... Now here is where I need some advice...The first primer coat came out nice and smooth and almost perfect. On the can it said wait 3-4 hours for re-coat, does that mean you can re-coat without sanding or no? I ran out of time to do another coat yesterday so now its has been around 24 hours. Do I have to sand now because it has been so long or could I just use acetone, or a better solvent to etch primer and then re-coat. Getting paint to stick is priority over looks for me on this project, although I do prefer a nice paint job in the end..So do you have to sand in-between each coat of primer and each coat of paint or is that just for perfection. Is it acceptable to use just a solvent between any of those layers... Also when I get ready to paint enamel, which will be two coats, and then taped and two more coats to add stripes on boat...after I tape and then paint initial stripe coat what do I do , lightly sand area up to tape. I don't want to ruin edge of tape so the stripe is not a perfect line, if ya know what I mean....Any thoughts on these issues. thanks for your time and concern....
 
Top