BajaRon
Petty Officer 3rd Class
- Joined
- Aug 23, 2015
- Messages
- 85
No Title
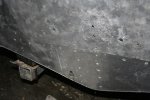
Sweeeeeeet!!! That looks excellent!!! I will copy that. And yes, it appears there was impact just behind the broken rib....both top and bottom. Good detective work Holmes!!! The 3/8 rivets sounds perfect
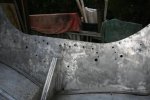
Could I plug the massive rivet hole with a stainless steel bolt with washers and 5200?
Thanks to all!!! Baja Ron
Sweeeeeeet!!! That looks excellent!!! I will copy that. And yes, it appears there was impact just behind the broken rib....both top and bottom. Good detective work Holmes!!! The 3/8 rivets sounds perfect
Could I plug the massive rivet hole with a stainless steel bolt with washers and 5200?
Thanks to all!!! Baja Ron