1981 Ebbtide Bass Boat | Newbie Boat Repair

Booska

Cadet
Joined
Apr 13, 2020
Messages
22
Greetings all,

This spring, I decided it was time to rip my boat apart and determine any damages or wear caused by it's long life span. I have a 1981 Ebbtide (Dynatrak I believe?) Bass boat. It's a sixteen footer so not too much on my plate so far. I ripped up all the carpet, and all the "additions" made by previous owners, restoring it to it's somewhat original state. I really like the layout now, and I'm gonna try restoring some of its beauty.

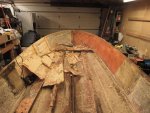
I ran into an issue outside my scope of knowledge though. Upon tearing up the center floor (lower platform) I discovered that a previously mounted seat pedestal had seen better days. Upon removing it, I was met with some soft and brittle fiberglass that gave out when stepping on it. I decided to cutout all the dead glass, leaving a hole in the floor. I'm tasked with restoring the hole and reinstalling a pedestal. This is where I could use some help.

So it seems there's a lot of ways I can go about this. Initially I was going to patch the hole with glass and then screw in the pedestal. That doesn't sound like a good idea now that I've been reading, because pedestals leverage a lot of weight and the fiber glass won't hold. So if I need somekind of backing to reinforce support, how am I suppose to install that backing if I can't get to the underside of the boat?

Without dragging on about every possible method, here are some pictures. My question is, if you yourself were to install a flush or surface mounted pedestal base at this location, how would you go about it. If there's any details that I haven't provided, let me know. Thanks a lot!


​​​​
 

Attachments

  • photo328096.jpg
    photo328096.jpg
    1.4 MB · Views: 3
  • photo328097.jpg
    photo328097.jpg
    126.9 KB · Views: 3

Scott Danforth

Grumpy Vintage Moderator still playing with boats
Staff member
Joined
Jul 23, 2011
Messages
50,481
go to the DIY links at the top of the forum. read links 14, 15, 18, 2, 3, 4a, and 4b

by the looks at what is underneath the floor, you have more than a bit of work ahead of you.

the last thing to rot on a boat is the floor. that looks to be where you are at.

the answer to your question is buried in the middle of the first 3 links I mentioned.
 

Booska

Cadet
Joined
Apr 13, 2020
Messages
22
Thanks for the quick response and directing me to those articles, I glossed over them when searching! Yeah, upon tearing out that square and looking underneath I was concerned at how it looked. However, the stringer doesn't look bad once I cleaned it off. I'm not necessarily sure what I'm looking for in terms of structural integrity of my stringers and rot inside/under the foam. I'm gonna take a closer look at it now that you've mentioned it. I'm sure those articles probably outline what damage I should look for.
 

Scott Danforth

Grumpy Vintage Moderator still playing with boats
Staff member
Joined
Jul 23, 2011
Messages
50,481
yes, and you will want to do some sample drillings.
 

Booska

Cadet
Joined
Apr 13, 2020
Messages
22
Looks like I got a restoration project on my hands haha. So the transom sample doesn't appear to be rotted (I don't think? It's not black) but it was wet, like soaked, and was in the water for only five minutes a week ago. I then proceeded to sample the floor, and other areas of the deck. The floor is rotted underneath for sure. I sampled the exposed stringer and that turned out okay. I'm will to bet the entire stringer is not okay though, it's probably wicked at the front and back and bad.

Got it into the garage tonight and looking into restoration of all the wood. Since I'm going this far, I might end up repainting or touching up the finish on the boat too. Who knows haha. Long road ahead of me now.
 

Attachments

  • photo328149.jpg
    photo328149.jpg
    850.9 KB · Views: 1
  • photo328150.jpg
    photo328150.jpg
    1.4 MB · Views: 1

Scott Danforth

Grumpy Vintage Moderator still playing with boats
Staff member
Joined
Jul 23, 2011
Messages
50,481
welcome to the restoration club....

take your estimate on the money and triple it

take your estimate on time and divide by 0.2

wear your PPE
 

Booska

Cadet
Joined
Apr 13, 2020
Messages
22
So I've weighed out my options on whether I want to pursue this restoration, or chalk it up and move on. I think I'm going to go through with it. If I wanted to share my progress, should I just create a new thread or continue on here?
 

bjf66

Chief Petty Officer
Joined
Dec 6, 2016
Messages
406
Booska welcome to club of restoration, I had same issues as you, although on larger scale,
do it once and do it properly as its a great learning curve
Previously i couldn't fibreglass, now don't thing much about it, and just get on with it
I would just keep going with this thread, as you not planning full restoration
although my title started out with stringer repair, and ended up rebuilding the boat and starting with clean canvas
best luck and keep the post coming
 

Woodonglass

Supreme Mariner
Joined
Dec 29, 2009
Messages
25,929
You can just keep posting and updating this Thread. If you want to change the title, just post here and ask the moderators to change it to whatever you want it to be.
 

Scott Danforth

Grumpy Vintage Moderator still playing with boats
Staff member
Joined
Jul 23, 2011
Messages
50,481
Agreed, keep this thread going and PM a mod to change the (hit the flag button and type what you want). I had typed this a day or two ago however apparently with the web site hickups the response was lost.
 

Booska

Cadet
Joined
Apr 13, 2020
Messages
22
Welp, this weekend has been eventful. I started by building an engine mount with the schematic I found in one of the stickied topics. Got the engine removed and onto the mount, along with all the hardware in the boat. Removed all electronics and wiring, seeing as I'm going to be replacing most of it. Made sure to write down any weird electronic connections/routing that isn't clear so when I go to reinstall it two months (or so) from now, I'll actually remember it haha. Then finally, I got the cap prepared for removal and stow-away.

The damage is a lot more significant then what I could have ever imagined. I lost some footage of my process and such, and am only able to upload these two tonight. I'm a lot further in this process, but wanted to bring you guys up to speed! If there is any wood in the boat, it's shot. Rotted wood, and waterlogged foam is what I was met with after ripping up the floor. Every piece I took out was absolutely soaked (to the point where it was more of a sponge then a sturdy piece of wood. I think the only reason my floor wasn't soft or completely given out was due to the amount of glass on top. So . . . All the wood had to go. Looks like I'm going to for sure be replacing the transom because it's soaked. While removing the hardware and excessive screws, the wood began to drip from being saturated so much. A lot of poor craftsmanship and consideration from the last person that worked on the boat or last rebuilt the transom. I can confidently say, the boat had some kind of restoration / hull repair done to it in the past.

There's a lot I found, and since I'm trying to keep everybody up to speed, I recorded some videos! I'll try to not make these large skips in time from one video to the next so I can go into more detail. I just get into a groove of destruction, and totally forget to stop and pickup my camera for a second. It looks like I can only attach one at a time, so I'll have to space it out.
 

Fun Times

Moderator
Staff member
Joined
May 16, 2009
Messages
9,149
Saw your post flag request for a title change...I hope it came out okay for you?

Good luck with the repairs.
 

Booska

Cadet
Joined
Apr 13, 2020
Messages
22
Yup! Thanks a lot.

Another update now that I was able to finish uploading. I haven't gone into too much detail about the destruction process because there's not too much to it - especially with my 16ft boat. If anyone wants more detailed explanations let me know, but essentially just removing everything. I've removed the cap from the boat, along with the gas tank and any remaining hoses and hookups. With the boat separated, I've begun cutting everything out.

I'm using a sawzall with a six inch fine-tooth metal cutting blade. I wish I would have got a longer blade so I could flex it more, but it did the job. I cut out around the edges of the deck, leaving a quarter inch lip so I can reference that later on for deck height. I'll eventually cut and sand that lip down, but leaving it for now so I can get accurate measurements. Cutting everything was pretty time consuming, and the only grace I had was the fact all the wood was rot. I really liked the sawzall because it allowed me to bend into tight spots, and im not afraid of puncturing the bottom hull because its less likely that I'll puncture the bottom hull then with a grinder.

I really need to get better about updating more often haha. I went from having a boat that floats to having nearly all the wood and foam removed. I'll try to be more detailed in the process of building back up. In the meantime, here is a video I recorded in the midst of taking out the wood and foam. Also had a little accident with the sawzall, but thankfully I was wearing gloves and PPE so the injury is minor and I was able to pick back up where I left off. Always wear PPE!

​​​​​​​
 

Booska

Cadet
Joined
Apr 13, 2020
Messages
22
I put "Repair" in the title thinking it was going to be some deck work and maybe stringers. I'm now leaning on the side of complete restoration, and asking myself what's the difference between a repair and restoration haha. So here are some more pictures detailing the damage and what not. I was able to get in the garage and work some more on the inner walls of the boat. In the video, I kept asking myself what the thicker walls were and if there was anything behind them. Turns out, it's more foam that has been glassed over. If that wasn't enough surprise, I also found more water trapped inside. Who would have thought that this boat I cruised hours on last season could hold so much water. This thing is gonna feel like a feather on the water compares to last season now that all the wet wood and foam will be replaced haha.

Have a bunch of stuff coming in the mail. Tyvek suit, more filters for my respirator, and some sanding supplies. I took some time off from work to put some real hours in the boat this upcoming weekend. Really excited thus far. I didn't think I was going to be this far along so quick, and I'm nearing the rebuilding stage (I say that ambitiously haha). Once I have my tyvek suit and sander, I'm looking at hours on end of sanding the inside to good fiberglass. Once I feel comfortable with the inside of the boat, and the sanding job I've done, I will flip the boat over.

Why am I flipping the boat over? Well.. I figured if there was ever a time I was going to paint the boat it would be now. Been reading nonstop on how I want to paint it (roll n tip vs spray) and whether I wanna paint or gelcoat. Still up for debate in my head, but I have a lot of time to decide so more research on that front. I definitely need to fill some gouges in the bottomside of the boat before painting. To do that, I know I should sand it down and feather the edges. Then I read some guys going over it with some pb or something in order to fill the deeper gouges. Anyone here know what exactly I should use? I'll be sanding and painting over it so it doesn't need to be a finish grade material. Just something to smooth out any gouges or deep chips I have.
 

Attachments

  • photo328504.jpg
    photo328504.jpg
    779.4 KB · Views: 2
  • photo328527.jpg
    photo328527.jpg
    1.4 MB · Views: 2
  • photo328528.jpg
    photo328528.jpg
    1.8 MB · Views: 2

Booska

Cadet
Joined
Apr 13, 2020
Messages
22
Hey everybody, I need some help here. Any information would be greatly appreciated. The interior wall of my hull in the front section of the boat has about an 1/2" to 1" A/B foam that had been glassed over. Now, I haven't really seen this before and can't find much information on it. I'm curious if I should replicate this, if it's necessary, and how I should go about replicating it without causing damage to my hull or glasswork by trying to control the foam. I know my boat must meet a USCG regulation for foam because it's under 20 feet. I can't find any information on if this was originally with the boat though. Judging by the pigmentation of the resin, and the construction found elsewhere on the boat, I'm leaning toward the side of this being an addition from a previous owner.

One of my concerns, is if I don't replace this foam. Will I have hull integrity/structure problems? My hull seems awfully flimsy and thin compared to when the foam was present. Obviously the boat is stripped right now so that's to be expected. I just don't want to restore the stringers and floor, just to put the cap on and have flimsy gunnels and walls. Does anyone have experience or knowledge in this practice? If so, I would love to know. Feel free to ask any questions incase the picture enclosed isn't enough. Thanks guys!!
 

Attachments

  • photo328623.jpg
    photo328623.jpg
    300.1 KB · Views: 2

Booska

Cadet
Joined
Apr 13, 2020
Messages
22
To anyone who may have found this thread and was also curious about the foamed hull side, and float boxes. Turns out, that is manufacturer specification. It's a technique they've labeled "Dura Core Hull Sides" which consist of your hull being layered outside in with fiberglass, balsa core, woven roving, more glass layup, Polyurethane AB foam, then a final glass layup. This is said to help smoothen the ride, and dampen noise. They don't specifically state it's usage toward meeting USCG flotation foam regulations, or for structural integrity purposes. It's up to you on whether you want to replicate that, but in my project I will be replicating it. The quality I found in my build is not consistent in the front as it is in the back. I'm going to redo them and try to achieve a more smooth and consistent surface. Just so everyone knows!

More news, I've calculates and ordered all my materials from US Composites today. Frisco Boating (somebody who I've watched religiously and found a lot of helpful information) directed me to that supplier. Really good rates, great customer service, and had everything I need. I'm going to be using Vinyl Ester resin instead of Epoxy for affordability and because the boat originally used it. Since I'm not adhereing to any epoxy or other materials I should be fine. I know what I'm getting myself into. For me, the extra effort, time, and prep work is worth the price difference. So I've ordered five gallons of that. I probably will need more, but would rather order more as I go then not have enough. I've also ordered 25 Yards (50") of 2.0 CSM, 6oz Woven Roving, and 1708 Biaxial CSM. I like that I can use the CSM 1708 with my poly. In addition, I got a bunch of Cabosil, chopped Strand, 2lb Polyurethane AB foam, and some other miscellaneous things. I should be good on glass for stringer, deck, transom, and wall rebuild.

This upcoming weekend, I'm going to close on my decision for paint color and aesthetic. Going to finish stringer and transom removal. Do a really good job of sanding down inside and outside of hull, and assessing damages. If I'm all good, and have time, I'm going to prep and begin painting the exterior hull of the boat. My plan is to take it off the trailer and put it outside. This way, since I decided to spray, I can build a booth to catch overapray and also flip it up on its belly. Being outside will provide great ventilation too. Suppose to be nice all next weekend and good temperature for paint so hopefully everything falls into place. Decided to to with paint over gelcoat because if this boat does have any gelcoat on it it's very very thin. I'm not gonna go through my entire thought process of paint but considering my boat is a trailer queen and does not get put out every day, the paint should be adequate. Once the boat bottomside or exterior hull is painted, I might consider spraying the trailer too. This is going to vary heavily on how much help I can get with moving the hull and how much room I have.

I figured once I have everything out of the hull, it will be the best time to paint it since it will be so light. Another note to anyone that may follow along with this method. Be very careful about your measurements and fitting your cap back on. I've premeasured in multiple locations to determine if I have any sort of hull warp or bending after my repairs. So far I have not experienced anything, but that could change very easily so be cautious of ensuring your measurements are consistent before and after (and during) rebuild to ensure hassle free cap reinstallation.

Updates to come this weekend. If anyone is interest in specific pictures or videos regarding this or any process let me know. Thanks for reading!
​​​​​​
 

Booska

Cadet
Joined
Apr 13, 2020
Messages
22
Hey, I figured out how to post images directly! So things are starting to slow down in this process, and it's a little disheartening but gotta keep going. Thought I was ninety percent of the way done with foam and wood removal, turns out stringers, transom, and hull sides were much much more difficult then I imagined. Even afte having the boat in the garage for so long, still finding wet and -soaked- wood that is literally dripping. At this point, now that I've removed all wood from the boat, it's safe to say that absolutely every piece of wood was saturated and rotted. Here is some juicy pictures for you guys since pictures have been lacking haha. I'll get better at this eventually.

Transom after removal, very thin layer of wood that needs sanded off still. Only used screwdrivers and prybars here. In hindsight, wish I would have bought and used an oscillating saw sooner. Would've been much quicker and safer.
xzPDFR4l.jpg


Hullside (left) removed to fiberglass hull. Hullside (right) with previous foam that had been glassed over. Side by side comparison. Also, some stringers removed by using sawzall and oscillating saw.
iOFTDOhl.jpg


A weird quarter panel thing that was behind the floatation boxes. Probably extra structural support for the transom. This was completely glassed over but terribly rotted. I imagine this is from the glass not being completely laminated / wetted out.
QTwPW6hl.jpg


This is what the transom looked like. Very saturated, and early signs of rot. Caught it at a good time. Glad I decided to investigate because at face value it looked dried and solid.
gz4qEScl.jpg


That's all for now. I'm at a point where I need to just sand, sand, and sand. Using 40 grit flap wheels to sand down the large contours, lips, and other rough edges. Then going over all the glass with 80 grit or less (Gonna try different grits out) to get a smooth layer of clean glass all over. I don't think I'm gonna get to painting this weekend unfortunately, but maybe I can get the interior hull sanded and holes filled. Next weekend is suppose to be nice out, just gotta have some patience. Thanks for reading!
 

Booska

Cadet
Joined
Apr 13, 2020
Messages
22
Really underestimated the process of sanding... So I've built up a booth around my boat with painters plastic wrap to contain the dust as much as possible when using the grinder. Since I'm working inside a closed garage, I wanted to minimize the amount of dust collection inside. Worked pretty good so far, I'm using staples and tape to secure it to the ceiling and gunnel of the boat.

Looking into different sanders right now. I bought a DA and RO sander from HF and neither of them really work for what I'm doing. I'm using a 4 inch angle grinder with 36 grit flap wheels to sand down lips, bumps, and edges to further smooth out later. Problem is, the two sanders I bought will not sand down to a flat surface after using my flap wheel. I've tried varying disc's with varying grits and nothing is working. Considering I still have to sand the outside hull, the cap, and possibly the trailer. I'm gonna be putting days on a sander. Might invest in a festool, fein, or Bosch high end sander. At this point, assuming they can do what I need, I think it's well worth the investment considering how much time and frustration they will save.

Does anyone have a festool, fein, Bosch, or similar quality and price point sander they would like to recommend?
 

chevymaher

Commander
Joined
Mar 29, 2017
Messages
2,934
I use the cheapo sanders for 20 bucks. I had one for 10 years I dropped it and had to get a new one. I got mine from Home Depot. I use them in bodywork. Works just and well as the 300 dollar board air sanders that break in a third of the time this lasted. I use harbor freight belt sander belts for it. Just cut them to size. One belt makes 2. They are cheap and last a long time the belt paper. It isnt paper it is a good emory cloth really.
 

Booska

Cadet
Joined
Apr 13, 2020
Messages
22
I have the sanders around the 20 to 40 dollar range (Both DA and RO) and seeing no progress when doing fairing. Tried using different brands of 40 grit on both sanders and it does nothing. I'm not looking for heavy material removal, but I am just trying to sand down to a smooth surface since I've used a flap wheel to remove lips and high spots.

I caved and ordered a Festool Rotex 125 for around $500. I got tired of guesswork and trying different tools for them not to work or accomplish what I need. I still need to sand the rest of the hull, the outside hull and bottom side, the cap, and the trailer. With so much sanding, and the size of this project, I justified the expense. After all is said and done, at least I'll have a really cool sander. Also a decent consideration in my circumstance is this entire operation is inside a closed garage so the dust collection festool offers is really attractive.

Thanks for the reply though!
 
Top