1985 Searay 197 Monaco Complete Restoration

tpenfield

Moderator
Staff member
Joined
Jul 18, 2011
Messages
18,199
Nice work and pictures. . . looks like you are taking 'the plunge'.
 

kshallen

Seaman Apprentice
Joined
Jun 19, 2013
Messages
37
TP. Yep, taken the plung head first. Thanks to some direct advice already provided, friscoboater's documented experiences, as well as others on this site including the in-progress viseo adventures from helium speaking goldie, I am all in. Excited actually as I've been pondering this effort for about 4 years with resistance from everyone I know. (I may have warn them all down!)

Can't wait for demo work to be completed this week and start cutting wood. I'll be placing an order with USComposites in next day or two. Some things are still scary to me and I'm sure I'll have plenty of rookie questions for you and the other experts. But I typically try to solve first (through the resources on this forum and other research) and then verify with experts so-as-to not ask too many simple questions.

Here are some pics of progress after 2 four hour sessions of demo. It's going faster than expected and as everyone on this forum already knows, the foam is the worst part. Fortunately some very large pieces of foam came out without busted knuckels.

Here's a question! What is the half life of this old foam in a landfill anyway as I will be disposing of it on my garbage collection for many weeks to come. Or, does anyone have other ideas how to get rid of it all? There's quite a pile starting to build already. Same question for the fiberglass coverings that once protected (or should have) the wood surfaces.

Enjoy the pics. I'll have more tomorrow. As always, advice is appreciated. Thanks all.


Woodonglass

Supreme Mariner
Joined
Dec 29, 2009
Messages
25,929
Half Life about the same as any other plastic product!!! Same for the Fiberglass. You might try a small short handled shovel on that foam. ;)
 

kshallen

Seaman Apprentice
Joined
Jun 19, 2013
Messages
37
Another 2 hours in, and both sides and bow have foam removed. The good news is there is't any good wood requiring a saw! All the original wood crumbles like dried out coffee cake. Here are a few pics. My pile of foam and fiberglass is growing. This pic is just from last eve. My goal is to tackle the stern this evening, and figure out and remove the transom on Saturday. I will have a few questions about the transom as the shape of the original wood beneath the fiberglass is puzzling. The section immediately adjacent to the outtdrive bracket is square'ish (just like "goldie's) seems simple enough and confirmed to contain rot. The 3/4" plywood layer underneath that however is an odd shape and appears to be made of multiple pieces. I think that removing all the wood (top to bottom and side to side) regardless of how Searay originally shaped and installed it is probably the right answer. Especialy since the "square" transom piece is definately rotted and no other good wood below the waterline in the boat has been discovered. I'll post some pics, mark them up with my thoughts and questions tomorrow. Thanks for viewing everyone.


kshallen

Seaman Apprentice
Joined
Jun 19, 2013
Messages
37
I think I'm at the point where I could use some advice from the experts.

Last evening I intended on ripping out the remaining foam and floor next to the engine area. But I was chicken due to concern about having exact measurements. I did have some measurements and pictures already, but the cautiousness in me wanted more. So I documented more current state info. While doing so, I took a few more transom pics because of questions I have. In this picture, you can see that the transom's second wood layer is not continous side to side and top to bottom. It appears that it mimics the outside hull shape for some reason. Strength?, beauty?, saving materials?, who knows. But when I rebuild it, want to do it right. And, the top section seems to be solid with no issues. The bottom section I'll remove both 3/4" layers down to the fiberglass.

Now for the questions.
1) Does it makes sense to leave the top section completely alone? It's above the water line, no signs of rot (I removed the port tie down and the wood where the bolts go through is 100% solid), only has holes where the swim platform mounts. Certainly I'll be removing the wood in the bottom section down to the fiberglass.

2) If you say to just gut both top and bottom pieces, how difficult will it be to attempt to mimic what exists? If you say "I agree with leaving the top section alone" then that's fine as the bottom section looks straight forward to me.

If you would like a video to be able to respond, let me know and I'll shoot one and post it tomorrow or Sunday.

Thanks all.

Here are the pics.


tpenfield

Moderator
Staff member
Joined
Jul 18, 2011
Messages
18,199
The transom core (wood) is certainly 2 pieces because of the offset shape of the transom. I would leave what is good, so just do the bottom section.
 

kshallen

Seaman Apprentice
Joined
Jun 19, 2013
Messages
37
Thanks TP. You and WOG are a god-send. As WOG said in one of his recent postsin the flamingo thread, I hope to be informed enuf after this labor of love to pay it forward for others too.

I think my wife thinks I'm crazy for pursuing this project, but it is rewarding to make the old Searay new again. She doesn't understand how I can spend hours at the laptop reading posts and watching videos, including goldie's hilarious adventures, to learn all that I can.

This weekend, after the rain gods leave here in MN, my goal is to sawzall the remaining glass and PL that once held the floor and stringers in and remove that lower section of the transom. And maybe, begin the journey of grinding, which does bring up a question I have, Minus the places where I need to bed the new stringers and any other wood in and the deck boards to the hull, and the places where I intend to paint (ski locker), do I really need to grind every inch of the hull bottom? I don't understand the purpose of grinding places such as where the foam will be touching the hull and beneath the gas tank to name a few. Unless, there's some purpose like insuring some type of foam to hull adhesion. Can anyone comment?

Thanks again to all the experts. Since I'm "all in" on this project thanks to the help of the expert mentors on this forum, does anyone prefer that I shoot some videos? I'm thinking that unless I have a question that still images and text can't get portray, my time and yours might be spared. And, there's no way I can compete with goldie's humor. He's a riot and has great questions in his videos. He's like Lewis and Clark blazing a recent trail for us new (to this forum) rookies. I'm just thankful that he's posts them at roadrunner speed.
 

tpenfield

Moderator
Staff member
Joined
Jul 18, 2011
Messages
18,199
The fact that the transom core is in 2 pieces has 'saved' you from having to do the entire transom. Water generally wicks into the wood core of transoms and bulkheads at the keel and absorbs its way upwards and outwards. The fact that you have 2 separate pieces making up the transom, means the moisture absorption stopped at the first piece.
 

kshallen

Seaman Apprentice
Joined
Jun 19, 2013
Messages
37
Hello fellow boat rebuilders. I've been cutting and grinding when time allows and the rain clouds leave. It's been a tough few rainy weeks.

In any case, I have all the floor removed except for the very rear where the elevated foam filled pieces sit. And of course haven't tackled the transom yet because the floor at the rear needs to be removed first. I'll post some pictures tomorrow evening because I have a few questions about grinding and only pics will do the questions justice.

Thanks everyone.

(WOG. I guess I won't be in the water by the end of June. Maybe Sept!)
 

Woodonglass

Supreme Mariner
Joined
Dec 29, 2009
Messages
25,929
It's ALL Good!!! I thought I'd have the BF done in 3 Months and I'm still going after 3 yrs.!!!!:eek::lol:;)
 

kshallen

Seaman Apprentice
Joined
Jun 19, 2013
Messages
37
OK experts. Have some questions for you. Here are the pictures and I'll post questions along the each pic.

Thanks.

WOG. While far from being done, at least I've been able to create my share of dust in the neighborhood. Yesterday I observed a neighbor close his garage door before dark (I was grinding away!). He never does that. I suspect it may have had something to do with the white cloud in the air across the street.:D

This first pic is the tool that I've become quite comfortable with for most of the demo. used with my angle grinder. Of course ya have to be careful not to let it mess up the hull. I have slipped just a couple of times resulting in a few small shallow (very shallow) blemishes. It is pretty easy to control. It both cuts and grinds quite effectively. It's not very good at cutting wood, but when all the wood crumbles like coffee cake, who needs a saw! (I did use a recip saw in the bow section and it was great. May need to use it in the rear - we shall see!) Next, based on answers to my upcoming questions, I'll break out the 36grit on the rubber backer on the grinder.

 
Last edited:

kshallen

Seaman Apprentice
Joined
Jun 19, 2013
Messages
37
Here are my key questions with supporting pictures. Your responses are my commands.

The questions hinge on the port and starboard in this first photo where the decking was once mounted. (SeaRay must own PL because they spread that stuff around quite generously. A good thing I guess until you learn that wood in boats won't outlast it!)

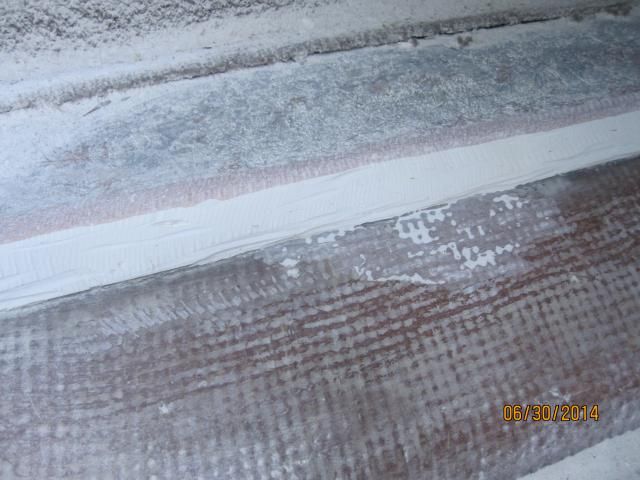
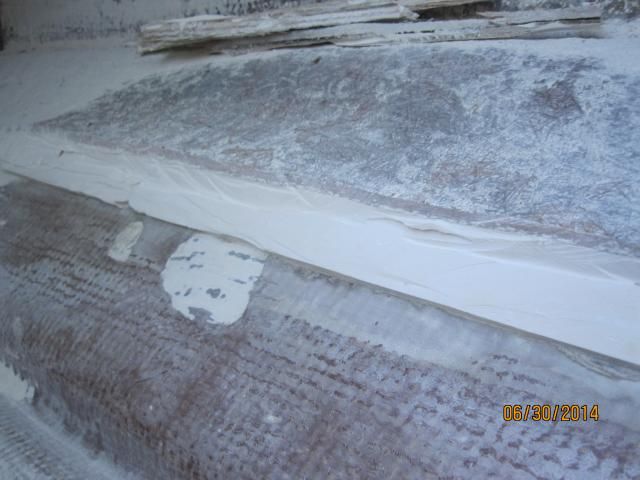
The first close ups show the port side where I ground the former mounting place fairly well - blending the sideward extra fiberglass matting (pretty thick too) that once held the decking in place (an assumption), construction adhesive, and bottom hull areas. The next close-up is the mounting place on the starboard side of this photo. I didn't take time to "blend" via grinding because I wondered if:
1) Can I leave some of this construction adhesive in place or must it all go? It is solidly attached to the hull, doesn't absorb water, and adds some rigidity. I left no original wood behind. Easy to do on this boat!

2) If you say take it out, which as you are probably already aware, will result in plenty more grinding time and will remove some original thick fiberglass that once held the top side of the decking in place. (Maybe it was originally put there for strength and had nothing to do with holding down the decking. When I say thick, it's over 1/8" thick.) Why would it need to all come out when it will be under the floor boards, which will be covered in resin and some type of glass cloth, with either peanut butter or PL on top of both old construction adhesive and hull? Also, the expanding foam will likely fill any gaps near the underside edges of the floor boards. Just trying to align energy and time with purpose.

3) If you say it's OK to leave original well-adhered construction adhesive in place, how important is it that I blend the three (thicker fiberglass at the side, construction adhesive, and the hull) into a smooth sloping plane when it will be under the decking?


Here is a close up of the port side. I ground this side so-as-to to blend materials into a smooth slope. I'll be sanding with 36grit to remove air pickets and ridges.


Here is a closeup or the starboard side (I didn't grind this one to a " sloping blend"). It's rough looking but does it matter?


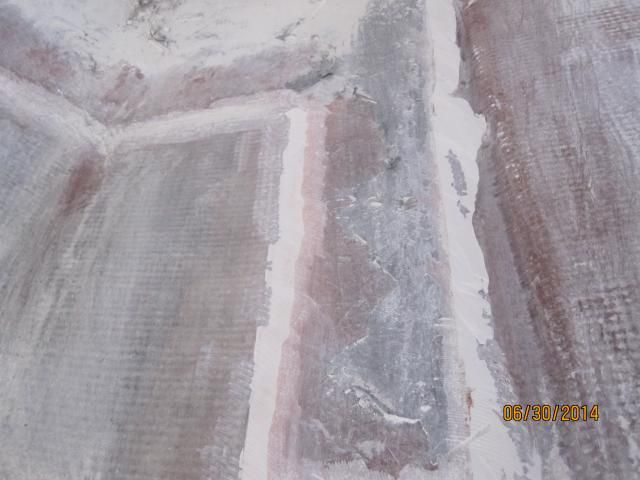
And one more perspective for the same question. This time from the area where some useless structure was in base of the ski locker. Maybe it was there for centerline strength. I'll be putting it back during rebuild because I'm certainly no boat engineer! (Do I really need to grind away all construction adhesive here too?)

I guess the question also applies to the construction adhesive where the stringers attached as well. You can see it in this photo as well. Does 100% of it have to go? Even where it is filling a strake?

 
Last edited:

kshallen

Seaman Apprentice
Joined
Jun 19, 2013
Messages
37
Hope everyone had a great 4th of July yesterday and enjoying this long weekend with friends and family.

When you have a few minutes, would love to hear your thoughts on my questions above regarding leaving some of the original construction adhesive in place which includes leaving plenty of the original thick fiberglass as is too. I didn'teasure it, but some of the fiberglass is nearly 1/4" thick and solid as a rock. Seems like I'd be removing some strength from that thick fiberglass or at least would need to build the strength back up during rebuild.


So, the basic question is: Do I remove all the construction adhesive and along with it, the related fiberglass? If is so, replace that thick fiberglass during rebuild time?

Let me know if you would like better pictures or a video to be able to respond.
Look forward to your answers. Thanks everyone.
 
Last edited:

Sasakura

Recruit
Joined
Jul 12, 2014
Messages
2
I don't know what type of adhesive you plan on using when you start reassembly but I would try applying your new adhesive to a small spot of the old adhesive and and see how well they bond together. If the two can't be separated without the same effort it took to remove the original adhesive, then I'd say leave the old stuff in place.
 
Top