1986 Mercruiser 140 Blown Head Gasket?

nola mike

Vice Admiral
Joined
Apr 22, 2009
Messages
5,478
The picture of the engine in post #34 that Dodge does not look like the correct engine. I agree with Fishrdan on this as well. That looks like the 470 engine. On a 3.0, the oil filter is in front of the distributor. the 470 is reversed.
And the valve clearance on a 470 is adjusted by using different length pushrods.
 

alldodge

Moderator
Staff member
Joined
Mar 8, 2009
Messages
42,699
My mistake........... The pics come from No 8 which is for the 470, should have kept going for manual 10

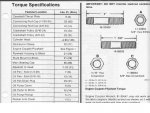
The 140 should be 0 lash and then one additional turn.

Head bots 93 and retorque after first 20 hours

torque.jpg
 

fishrdan

Admiral
Joined
Jan 25, 2008
Messages
6,989
It's not going to hurt re-torquing the head bolts after 20 hours, but it's not needed with a modern composite head gasket. Merc SM 13 and 26 for the 3.0L engine both say to torque to 90 FTLB, but nothing about re-torquing after 20 hours. The newer engines use a composite gasket where the old engines used a steel shim gasket. (Both of those manuals also say to torque the rockers to 20 FTLB,,, which is completely wrong...:facepalm:)

Really depends on the head gasket used, if in doubt, re-torque - properly...

Make sure the engine is at room temperature.
Drain the coolant (block).
Start at the first bolt in the torque sequence.
Loosen the first bolt about ? turn.
In one motion tighten the bolt to the original torque spec.
Repeat this process one bolt at a time following the torque sequence.
 

bruceb58

Supreme Mariner
Joined
Mar 5, 2006
Messages
30,592
It's not going to hurt re-torquing the head bolts after 20 hours, but it's not needed with a modern composite head gasket.
I would tend to agree with you. I bet there is no service interval on a new 3.0 that has you re torque the head bolts.
 

pvovk

Cadet
Joined
Jul 9, 2016
Messages
16
Ok. Quick update, but mostly I need help again. Head was cracked in several places (along with bad valves and burned exhaust valve in #4) so purchased a complete new head (arrived, then I noticed a bad pushrod and had to order pushrod and rocker arm, then went on vacation). New head looks good. Installed everything. New manifold gasket and torqued manifold bolts to 23 ft-lbs. Cylinder head torqued to 93 ft-lbs. in three steps. New head gasket is composite (and reinforced between the #2 and #3 cylinders where the existing gasket was split), not metal like the previous one.

Before teardown, engine was at #1 TDC and I did not move it until setting the valve lash after installing the distributor. Cold compression 130 psi in 1,2,3 and 125 psi in #4. Can't get it started (doesn't even try, the engine just spins on the starter). No vacuum whatsoever on the vacuum gauge when cranking but maybe that's normal. Fuel through carb, but totally dry spark plugs (new plugs). I am fairly sure that I set the valve lash correctly.

The distributor may not be correctly installed though as when I removed it (to have access to remove the pushrod cover), I didn't make marks as I now read in the Seloc manual but I did notice the relationship of the rotor to the distributor and the slot in the bottom where the distributor inserts into what I think is the oil pump, etc. as I removed it. I just re-checked the distributor installation and I feel it is correct.

I do get spark to the plugs. Engine doesn't even try to kick over, just spins smoothly on the starter. Should there be some vacuum when cranking and if not, what is the reason? Shouldn't there be fuel on the spark plugs?
 

alldodge

Moderator
Staff member
Joined
Mar 8, 2009
Messages
42,699
Would expect a bit more compression (in 140 to 150 range) bit above 100 it should hit. Figuring you did nothing to the bottom end (crank and cam) this should be the distributer. Pull plug No 1, stick your thumb or a cork in the hole, then bump the starter until pressure pushes the cork or thumb out.

Now look at the damper it should have just pasted TDC, if its to far away try again until its real close. Now look at what the rotor is pointing at. Should be right at No 1. If not it needs moved and use a screw driver if need be to get the oil pump slot lined up
 

pvovk

Cadet
Joined
Jul 9, 2016
Messages
16
Thanks for the quick reply. When I tried that, I discovered no air coming out of any of the spark plug holes. Off with the rocker cover and re-set the valve last. Now, lots of pressure. Started right up and sounded good. Took to the lake and ran great for a few minutes at slow speed, then increasing valve noise and then a very noticeable metallic sound at the frequency of a valve. Limped to the dock (not very far away though). Total time on engine at the lake 0.1 hrs.

Apparently, I don't know how to properly set the valve lash. When I set the 5 when the #1 was at TDC compression, and then the other 3 when #4 at TDC compression and then re-checked the first 5 again and all were loose so re-set them. I did this 3 times on all until none were loose. Got great compression, but then when all put together and tried to start, nothing (as described earlier) and later found no air/compression on any cylinders.

Re-set all valve lashes again, but only once without repeating. Lots of pressure out of the spark plug holes now. Started right up and ran good in the driveway on muffs. Took to the lake and good for a short while, but then the valves were making noise and it got worse. I think the valve lash is incorrect, but I guess I don't know how to do it, even though I followed the instructions in the Seloc manual (which agree with the ones in the Clymer manual).
 

fishrdan

Admiral
Joined
Jan 25, 2008
Messages
6,989
I worked off a Selco for several years, and here's some solid advice... Chuck that Seloc/Climers in the garbage and download the Merc manual available online (search some old threads or the "stickies" at the top of the for your year of engine).

If you set the valves 3 times in a row, that will throw off your adjustment, the lifters will be pre-compressed when you went to round 2 and 3... Since you're having issues setting the valves, just do it while the engine is running, messier, but easier.

1- Warm up engine
2- Remove valve cover
3- Start engine
4- Loosen a rocker nut until the rocker clatters
5- sloooowly tighten that rocker nut "just" until it stops ticking
6- tighten that rocker nut 1 full turn more, 1/4 turn at a time, waiting a couple seconds between 1/4 turns to allow the lifter to bleed
7- Go through steps 4->6 on all the other rockers (valves should be quiet now)
8- Reinstall valve cover
9- Clean up oily mess from rockers spitting all over the place

If the valves are noisy before you start adjusting them, identify the noisy ones first and tighten them a bit so you're not hearing a bunch of ticking valves, then run through all the valve lash adjustment.

Sounds like you had the rocker cover off, did you do anything with the lifters, did you remove them from where they were located. If you removed them, did they go back on the exact same cam lobe (hole) they were removed from?... Lifters are broken-in to their specific cam lobe, and can't be swapped around without potential cam damage. If they were mixed up, it's best to get a whole new set of brand new lifters, install them, then run through the cam break-in procedure: upon initial engine startup run the engine for 15-20 minutes at 1500-2000 RPM.
 

pvovk

Cadet
Joined
Jul 9, 2016
Messages
16
Thank-you. I only removed the lifter for the #4 exhaust to check it and the cam lobe since that valve was burned. I will look for the Mercury manual and do what you said.
 

pvovk

Cadet
Joined
Jul 9, 2016
Messages
16
Removed the rocker cover. Five of the eight rocker arm stud nuts are so loose I can loosen with my fingers. I will purchase all new today from the boat store (local parts store doesn't have enough since from another post, they are identical to a 1968 Chevy II 153 cu in). The new nut that came with the new rocker arm (for the #4 exhaust) went on very snug and I noticed at least a couple of the existing ones weren't that tight. That should take care of the issue as it ran great for a few minutes until the nuts loosened.
 

fishrdan

Admiral
Joined
Jan 25, 2008
Messages
6,989
Loose nuts, looks like you found your problem. If you're confident that you can set the valve lash cold, that's what I would do, but just adjust each valve once.
 

pvovk

Cadet
Joined
Jul 9, 2016
Messages
16
Thanks again. I started setting them cold today but the #2 and #3 cylinders made no pressure. Should I loosen them and wait a while for the lifter to move up and then set them? Seems like the lifter is low when I set some of them so that it's too tight when it pumps up and not letting the valve fully close. Seems as though I'm missing a critical piece of information regarding whether to crank the engine for a while and then set them, or waiting a while for the lifters to settle/raise after removing the pressure from the lifter by loosening the rocker stud nut.
 

alldodge

Moderator
Staff member
Joined
Mar 8, 2009
Messages
42,699
Thanks again. I started setting them cold today but the #2 and #3 cylinders made no pressure. Should I loosen them and wait a while for the lifter to move up and then set them? Seems like the lifter is low when I set some of them so that it's too tight when it pumps up and not letting the valve fully close. Seems as though I'm missing a critical piece of information regarding whether to crank the engine for a while and then set them, or waiting a while for the lifters to settle/raise after removing the pressure from the lifter by loosening the rocker stud nut.

You might needs some new lifters. Could also be that there is no oil in the lifter and until the motor is running they won't pump up. So if you just adjusted them, then did a compression test, it could be missing oil. The way lifters are installed in a motor, is let them soak in container of oil over night, the oil will seep in and fill up. You could also just fire it up and see if the pump up
 

pvovk

Cadet
Joined
Jul 9, 2016
Messages
16
Today, I loosened all of the rocker arm nuts and left it alone for a while (>30 mins). Then, I adjusted them as before (but just once and didn't re-do them again). Verified air pressure out of each spark plug hole when cranking the engine before buttoning it up. Ran on muffs and seemed good. I will perform a compression test when warm to see how good it got (recall before the head removal it was very bad and uneven). Starts first time every time and idles quite well (not perfect, but awesome compared to before).

Took to the lake with my two daughters and the engine ran the best ever since I purchased the boat in March. My 15 year old daughter even water skied for the first time. It was a beautiful evening to be in a boat (that runs properly) on a lake.

Thanks so much to all who helped me in this post. It was very helpful. It feels so good to finally have a boat the runs well.
 
Top