1987 17ft bluefin transom

bluefinnn

Cadet
Joined
Aug 1, 2019
Messages
11
Looking to replace the rotten transom. Have some of the hardware off. Do I need to take out all the stuff below what I've done already? What about the 3 thru the hull fittings(drain hole, live well hole & whatever the other one is)? Does the wood go all the way to the bottom below the drain hole? Thanks for any help. Hope I didn't get in over my head. I've had this boat for 20 years but sat the last 3 due to medical issues. Now I'm ready to fish again.
 

Attachments

  • photo318070.jpg
    photo318070.jpg
    27.8 KB · Views: 18
  • photo318071.jpg
    photo318071.jpg
    16.2 KB · Views: 15
  • photo318072.jpg
    photo318072.jpg
    26.8 KB · Views: 16

Woodonglass

Supreme Mariner
Joined
Dec 29, 2009
Messages
25,930
Transom wood is top to bottom all fittings and hardware must be removed. Remember to NOT use PT plywood to make a new transom. READ all you can here on the forum regarding Aluminum boat transom replacement
 

bluefinnn

Cadet
Joined
Aug 1, 2019
Messages
11
I have looked at a lot of previous posts. I couldn't find any regarding the actual drain plug hole. the other 2 holes have a fitting to get a tool on but the drain hole is just a straight shot, how do you remove it? I guess the only hardware remaining would be the rivets going around the outside of the transom, correct?
 

GA_Boater

Honorary Moderator Emeritus
Joined
May 24, 2011
Messages
49,038
Stick your head under the splashwell and look. Take a few pics under the splashwell.

The transom wood does not go all the way to the bottom.

Take off the kicker bracket. Remove the mess of screws holding the inside flanges of the splashwell to the wood, there are a bunch. Remove the two splashwell drain tubes and what looks like a transducer cable. Are those two screws or rivets on the upper right side of the motor cutout - Take 'em out.

Can't see 'em in your pics, but the upper transom corners should have something, machine screws with nuts or maybe rivets. Probably 3 or 4 in each corner.

Leave the drain and live well fittings alone, they don't go through the wood. Don't remove rivets around the outside of the transom.
 

bluefinnn

Cadet
Joined
Aug 1, 2019
Messages
11
Thank you for clearing the fittings issue up. I can't get pics right now but what about the 8 rivets/bolts above & to the left of the drain plug. Do they need to come out?
 

GA_Boater

Honorary Moderator Emeritus
Joined
May 24, 2011
Messages
49,038
Thank you for clearing the fittings issue up. I can't get pics right now but what about the 8 rivets/bolts above & to the left of the drain plug. Do they need to come out?

No - They are for the knee brace. The 6 empty holes above secure the transom wood by clamping the wood between the knee brace and transom skin.

Like I said, stick your nose under the splashwell and you'll see what I'm talking about.
 

bluefinnn

Cadet
Joined
Aug 1, 2019
Messages
11
That's great. I'm at work but I know the brace your talking about. Just wasn't sure if any of them bolts contacted wood. From inside no wood is visible. Thanks again, I'll be working on it tomorrow. Hopefully the wood will come out ok to help with a template. For sure the top part is rotted.
 

rookie456

Petty Officer 3rd Class
Joined
Aug 25, 2011
Messages
81
I am in the process of rebuilding a 1987 Blue fin boat also. I started about a month ago. Originally it was just going to be the transom, but everything was rotted, so I gutted the whole thing.
I would suggest removing the complete splash well, it will make the transom easier to replace. you have to remove the screws holding the splash well to the wood part of the transom anyway, I think after those screws come out there are four rivets on each side that hold the splash well in.
I took some pictures of what the transom looks like with the wood and splash well removed. There are 2 screws on each side of the gunnels (not sure if that is the right term for the top rails), they are hard to get out because of the flotation foam under the rails does not give you room to get a screw driver in there. They are screwed into the wood transom. You cant see the wood transom from inside the boat because it is sandwiched between a sheet of aluminum. you can use that sheet of aluminum as a template if the wood comes out in small pieces.
 

Attachments

  • photo318107.jpg
    photo318107.jpg
    26.3 KB · Views: 21
  • photo318108.jpg
    photo318108.jpg
    19.4 KB · Views: 17
  • photo318109.jpg
    photo318109.jpg
    15.8 KB · Views: 18
  • photo318110.jpg
    photo318110.jpg
    24.6 KB · Views: 18

huggyb1972

Petty Officer 1st Class
Joined
Apr 1, 2013
Messages
256
I can't speak for the 17' but on the 19' all but 1 drain fitting went through the transom wood section.
 

bluefinnn

Cadet
Joined
Aug 1, 2019
Messages
11
I dug mine out with a crow bar & blew it out with a shop vac. It was pretty much mulch. Mine was obviously worked on by someone before I bought it. Splash well had different sized screws along with the rivets. I'll look into the sheet your referring to for the template, I didn't take out the splash well.It had also been caulked along the flange, so don't know if I want to try to get it off. Guess I'll do the card baord template method. I pulled the seats & rolled back the carpeting to the dash & just the back section of the floor looks bad. pulled that section off & will need replacing. It's been a long day but got a lot done. This is a great website!
 

rookie456

Petty Officer 3rd Class
Joined
Aug 25, 2011
Messages
81
The sheet I used for a template is what your splashwell is caulked to. My plywood was so bad that the splash well separated from the aluminum sheet it was caulked to before I took it apart. I cut my plywood transom to have about a half inch gap to the side of the boat, I didn’t want it too tight across the boat and stress the rivets on the seam between the back and side, and it looked like the previous transom had a half inch gap also.
 

rookie456

Petty Officer 3rd Class
Joined
Aug 25, 2011
Messages
81
Picture of gap on mine before I removed it
 

Attachments

  • photo318199.jpg
    photo318199.jpg
    103.5 KB · Views: 15

bluefinnn

Cadet
Joined
Aug 1, 2019
Messages
11
Wow. That is a gap. looks like your tie down just makes it. Do you know if yours is the original. The height seems level. Mine wasn't quite level & had a little gap on the sides. I know mine was worked on, not sure if the wood was replaced. Do they shrink after all the years? Did you already replace yours & did you cut it to match the old one.
 

rookie456

Petty Officer 3rd Class
Joined
Aug 25, 2011
Messages
81
This is my first time replacing a transom, so I am just relaying how I am doing it. Hopefully others will respond with advice.
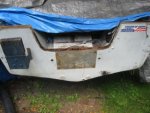
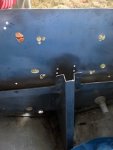
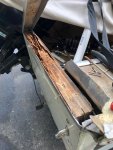
I believe the transom I removed was original. I did not see any evidence that areas had been disassembled to remove it in the past, but I don’t know for sure.
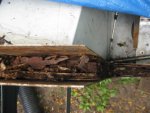
i used the aluminum sheet as a guide for the angle I would need to match. I cut the plywood about an inch larger than the aluminum sheet and then I slid it in the boat, it was to big, so I kept cutting a blade thickness off of the edge till it fit. I would suggest not trimming out the motor mount area until you have the outboard edges correct. Mine was a very tight fit thickness wise and you will need some part of the plywood to grab onto to get it back out.
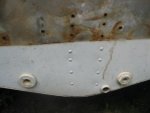
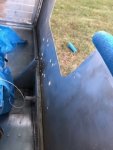
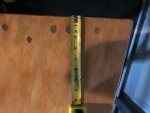
I have my new plywood epoxied and ready to be installed. The center of the holes for the tie downs wound up about 1 1/4 inch from the edge of the plywood.
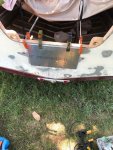
when you put the new plywood in, it is going to be very tight thickness wise, at least on mine it was, I had to tap it in with a mallet to get it to seat all the way, but because my splash well was removed, I could see where the plywood was getting hung up.
adding 2 pics, one shows distance from edge of plywood to tie down, the other is when I did a fit of the plywood so I could predrill the holes I needed, it also shows the extra area of plywood I had in order to grab onto to remove it.
i have a thread of my rebuild going
https://forums.iboats.com/forum/boa...r/10781271-complete-rebuild-17ft-bluefin-s170
 

Attachments

  • photo318120.jpg
    photo318120.jpg
    140.4 KB · Views: 13
  • photo318254.jpg
    photo318254.jpg
    62.7 KB · Views: 13
Top