Hi everyone. After reading some of the build threads and reviewing what needs to be done I have decided to make this thread in order to both document my first major restoration and to get some guidance to minimize my mistakes along the way, but first the story.
Back in 1990 my father bought a 1990 Dynasty 220 Cuddy with the 5.7L OMC Cobra drive. On our first outing the fuel gauge stuck and stranded us in the middle of the lake. This set the scene for the future, multiple cracked blocks, forgetting drain plugs, impacting random rocks and stumps at speed as well as the standard problems from age. It was sold to someone who apparently did not like to talk to people as they added through the hull exhaust above the swim platform. After repossessing the boat in the late 90's it was taken out in the gulf where it was inundated with salt water and the unsecured anchor hatch was blown off leaving a large hole for untold amounts of water to enter the bow.
Since the early 2000's it did not see much use and was only used for the occasional fishing trip. It was during this time period that the interrupter switch and shift cable started acting up. By 2005 I was out on my own and becoming interested in using the boat again. I only used it a couple of times and it ran great, usually, once it got into gear but we noticed it had a rather large leak at the transom. The fix of course was to put in a better bilge pump...
In 2006 I found that gear oil was leaking out the prop and it had water in it. That finally convinced us that we needed to take it in to the shop to get the problems looked at. They replaced the shift cable and interrupter gear as well as the lower gear case. I sealed around the transom mount hoping it would stop the leak and it did significantly slow it down.
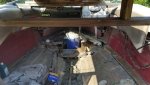
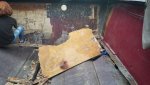
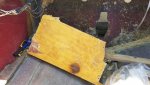
2007 was the year that Lake Texoma flooded for most of the summer and since I did not feel like driving it 100 miles I only used it three times. At Thanksgiving I went to drain the water from the block when I noticed the motor was sitting a little funny. On closer inspection the motor mounts were sitting about 1" lower than usual. When spring came around we started to tear into it to see what the problem was, what we were not expecting to find was this...
Sunken mount.

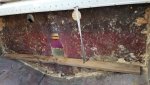
Rotten deck.

More rotten deck.

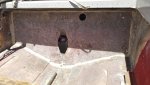
Under port motor mount.

It was quite discouraging. We pulled the rest of the carpet and the upholstery and let it sit while we figured out what to do. That was over four years ago.
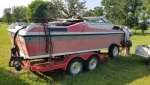
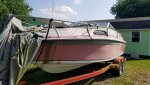
So now I have gotten the urge to try a restoration and hauled it down here so I can work on it without a 4 hour trip. Today I did some poking around and found that the lower transom might as well not even be there. So any plans of a quick repair job are gone and it is time to tear it up and start the biggest project I have tried yet.
Tomorrow I am going to pull the drive and start working on getting the engine out. I will also get some better pictures of the boat and damage in general so hopefully someone can give me some pointers.
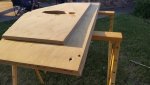
Current condition.

Back in 1990 my father bought a 1990 Dynasty 220 Cuddy with the 5.7L OMC Cobra drive. On our first outing the fuel gauge stuck and stranded us in the middle of the lake. This set the scene for the future, multiple cracked blocks, forgetting drain plugs, impacting random rocks and stumps at speed as well as the standard problems from age. It was sold to someone who apparently did not like to talk to people as they added through the hull exhaust above the swim platform. After repossessing the boat in the late 90's it was taken out in the gulf where it was inundated with salt water and the unsecured anchor hatch was blown off leaving a large hole for untold amounts of water to enter the bow.
Since the early 2000's it did not see much use and was only used for the occasional fishing trip. It was during this time period that the interrupter switch and shift cable started acting up. By 2005 I was out on my own and becoming interested in using the boat again. I only used it a couple of times and it ran great, usually, once it got into gear but we noticed it had a rather large leak at the transom. The fix of course was to put in a better bilge pump...
In 2006 I found that gear oil was leaking out the prop and it had water in it. That finally convinced us that we needed to take it in to the shop to get the problems looked at. They replaced the shift cable and interrupter gear as well as the lower gear case. I sealed around the transom mount hoping it would stop the leak and it did significantly slow it down.
2007 was the year that Lake Texoma flooded for most of the summer and since I did not feel like driving it 100 miles I only used it three times. At Thanksgiving I went to drain the water from the block when I noticed the motor was sitting a little funny. On closer inspection the motor mounts were sitting about 1" lower than usual. When spring came around we started to tear into it to see what the problem was, what we were not expecting to find was this...
Sunken mount.
Rotten deck.
More rotten deck.
Under port motor mount.
It was quite discouraging. We pulled the rest of the carpet and the upholstery and let it sit while we figured out what to do. That was over four years ago.
So now I have gotten the urge to try a restoration and hauled it down here so I can work on it without a 4 hour trip. Today I did some poking around and found that the lower transom might as well not even be there. So any plans of a quick repair job are gone and it is time to tear it up and start the biggest project I have tried yet.
Tomorrow I am going to pull the drive and start working on getting the engine out. I will also get some better pictures of the boat and damage in general so hopefully someone can give me some pointers.
Current condition.