1993 Mercruiser 4.3 v6 assembly

dlogvine

Master Chief Petty Officer
Joined
May 4, 2015
Messages
839
I started putting together the engine that i just got from the shop. Camshaft went inside no problems with the new cam bearings, then went the crankshaft. Measured all the main bearing clearances, all were good. Tightened up the caps. Then went the thrust plate on the camshaft and new timing gear. But when i tried to tighten tbe sprocket bolts the camshaft stopped spinning and looks lile a dowel is sticking too far. On the pictures I saw of the installed camshaft the dowel is flushed. Should there be some bearing that goes between the thrust plate and the camshaft? Thx
 

dlogvine

Master Chief Petty Officer
Joined
May 4, 2015
Messages
839
No Title

These are the photos of the camshaft with and without the timing gears.
 

Attachments

  • photo270949.jpg
    photo270949.jpg
    65.2 KB · Views: 0
  • photo270950.jpg
    photo270950.jpg
    100.2 KB · Views: 0
  • photo270951.jpg
    photo270951.jpg
    64.2 KB · Views: 0

dlogvine

Master Chief Petty Officer
Joined
May 4, 2015
Messages
839
image_270954.jpg I looked at all the diagrams on the web for this engine, none has anything that goes between the camshaft and thrust plate... Im completely lost, it is obvious that when I tighten up the sprocket bolts even finger tight, the camshaft hits the plate and stops spinning, as soon as I loosen up the bolts, everything goes back to normal and spins ok...
This is the diagram. I also checked the timing gears, all are identical to the old ones.
 

Scott Danforth

Grumpy Vintage Moderator still playing with boats
Staff member
Joined
Jul 23, 2011
Messages
51,729
thrust plate is the cam retaining plate. the nose of the cam should be relieved for the retaining plate

the retaining plate should be a few thousandths thinner than the relief

450px-Ft_vs_oem_roller_cam_nose.jpg
 

dlogvine

Master Chief Petty Officer
Joined
May 4, 2015
Messages
839
I'm soooo pissed off. Machine shop that was working on my engines switched the camshafts and did not label them. One was for 2001 Vortec Engine and the other for 1993 Mercruiser. And I was breaking my head trying to figure out why the camshaft has so much play and what is wrong with the thrust plate. But finally this problem is resolved, camshaft, crankshaft and timing gear is in. Next will be the pistons. Thank you for help.
 

Scott Danforth

Grumpy Vintage Moderator still playing with boats
Staff member
Joined
Jul 23, 2011
Messages
51,729
Its your responsibility to know what your putting together.
 

dlogvine

Master Chief Petty Officer
Joined
May 4, 2015
Messages
839
yes and no. The engine was in the machine shop for inspection and cleaning. They took it apart in the shop. So when they gave me labeled containers with the parts for two similar engines, im not this good to identify unlabeled part by their looks. The blocks and crankshafts were labeled but the rest of the parts were identified only by the label bin.
Now I have another question. Since Im putting new rings on the pistons, I gt two completely different advises, one is to gap every compression ring, the other one is since the rings are brand new they must be up to spec. Im on the cautious side and would most likely check the gaps, but do I really need to do this?
 

Scott Danforth

Grumpy Vintage Moderator still playing with boats
Staff member
Joined
Jul 23, 2011
Messages
51,729
always file gap your rings. the ring manufacturer doesnt final gap them for you

plenty of face-tube videos out there.
 

dlogvine

Master Chief Petty Officer
Joined
May 4, 2015
Messages
839
I have the following progress:
1. Installed the camshaft bearings. This time I used the machine shop to do so, but I purchased the bearing driver, so the next engine I'll do it myself.
2. Installed the camshaft. Need to use 3 long bolts to hold it while installation. Lubricated the bearings with the assembly lube.
3. Freeze plugs. Can use the socket of the right size as a driver.
3. Main crankshaft bearings. Some people advised to lube the block and caps inside with a little lube, while other said to never do so. just cleaned them up and inserted the bearings.
4. Crankshaft. Lubed the bearings well.
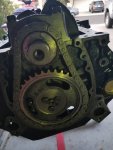
5. Timing gear. Retaining thrust plate. For the timing gear had to align both gears using the dots on both, while putting on the chain.
6. Timing cover with the gasket.
7. Piston rings (gapped, they were all up to specs).
8. Pistons. When putting the pistons the bolts on the push rods covered with the protective covers not to scratch the crankshaft lobes.
9. Rear main seal, drove it into the seal retainer with an appropriate side metal driver. It goes with the gasket.
10. Oil pump. Had to use the original pickup and shaft. To remove the pickup, tightened up an old pump in the wice and tapped it gently with the rubber mallet sideways to shift it left and right, then pulled it out. To remove the shaft, had to use the wrench to pry the nylon connector off. Installation was easier, did it by gently tapping the shaft.
11. Oil pan and oil pan gasket. No difficulties here.
That is where I am at now. All the bolts are tightened up to the torque specs.
 

dlogvine

Master Chief Petty Officer
Joined
May 4, 2015
Messages
839
Next Im going to do the following.
12. Lifters and retainers.
13. Pushrods
14. Head gaskets and heads.
15. Prime the engine.
16. Intake manifold.
17. Distributor.
18. Fuel pump
19. Flywheel.
20. Tension pulley.
21. Starter.
22. Engine mounts.
After this will be done I'll lift the engine in the boat, and install
23. Carburetor
24. Spark plugs
25. Water pump, Alternator, Fuel filter and the other accessories.
26. Exhaust manifolds, Risers and hoses.
27. Thermostat housing
28. Wires.
And this will complete the rebuild process.
Does it sound like a complete assembly order or did I miss anything? Im trying to put a complete assembly order in place, so that I can use the notes for the next engine rebuild.
If you have anything to add or correct, please feel free to add.
Thank you.
 

dlogvine

Master Chief Petty Officer
Joined
May 4, 2015
Messages
839
I started final part of assembly of this engine. Unfortunately I lost my USB drive with the pics of the engine so I have some troubles with exact location and types of bolt used to install the accessories, like an ignition coil, electrical fuel pump, circuit breaker panel. I tried to find the pictures of these parts online in different postings for Mercruiser 4.3, but some connections are not visible. Is there any place with detailed pictures of the engine assembly? Thank you
 

dlogvine

Master Chief Petty Officer
Joined
May 4, 2015
Messages
839
The engine is almost completed, left is some wiring bits, carburetor and exhaust manifolds. IS there any way to check how it is running before putting it back in the boat? I need to get external fuel tank but besides that, what else is needed? And what should I connect to make the engine run? I assume the water hose into a water intake. Anything else? Thx
 

achris

More fish than mountain goat
Joined
May 19, 2004
Messages
27,468
Top