1995 Crownline Interior restoration....

Corjen1

Lieutenant Junior Grade
Joined
Aug 24, 2013
Messages
1,237
No worries Jerry, I dont mind the critique if you tell me how to do it better.... this forum is about posting stuff, spurring conversations and hopefully passing something on for the next guy working on a boat....

Any tips on hoy you do the barrel back seats....As you know, they thoroughly kicked my butt on this job. I know there has to be a better way than this...

7EC27ED5-4AE1-4233-859D-C06741367811_zpsifgzs5q9.jpg
 

Corjen1

Lieutenant Junior Grade
Joined
Aug 24, 2013
Messages
1,237
OK, so here we go.. the plan is to finish this project this weekend. these are the last two pieces. The owner brought me back the bow back rest structure after fitting the skeleton to the boat.

I picked up this little toy, a digital angle finder... works pretty slick!!


Here are the skeletons getting slats...


Both side have 2 coats of WoG's old timer formula....ready for final coat tomorrow. Foam install and the upholstery wrap...


Patfromny

Lieutenant Junior Grade
Joined
Dec 2, 2012
Messages
1,197
Looking good Cor. Looking forward to some unwrapping pics of the glastron soon.
 

Jerry200LX

Seaman Apprentice
Joined
Jul 20, 2016
Messages
37
Finally got some free time to get back here. I tried to respond yesterday at work and about halfway through got interrupted and couldn't finish and ended up deleting what was a lengthy post.

I think what caused your problem was not allowing enough material when patterning the seat back. The old vinyl has obviously had a lot of shrinkage to pull away from the seat back. You have to allow for that shrinkage when patterning the new cover. Here is how I would make that seat cover.

First thing I would do before pulling any staples is lay the seat on its back and with both hands apply enough pressure to the vinyl to force it into position against the foam. The will probably result in the vinyl tearing, possibly all the way to the top, which is fine. You only need the sewn edge intact to draw out the new pattern. While the old vinyl is pushed into position, take note of the gap where the tears are. Mark and measure the gap if necessary as this will indicate how much extra material to allow for on the new panel. Lay out the old panel with the gaps on the new vinyl across the roll so the stretch will run side to side on the new panel. Always make your new patterns so that the stretch in the vinyl works to your advantage. After it is cut out, test fit the panel to the seat before you do any sewing. The old cover should have left marks in the foam indicating where the old seams were. Be careful not to get the new panel too wide as then you will have to deal with wrinkles. When satisfied the new panel is going to fit, it's time to sew. Note: I would pattern the panel on the back of the seat across the roll also so the stretch runs side to side.

Fitting the cover: Pull the cover over the seat and first establish the top edge alignment. I would pull the cover tight where the "arms" of the seat meet the bottom on both sides and shoot a couple of staples there to hold it in place. Only use a couple as you may need to pull them later and make adjustments. Start the stapling in the front of the seat in the middle and work around to the sides pulling as tight as possible but keeping the alignment at the top edge. Once the front of the seat back is completely stapled, it's time to staple the back. Doing it in this sequence allows the cover to be pulled tight enough to eliminate wrinkles.

I'm sure I will read this post later and see something I left out, but, that's basically how I would do the seat. If something isn't plain or is confusing, let me know as every upholstery guy has his own techniques and ways of doing things. Because they are different doesn't mean one is wrong. Hopefully this will help you out.
 

Jerry200LX

Seaman Apprentice
Joined
Jul 20, 2016
Messages
37
Since you seem open to suggestions, I though I would run a couple of things by you.

I didn't see any plastic being used to cover the foam in your cushions. To me this is really important as it keeps water from seeping into the foam where there are seams, pleats, etc. Keeping the foam dry goes a long way to preventing mildew and mold in the seats. I experimented with a lot of different plastics to find one that works well. I found that dry cleaner bags work great. They are soft and pliable enough to not effect the seat cover and are strong enough to do the job needed. I buy prom dress size bags by the box from a local dry cleaner. I cut off the closed end and split the bag and it makes a sheet of plastic large enough for most seats.

Also, anytime I am stapling vinyl that's going to be at a 90 degree angle to the staple surface I use a tack strip. This will keep the staples from pulling through the vinyl because of the angle. I use plastic marine tack strip, the ones used in furniture won't work because they come apart when wet. Where I would use these tack strips would be the front of your seat back and on the inside pulls on cushions.

Just wanted to throw that out there.
 

Woodonglass

Supreme Mariner
Joined
Dec 29, 2009
Messages
25,929
Cordell, You remember the Orange Boat you and I did? That guy is NOW doing upholstery work after attending Upholstery School at a Local Vo-Tech school. He is Redoing his "Barrel Seats" cuz the Guy that did them did a horrible job!!! He told me that he was taught to use clear plastic to make his patterns and PIN it to the seat through the foam. He then Traced the outline of the seamlines left in the foam, with a majic marker. His "Fit" on his covers was great. I've asked him for pics and will post when I get them. Sure wish I had some "Practice Seats" to experiment with.:D The compound curve (Top to Bottom and side to side) sure is a perplexing fit. I haven't figured it out yet either. I called the Original company that made the seats for the Boat and he told me that If I didn't have the patterns(he said he'd sell me copies for $300) I would NOT be able to make the cover. I got sick and couldn't complete the job and seeing what you're going thru, I'm GLAD I didn't have too. But now you've got my curiosity spinning and want to figure out how to do em. I've searched the internet with every Key Word I can think of and I've yet to find any videos or pictorials of an upholsterer doing seats like these. I even sent Cechafalo a message and asked him to DO ONE so we could all see how it's done. No response yet!!!

Also, are you putting a full strength coat of Polyurethane for the last coat? It's important to do that.
 
Last edited:

Jerry200LX

Seaman Apprentice
Joined
Jul 20, 2016
Messages
37
Using plastic for making patterns will absolutely work. It does have it's pros and cons though. Sometimes it's the only way to get a pattern if the old seat cover is too far gone to use. On the down side, it's more time consuming and you have to be really careful to get accurate alignment marks to go by when sewing the new covers. I have used that method when necessary but if the old covers are in relatively intact shape and aren't stiff as a board, I had rather mark the old cover, split the seams and use them for pattern. The way I look at it, if the old covers fit perfect, if done accurately the new covers will fit perfect.
 

Corjen1

Lieutenant Junior Grade
Joined
Aug 24, 2013
Messages
1,237
One down, one to go....the other is stitched up, but Im in need of a nap!!!! Im too fat, old and lazy to be in the garage when its 104 out, feeling like 112!!!!! 10 hrs is enough!!!


Have a good night all
 

Jerry200LX

Seaman Apprentice
Joined
Jul 20, 2016
Messages
37
104 degrees? Ouch! Look on the bright side, at least the vinyl wasn't cold and stiff and hard to stretch. :)
 

Woodonglass

Supreme Mariner
Joined
Dec 29, 2009
Messages
25,929
If the customer doesn't like those...Let me know and me and Bubba will pay him a visit!!!:rockon:
 

Corjen1

Lieutenant Junior Grade
Joined
Aug 24, 2013
Messages
1,237
Jerry, thanks for the info. I watched something about the direction of stretch in vinyl...I will have to start paying more attention to that.

Thanks Mike, the costumer has been very happy with the work so far..

Here is the final piece...


These turned out to be harder to wrap than I first thought they would be...mostly due to all the varying angles.

Later today the customer will pick these up.. then Ill post some pix of the entire boat.
 

Jerry200LX

Seaman Apprentice
Joined
Jul 20, 2016
Messages
37
I was looking through these posts again and like I said I will probably see something I left out. In the post about wrapping the foam in plastic before covering I forgot another advantage to doing this. Having the plastic over the foam helps a lot when trying to stretch the vinyl cover over the seat. The cover will slide easier and this makes it a lot easier to get the cover in correct position before stapling. If you're not using plastic now, I would consider it in future jobs. Just remember the plastic needs to be soft and pliable and just thick enough not to tear easily.
 

Woodonglass

Supreme Mariner
Joined
Dec 29, 2009
Messages
25,929
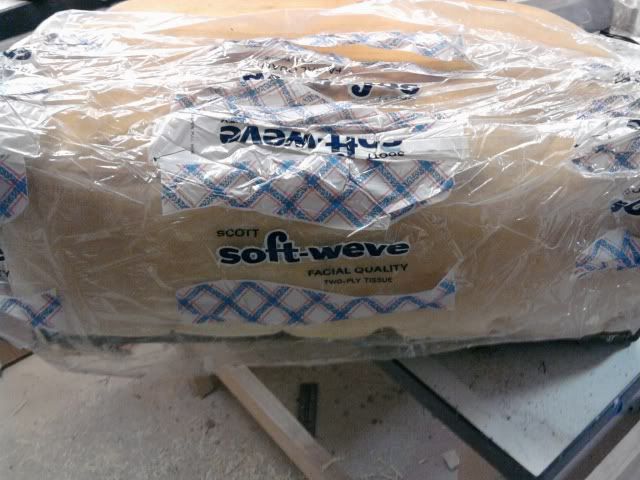
Yeah, I use WalMart Bags to cover my foam. Had a big discussion about it in my thread. I then took my old Back to Back Seats apart that were made in 1961 and found this...I guess they ran out of the Good Plastic. I figure the Walmart Bags will work just fine and They are FREE!!! Plastic help to preserve the foam to. The constant rubbing and shifting of the vinyl will wear down the foam over time.
Photo0380.jpg
 

Jerry200LX

Seaman Apprentice
Joined
Jul 20, 2016
Messages
37
At least it says facial quality. :joyous: oh, I guess that meant what was in the bag, not the bag.:lol:

How big are your Wal Mart bags there? The ones I get aren't big enough to cover a seat cushion.
 

Woodonglass

Supreme Mariner
Joined
Dec 29, 2009
Messages
25,929
They have BIG ones behind the counter if you ask for them they'll give em to ya! I cut the handles off and then split em at the side seams. Works out to be about 16 x30 piece. I use spray glue and overlap when needed. I'm a C.O.B. so free is Good!!!
 

JaCrispy

Petty Officer 1st Class
Joined
Jul 8, 2014
Messages
391
Hey Corjen, nice job on the upholstery! Haven't been on here in a while but my Ol Hag is still running strong! Thanks for the tips everyone!
 

Corjen1

Lieutenant Junior Grade
Joined
Aug 24, 2013
Messages
1,237
OK. here are some pix of the boat complete. We had to mess around with the bottom rail of the bow back rest, But the costumer was very happy with the boat. has gotten several inquires and compliments. So that makes me happy!!


So with that...project complete. Thanks for your interest and commentary. If you have any questions on how I did things... feel free.
 

Woodonglass

Supreme Mariner
Joined
Dec 29, 2009
Messages
25,929
Not to Shabby for a guy that couldn't spell Sewing Machine a few years ago!!!! This is Well Deserved!!!

iBoats Upholstery.jpg
 

Attachments

  • iBoats Upholstery.jpg
    iBoats Upholstery.jpg
    77.8 KB · Views: 0
Top