1999 Celebrity 190 - Engine Mount and Stringer Repair

JASinIL2006

Vice Admiral
Joined
Feb 10, 2012
Messages
5,725
Re: 1999 Celebrity 190 - Engine Mount and Stringer Repair

Stinks to run out of supplies when you're in the mood to keep working, doesn't it? Looks like you're moving along!
 

bvetter

Petty Officer 1st Class
Joined
Jun 2, 2013
Messages
263
Re: 1999 Celebrity 190 - Engine Mount and Stringer Repair

Here is a pic looking back toward the transom. My sacrificial plywood for wetting down material...


Tonight I cut out a new floor piece for the ski locker. Will be wrapping it in CSM before installing, when I get more resin.


Then, I decided to tackle something I have not been looking forward to.....the transom. First I ground down some of the gelcoat on the inside of the keyhole to get a better look at the various layers. Quite honestly, the wood looked very good except for at the base of the keyhole, what a shame it all has to come out......


So this is where I started tonight on the transom.

 
Last edited:

bvetter

Petty Officer 1st Class
Joined
Jun 2, 2013
Messages
263
Re: 1999 Celebrity 190 - Engine Mount and Stringer Repair

Stinks to run out of supplies when you're in the mood to keep working, doesn't it? Looks like you're moving along!

Oh boy does it ever. Could have really used another quart, that would have been perfect. Oh well, things could be a lot worse I suppose....
 

bvetter

Petty Officer 1st Class
Joined
Jun 2, 2013
Messages
263
Re: 1999 Celebrity 190 - Engine Mount and Stringer Repair

I started by using the circular saw to make cut lines along the transom. I set the depth to around 1-3/4", the thickness is uniform at 2" all around the keyhole. Disassembly actually didn't go to bad at first, then things got weird....


You can't see it in this pic, but between the plywood and fiberglass hull, the factory used their own version of PB, it's pink and looks just like autobody filler. As I started removing pieces, some of the pink stuff came off with the wood, leaving the hull glass behind. What I noticed, was that there was a couple small pockets of blue stuff inside the pink, almost as if their "PB" mixture either wasn't mixed properly, or maybe the catalyst didn't totally get mixed in. The blue stuff was still gooey, like playdough. No big deal, so I just keep moving on.


The stbd side comes off fairly easy, then I move to the port side, and chunks come off VERY easily, and this is where it gets really weird. That blue stuff is all over the place!!!


Like I said, it's still soft and gooey. Almost like catalyst was never mixed in. Has anyone ever seen this??? Now I'm really glad this transom is coming out!!
 
Last edited:

jbcurt00

Moderator
Staff member
Joined
Oct 25, 2011
Messages
25,138
Re: 1999 Celebrity 190 - Engine Mount and Stringer Repair

RE: The gooey blue gunk, no idea. Be interesting to see what others think.....

Else glasswork & demo all look GREAT! Nice work.
 

bvetter

Petty Officer 1st Class
Joined
Jun 2, 2013
Messages
263
Re: 1999 Celebrity 190 - Engine Mount and Stringer Repair

Now it's time for some questions I've been meaning to ask:

1) What grit of sandpaper is recommended for buzzing down the bare plywood before wetting it out?

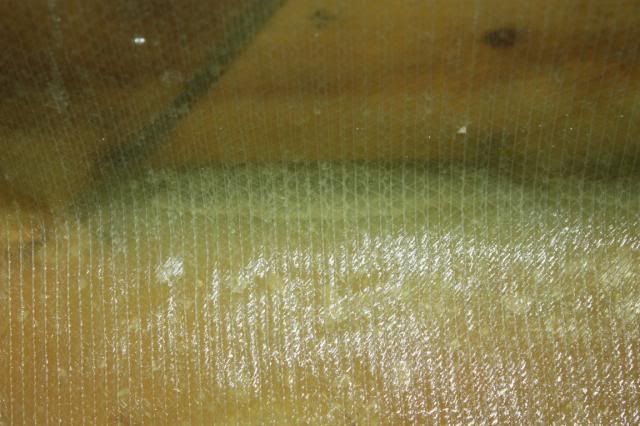
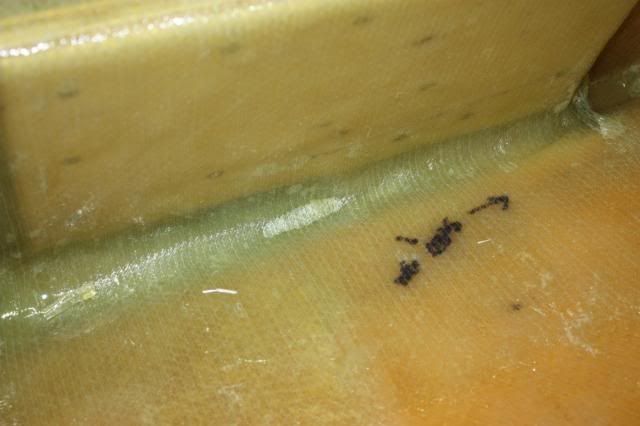
2) After finish up the 1708 on the stringers and bulkheads, I came back the next day and noticed some air pockets in a couple of places along the fillets. A couple on the order of 1-2" long by 3/4" high. Not sure if they were there when I did my primary tabbing of CSM or if the bubbles are between the CSM and 1708. Should I grind those areas down and redo, or drill a small hole and inject resin, or don't worry about it and do nothing? Here are some examples.


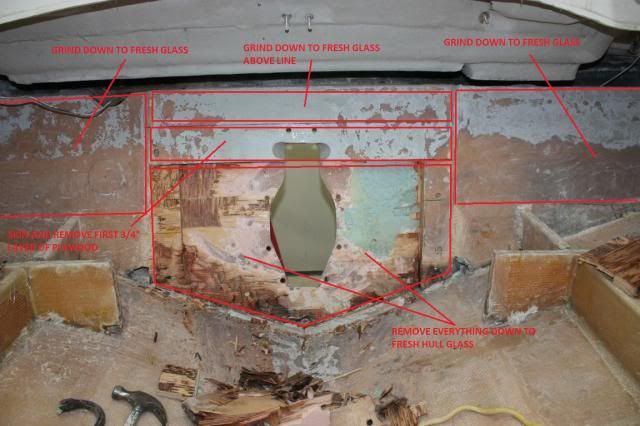
3) If you'll remember my plan to redo the transom (back in post #63), basically was going to fully remove the centre section, leaving outer wings of the existing transom. I'm still forging ahead with this plan but may do a slight modification to it. Here is the issue. On the top of the transom, I have very little to no room between it and the top cap to tab the new transom to existing hull glass above the outdrive. I was thinking of leaving a 4"-6" strip at the top of the original centre section in place, and to a ruff'n'scuff on the glass, this would give me a strip of something to tab in my new transom to something existing. Essentially, when the new transom is in place, it would sit flush with the old strip directly above it, then I can 1708 over the entire thing. Then I got thinking, rather than cut right down to the hull glass at that strip, why not only cut down 3/4" and leave another 4" strip of original transom plywood just below it. That way I could finger joint the new transom in with the existing one for better strength, this is difficult to explain, not sure if the following will illustrate, may need to do a profile drawing.

 
Last edited:

bvetter

Petty Officer 1st Class
Joined
Jun 2, 2013
Messages
263
Re: 1999 Celebrity 190 - Engine Mount and Stringer Repair

RE: The gooey blue gunk, no idea. Be interesting to see what others think.....

Else glasswork & demo all look GREAT! Nice work.

Thanks!
 

bvetter

Petty Officer 1st Class
Joined
Jun 2, 2013
Messages
263
Re: 1999 Celebrity 190 - Engine Mount and Stringer Repair

This might help depict question #3 above. A quick profile sketch of the transom layout.

Black is original transom plywood.
Green is outer hull fiberglass.
Maroon is new transom plywood.

 
Last edited:

tpenfield

Moderator
Staff member
Joined
Jul 18, 2011
Messages
18,192
Re: 1999 Celebrity 190 - Engine Mount and Stringer Repair

Regarding your question about the air pockets that formed at the right angles of the tabbing. The resin/glass does 'tighten up' a bit as it cures, so it is best to have the wetted glass a bit 'loose' at right angles, etc. The fillet radius is what helps in that regard.

But . . .

does not look like anything to worry about and not worth any re-work.
 
Last edited:

JASinIL2006

Vice Admiral
Joined
Feb 10, 2012
Messages
5,725
Re: 1999 Celebrity 190 - Engine Mount and Stringer Repair

For small bubbles, I did just what you propose: I drilled a small hole and injected some catalyzed resin in there. I know that resin won't add much in strength, but I didn't want to leave cavities down low that might hold water if any were to collect nearby. For small bubbles higher up, I didn't worry about it. Larger bubbles - half-dollar size or bigger - were ground out and another layer of 1708 was put down.

I don't know the answer to your question about piecing in the transom shield. Certainly, a finger joint will be stronger than a butt joint. I had a similar situation in that much of my transom shield was in pretty good shape, but I went ahead and pulled it all out and replaced it it. Too many forces being applied to that back end for me to feel comfortable piecing things together. I'd be a little concerned in your situation, especially given what you found with that blue goo. That can't be providing much adhesion, and I'd have to consider the rest of the transom suspect. You're going to this much trouble, why leave any of it in? It's not that much more work to pull it all out, grind down to good glass on the hull and have something that's known to be good. Just my $.02.....

Anyway, re: injecting the resin, we have lots of farm supply stores near us and I bought several big ol' hypodermic needles used for giving antibiotics to cattle. Worked like a charm.

Good luck,
Jim
 

greenbush future

Lieutenant Commander
Joined
Aug 28, 2009
Messages
1,814
Re: 1999 Celebrity 190 - Engine Mount and Stringer Repair

I didn't read your entire thread, but the proposed transom fix is because you are not removing the cap? or is it just the way the boat is constructed? I would venture to guess your idea is the second choice to removing the entire transom and replacing all in one. Because you are running an I/O there doesn't seem to be as much stress on the transom, which you would have if you hang a 150 HP outboard on as an example. But I'm not an expert this is just my opinion.
 

jbcurt00

Moderator
Staff member
Joined
Oct 25, 2011
Messages
25,138
Re: 1999 Celebrity 190 - Engine Mount and Stringer Repair

You plan to leave what, 15% of the old transom ply, to what end? Saving plywood? Saving demo time?

The plywood & glass, inside & out, at the keyhole needs to be flat & parallel to each other. It also needs to be perpendicular to the centerline of the boat. Neither of those conditions will be easily met leaving some of the old & attempting to transition it to the new, IMO. You will likely spend much more time & effort carefully removing a portion of the existing transom, prepping it & the exposed transom fiberglass skin and trying to blend the old & new, then just going ahead & removing it all & replacing it all.

I definitely wouldn't seam the transom 10% above ( original layer closest to the motor) the keyhole, and have another seam so close, and less then a third of the way into the keyhole (original layer closest to the outdrive, against the transom skin). Those seams are poorly chosen in relationship to each other and relative to the keyhole, IMO. But since I wouldn't seam the plywood anyway, for me, their locations aren't really relevant anyway...
 

Woodonglass

Supreme Mariner
Joined
Dec 29, 2009
Messages
25,929
Re: 1999 Celebrity 190 - Engine Mount and Stringer Repair

Uhhmmmm, You're thinking about this all wrong. Remove the entire center section and grind to fresh glass. That IS the integral part of the transom. You will then "Glue" the new transom to the outer skin of the boat with "PB". This will secure it to the boat and then you will grind the wings down to fresh glass and with tabbings and full layers of 1708 secure the transom to the sides and the bottom of the hull. The top is insignificant. Large air bubbles should be ground out and patched. Small ones pierced and injected if possible or left alone.
 

bvetter

Petty Officer 1st Class
Joined
Jun 2, 2013
Messages
263
Re: 1999 Celebrity 190 - Engine Mount and Stringer Repair

Thanks guys. I guess I was too concerned about not being able to wrap the transom at the top. If taking the whole centre section out and doing a one-piece against the outer glass without doing a tab/wrap at the top is fine, than that's what I'll do. Thanks WOG for the tip.

@Tpenfield
Yes I did notice how the glass tightens up around the inside corners a little bit, very noticeable when my resin was starting to kick and trying to lay a fresh piece of 1708, it tries to hold it's shape and is more difficult to beat into submission. I'll try to take leave "slack" in the inside corners on future tabbing as you've suggested.

@Jim
That's a good point about the gaps being a cavity for water, I never thought about it that way. Especially up here in the frozen north where ice would cause delamination. I may just drill a small hole and inject catalysed resin.

@Greenbrush
You are correct in that I am not removing the cap, therefore there is very little access between the cap and the upper portion of the transom for tabbing in. Not enough room to do any effective grinding at least.

@jbcurt
The idea about the finger joint was not at all to save demo time or plywood, more to do with having something for the new transom to tab to. I was concerned about not having anything to tab 1708 to at the top (being that there is no room under the cap). I agree with your comment about it being difficult to maintain parallel surfaces with the finger joint. May seem easy on paper, but very difficult to execute properly in reality.

@WOG
I prefer the route you've suggested. Will forge on with the demo!

Thanks again gents!

-Brandon
 

JASinIL2006

Vice Admiral
Joined
Feb 10, 2012
Messages
5,725
Re: 1999 Celebrity 190 - Engine Mount and Stringer Repair

I can't see well on the pictures, but it looks like you have some surface that would accept tabbing. Some other spots do look like the access would be too tight to get a small grinder (or even a Dremel) in there. I had parts of my transom - on the top, like yours - that weren't tabbed originally and that couldn't be tabbed. (In my case, there are some contours in the hull where the it 'bulges' out; no way to tab it there. I tabbed the snot out of it around the sides and the bottom, and I put a few small tabs in at the top where I could.

I would think that having a solid transom shield, adhered to the hull with PB and tabbed where possible, would be much stronger than a pieced-together shield with some unidentified blue gunk underneath.

Also, installing the shield as one piece will make it much easier to keep it parallel and true, as jbcurt00 mentions above.
 

bvetter

Petty Officer 1st Class
Joined
Jun 2, 2013
Messages
263
Re: 1999 Celebrity 190 - Engine Mount and Stringer Repair

Got the rest of the transom out tonight, the blue mystery goo was a pain in the butt to get out. Ended up pounding away at a chisel for a couple hours. Just need to do some final clean up and grinding and then should be ready to go for reassembly.

Got my second order of resin in today, so I was able to do a little prep work on the ski locker floor.

Going back to the transom, I have a question. How thick does the layer of PB usually end up being in between outer transom skin and plywood, assuming good clamping/compression during installation? 1/8" give or take a little?
 

bvetter

Petty Officer 1st Class
Joined
Jun 2, 2013
Messages
263
Re: 1999 Celebrity 190 - Engine Mount and Stringer Repair

It sucked, but the transom is now ground down! We finally had a really nice day out (+3 degrees C), likely the nicest since October or so, so I had all the garage doors wide open, man it was nice to have fresh air in there!


Still looking for some input on how thick the PB layer usually ends up being between the skin and plywood once it's clamped into place? I assume I want to get it as thin as possible as long as there is even coverage throughout the surface area? The pink mixture from the manufacturer was between 3/16" and 1/4" thick throughout, but this seems like a little much, so I was thinking of building up a couple layers of CSM/1708 on the skin before doing the plywood install. Thoughts?
 

JASinIL2006

Vice Admiral
Joined
Feb 10, 2012
Messages
5,725
Re: 1999 Celebrity 190 - Engine Mount and Stringer Repair

Going back to the transom, I have a question. How thick does the layer of PB usually end up being in between outer transom skin and plywood, assuming good clamping/compression during installation? 1/8" give or take a little?

You have quite a bit of control over how thick the PB is. I tried to shoot for a combined thickness of just shy of 2" for hull, PB and transom. How thick your PB ends up depends on how much you pull down on the clamps. I just made a good, thick batch of really hairy PB and I troweled it a bit heavier than I needed it, to make sure I had no voids. Any excess that oozed out got smoothed into a fillet.

What is the thicknesses of your hull and transom shield as they are now?
 

jbcurt00

Moderator
Staff member
Joined
Oct 25, 2011
Messages
25,138
Re: 1999 Celebrity 190 - Engine Mount and Stringer Repair

Apply the PB to both the transom skin & the back of the plywood transom w/ a notched trowel. Helps get even coverage, on both surfaces, then have some excess PB to squeeze out to make fillets.

Keep a metal serving spoon handy (dollar store NOT the kitchen :watermelon:), dip it in acetone, and smooth down the fillets & any excess 'hair' sticking up as you make the fillets concave. Dip & clean spoon as necessary to keep it 'clean' and wet.
 

bvetter

Petty Officer 1st Class
Joined
Jun 2, 2013
Messages
263
Re: 1999 Celebrity 190 - Engine Mount and Stringer Repair

Apply the PB to both the transom skin & the back of the plywood transom w/ a notched trowel. Helps get even coverage, on both surfaces, then have some excess PB to squeeze out to make fillets.

Keep a metal serving spoon handy (dollar store NOT the kitchen :watermelon:), dip it in acetone, and smooth down the fillets & any excess 'hair' sticking up as you make the fillets concave. Dip & clean spoon as necessary to keep it 'clean' and wet.

Thanks jbcurt00. By chance my wife went to the dollar store today to pick up some things, so I had her get a metal spoon. We'll see how she goes! I had a plastic one that I tried on other fillets, but the curvature was all wrong, so I ended up using a pie server instead and it worked, only thing was it had a really tight radius which was inconvenient at times.
 
Top