2008 3.0L cranks but won't start - long post

TBarCYa

Senior Chief Petty Officer
Joined
Apr 13, 2005
Messages
781
So now I'm totally stumped. I checked and I have spark at the plugs. It's not amazing, but there is spark. I replaced the cap, rotot, plugs, wires and coil. I did not replace the ignition module or the pickup coil but the coil tested good. I have 12.6v feeding the coil and at the distributor. I cleaned all of the battery connections. I even bypassed the neutral switch.

When I pour fuel in the carb, it doesn't even try to start until it works that through, then it tries to fire. So I'm flooding it with dumping fuel in. That leads me to believe that my carburetor is working as expected. I get the same result if I pump the throttle several times before cranking.

So thinking logically, an engine needs air, fuel, spark and compression to run... And timing. I haven't tested the compression yet because the engine was running on Saturday before the backfire / etc. The distributor hasn't moved because I tried to move it and cannot. The question then is the timing chain. I don't hear any weird noises from the engine when cranking but is it possible that the timing chain jumped a tooth? I know the cam is turning because the distributor is turning.

I hate to have to take it to a shop but that's where this is leading if I don't make some progress soon.
 

alldodge

Moderator
Staff member
Joined
Mar 8, 2009
Messages
42,701
If there is more then one wire on the Negative side of the coil, remove and only leave the distributor one. If you have a Tach it may be shorting out.

Need a spark tester, and it should be white or at least Blue at 3/16 gap

If the motor is being flooded with gas it will be real hard to fire

Move the throttle to 1/2 , then let sit this way all night. I want the fuel to evaporate. Get some starting fluid, and with flame arrestor off the carb, start cranking the motor and do not touch the throttle. When it starts to crank, spray some starting fluid over the carb (you don't need to be real close). If it fires, you have spark, if it doesn't you do not
 

TBarCYa

Senior Chief Petty Officer
Joined
Apr 13, 2005
Messages
781
I'll pick up a spark tester just in case but I might know the problem. I did a compression test and got 120, 90, 90, 90. I also checked the oil and the level is perfect but it looks to be a little milky. Not terrible, but not great either. I'm thinking (hoping) it's a head gasket and not a cracked block but I live in FL so I don't know how I'd have cracked the block, especially while running.
 

alldodge

Moderator
Staff member
Joined
Mar 8, 2009
Messages
42,701
Agree 90 is not good, nor is 120 for that matter, you need 140 to 150
 

TBarCYa

Senior Chief Petty Officer
Joined
Apr 13, 2005
Messages
781
Looking for the head gasket set... All I'm finding are gasket sets for old engines... I found a part number for the head gasket alone for my 2008 but not the set. Any ideas? I tried searching iboats but it cannot find my model for some reason.

The head gasket I found is 27-52364 but I need the whole set.

Thanks.
 

TurtleTamer

Petty Officer 2nd Class
Joined
May 10, 2018
Messages
143
This leads me back to my original theory that you're getting water in the engine via the riser/riser gasket. If it hasn't been changed in the last five years or so, then you probably have your culprit. Water coming in through the exhaust valves can be a pretty insidious issue to isolate since you can't see it, and there's not a "lot" of water coming in. One telltale can be lower compression due to rusted exhaust valves sealing incorrectly. It also doesn't take much water to extinguish your possible flame on startup (once running, an engine can handle a bit of water but will almost never start that way). Another telltale is the slow cranking that will speed up again once it sits (because the water drains past the rings). Lastly, there's the milky oil.

Mine is of similar vintage and couldn't find a whole gasket "set." Only the head gasket, VC gasket, valve seals and lifter cover gasket. You'll need to get the intake and riser gaskets separate.

Your compression numbers are odd given that it was running before. Did you have the throttle open? Was the engine warm or cold? Was this dry or with oil? But again, if this was indeed accurate, it can be yet another telltale for water intrusion from your riser area. #1 is furthest from the riser, and usually it's the highest one from water level since the stern sits low in I/O boats. Therefore it could easily have less water intrusion than the others. Before you go digging into your head you may just want to remove the riser and manifold first to have a look, though if you've rusted some valves, even a little, you'll need a valve job.
 

TBarCYa

Senior Chief Petty Officer
Joined
Apr 13, 2005
Messages
781
When I did the compression test yesterday, I pulled one plug at a time and after thinking about it I remembered that itś supposed to be done with all plugs removed. So I removed the plugs and did the test again and got 120,110,100,165. If not for the 165, Id think that I was in decent shape with low, but consistent, compression.

One weird thing is that every time I remove the plug or the compression gauge from the #3 cylinder, it hisses as if thereś pressure being released. Not sure if itś relevant or not. Also the #3 and #4 plugs came out wet and all 4 smelled of gas.

This leads me back to my original theory that you're getting water in the engine via the riser/riser gasket. If it hasn't been changed in the last five years or so, then you probably have your culprit.

Iḿ going to check the riser because nothing but routine maintenance has been done since I bought it new in 2008. Granted, it spent the first 7 years used 90% in fresh water (maybe 10 hours per year running) and only seasonally but the last 3 years itś been used year round in saltwater. And I did notice a little rust around the riser gasket so hopefully thatś where the problem lies.
 

TBarCYa

Senior Chief Petty Officer
Joined
Apr 13, 2005
Messages
781
One more thing... It didnt strike me as an issue until just now but the last time I pulled the block and manifold drains not much came out of the manifold.... So Iḿ wondering if thats because itś leaking past the riser gasket and Iḿ only draining the manifold....
 

TBarCYa

Senior Chief Petty Officer
Joined
Apr 13, 2005
Messages
781
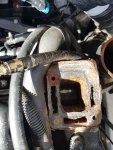
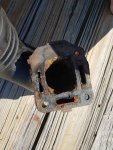
I think we found the problem. There is water in the exhaust manifold that is NOT in the water jacket. The question then is are the valve seals something that I can replace or should I bite the bullet and send it out for freshening up?
 

Attachments

  • photo292601.jpg
    photo292601.jpg
    566.1 KB · Views: 0
  • photo292602.jpg
    photo292602.jpg
    754.5 KB · Views: 0

TurtleTamer

Petty Officer 2nd Class
Joined
May 10, 2018
Messages
143
The head is pretty easily done yourself, except for surfacing and valve seat grinding. Your low compression in 2 and 3 tells me you have a warp in the head there. Engine will run with that warp, but not as well, and it would have been cranking a bit oddly as if it has good compression on two cyl and "skips" between the other two. High compression in 4 speaks to water.

Replace that riser. Manifold may need replacement as well, and it'd be good insurance to do it. I voted to test mine for cracks and clean it out real well and change it next season as they're a bit pricey.

So, remove the head, inspect the head gasket and mating surfaces, clean block deck and check it for warping. Clean up the pistons as well (oven cleaner works REALLY well). Disassembling the head isn't difficult and you should be able to find youtube videos. If you can't find one for the 3.0, just search chevy small block. The steps are the same. Keep track of which pushrod and rocker (and valve) went where, using a tackle box or something of that nature to keep it all in order. THIS DOES MATTER. And one thing I almost forgot. You will most likely have to use a flat file on the area where the valve keepers hold the valve because they will mushroom slightly and score the hell out of the valve guides upon removal. You'll know you need to if the valves don't want to come out of the head.

Take the bare head to the machine shop and have it checked for cracks and warping. They'll likely have to machine it down .010". They'll grind the valve seats as well. At this point you can bring your valves and seals and have them put it back together, or you can take it home and lap the valves in yourself. I use a drill for this with valve grinding compound. It can be bought at auto parts stores. Be careful to lube the heck out of the valve stems to avoid heat. Youtube is your friend on this one too. Some people use hand tools for this but on fresh seats and rusty valves I find the drill to make quick work of it. You can also use the drill to clean the valve before installation. You chuck it into the drill and carefully hold a piece of scotch brite on the valve and spin it. I use WD-40 to lube it. This worked better for me than a sandblaster.

When it's all back together, whether you did it or had the shop do it, leak-check the valves. Place the head on its side, with the ports facing up. Gently whack each valve with a dead-blow hammer or big rubber mallet (this "seats" the valves better). Fill each port with carb cleaner, brake parts cleaner, or similar chemical and watch for it leaking into the combustion chambers. If it leaks, the valves need more grinding. You can try a couple more whacks with the mallet but most likely the valves aren't sealing. Be careful whacking at this point because carb cleaner will shoot all over.

Lastly, don't get goofy and think you're going to have a port and polish job done on the head and get some power out of it. I did it, because my labor is free to me and I really wanted to know if I could get some more out of it. I did, kind of. Acceleration is a lot better and so is throttle response, but I don't get much more for top end and I actually had to enlarge my jets to give it enough fuel. I don't regret it, but I wouldn't do it again. Maybe if the motor spun to 6000rpm it'd have made a bigger difference but that would probably be a bad idea.
 

TBarCYa

Senior Chief Petty Officer
Joined
Apr 13, 2005
Messages
781
Well... It looks like fixing the boat is on hold for a few weeks because now we're moving. Thank you for all of the help, once the parts arrive and I get time that I'm not packing or moving stuff, I'll get started on tearing it apart.
 

TBarCYa

Senior Chief Petty Officer
Joined
Apr 13, 2005
Messages
781
I sent the head out for a rebuild and was told that there was a slight warp that they machined out as well as doing the valves, etc. In all, the report was that the head was in good shape.

I put the whole thing back together with a fresh head gasket, valves adjusted (3/4 turn more than zero lash) and still have weird compression numbers. The first time I checked compression before trying to start, the #3 cylinder was still low and #4 was still high then I tried to start it and it failed. The next day, I started with a compression check and the numbers were all much lower ranging from 90-120psi. I did the compression check again and still got weird but low numbers.

So now, after the move, I'm going to take it all apart again and double-check that the block is flat, the gasket isn't damaged and I'm going to chase all of the head bolt threads and replace the bolts in case I'm not getting even torque for some reason.

Two things.... First I adjusted the valves after cranking the engine for 15-20 seconds to pump up the lifters. The online manual doesn't specify to do this but every youtube video I watched (both of them) say to do this and it makes sense that if the valves are adjusted with the lifters dry that when they're pumped up the valves wouldn't close. The other thing is that the #1 cylinder took much longer to pump oil up to the rocker. The other 6 lifters all had oil within the first 15 seconds of cranking whereas it took at least 2 or 3 cycles before the front cylinder had oil out of the pushrod. Is this indicative of some other problem? I have 20psi on the oil pressure gauge when cranking.
 

TurtleTamer

Petty Officer 2nd Class
Joined
May 10, 2018
Messages
143
I ran into this on mine. It was debris that had fallen down onto the lifters when I removed the head and cleaned the surface that kept the pushrod from sitting all the way against the lifter. I pulled the lifter cover to investigate and that's what I found, along with rust lines where the old head gasket had leaked ever so slightly into the bolt holes. Still, it took what seemed like an excessive time cranking to get them to pump oil out of the rocker. Leave the plugs out, rest the valve cover over the valves, and turn over for about 4-5 seconds at a time and let the starter cool in between. Lift the rocker cover between runs with the starter to see if they've been pumping oil out yet or not. If you didn't use any assembly lube when putting it together, make sure your dry ones get some before you continue.
 
Last edited:

TBarCYa

Senior Chief Petty Officer
Joined
Apr 13, 2005
Messages
781
I didn't pull the lifter cover but I will this time around.

Thanks.
 

alldodge

Moderator
Staff member
Joined
Mar 8, 2009
Messages
42,701
Are you finding zero lash by lightly rolling the push rod back n forth while moving the push rod up/down with your fingers?

If so, pull the lifters and place them in a pan/bowl with oil and let them soak.
 

TBarCYa

Senior Chief Petty Officer
Joined
Apr 13, 2005
Messages
781
Are you finding zero lash by lightly rolling the push rod back n forth while moving the push rod up/down with your fingers?

If so, pull the lifters and place them in a pan/bowl with oil and let them soak.

I was finding it by tightening the nut until the pushrod didn't have any up and down movement and the rocker wouldn't move. Not up and down or rock g side to side.

Are you thinking I still had them too tight? What's the purpose of soaking the lifters?
 

alldodge

Moderator
Staff member
Joined
Mar 8, 2009
Messages
42,701
The push rod is twisted back n forth to make sure it stays in the center of the lifter and rocker arm. The UP/DOWN is the critical thing to feel. Once there is no up/down then that is zero lash. If the rocker may still slide but should not move up/down

You could also adjust them while running. Loosen each rocker slowly 1/4 at a time until there is clatter and engine is not running as well. Once there, start bringing the nut back down until all clatter stops, then 1/4 at a time until you have 3/4 turn in. Wait for the motor to smooth out with each 1/4 turn
 
Top