"68" Mark Twain runabout 15 ft restoration with Pics

wambs8

Seaman
Joined
Aug 18, 2008
Messages
69
Re: "68" Mark Twain runabout 15 ft restoration with Pics

PICT00396.jpg

The floor all fiberglassed in. With the help of my wife and the lower temps I was able to get this done in large sections. Its getting cold here at night hence the lights. The center section was overlapped so I will have to sand this flat before I put in the vinyl floor.
 

wambs8

Seaman
Joined
Aug 18, 2008
Messages
69
Re: "68" Mark Twain runabout 15 ft restoration with Pics

boat092.jpg

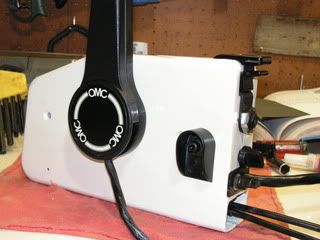
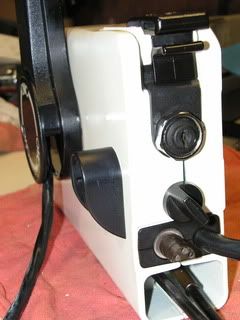
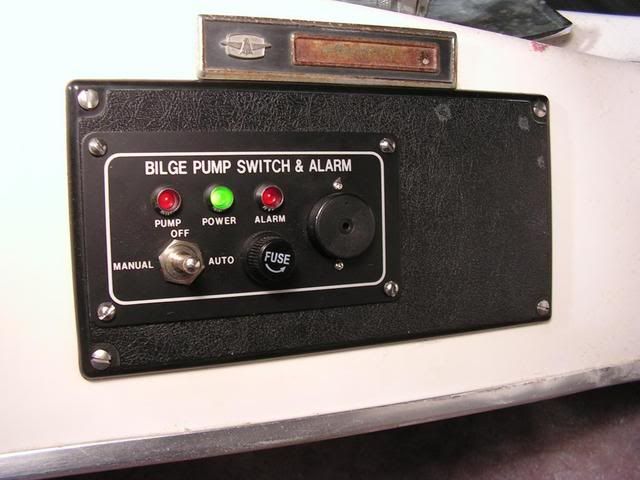
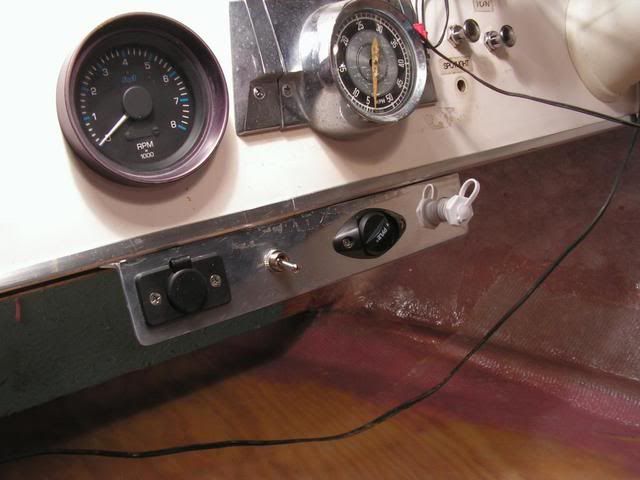
Worked on the electrical this winter (too cold to paint/fiberglass) This pic is the control for the bilge pump. It sits to the right of the steering wheel. I still need to cut a hole in the plastic and remount the trim Gage

boat055.jpg

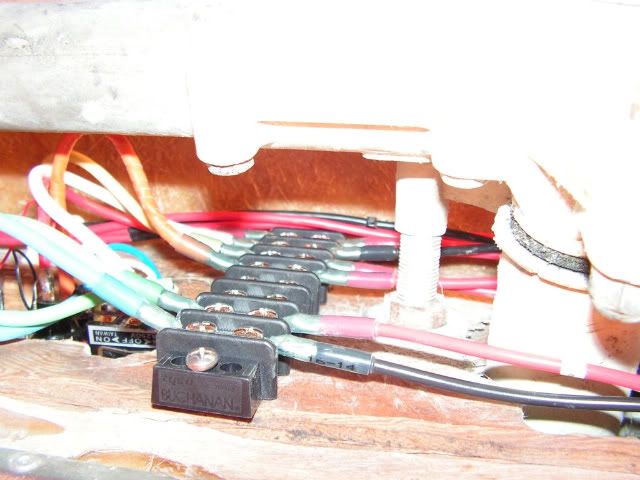
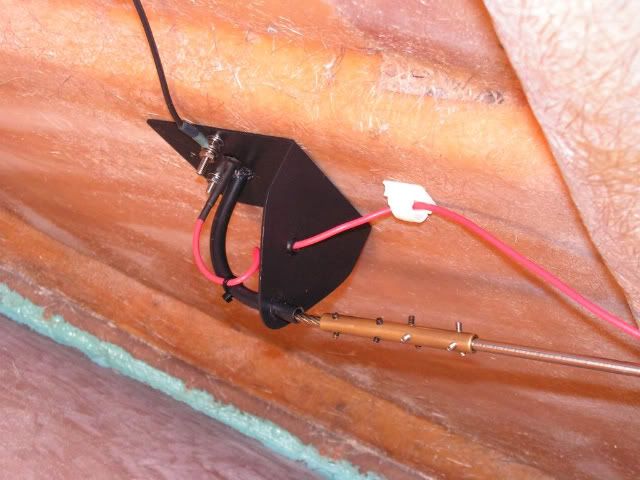
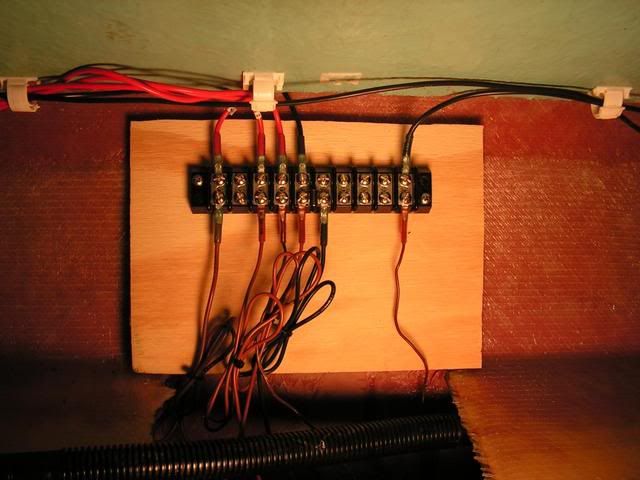
This pic shows the bilge panel connections on the rear of the dash. I used terminal blocks for all connections throughout the boat. No butt splices. I think it makes the wiring much neater and will be easier to diagnose a problem in the future.
boat062.jpg

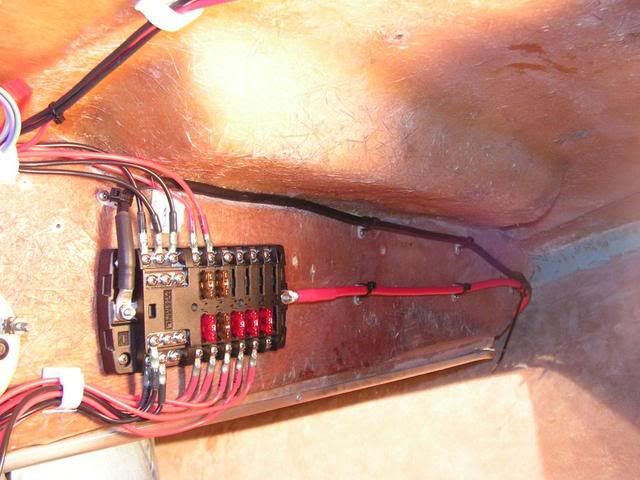
Image of fuse box and connections
boat053.jpg

Another pic of fuse box showing detail. Not a lot of good light under the bow of the boat.
boat082.jpg

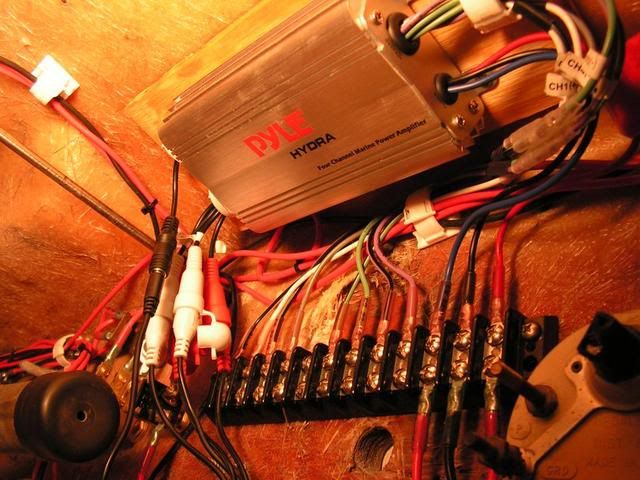
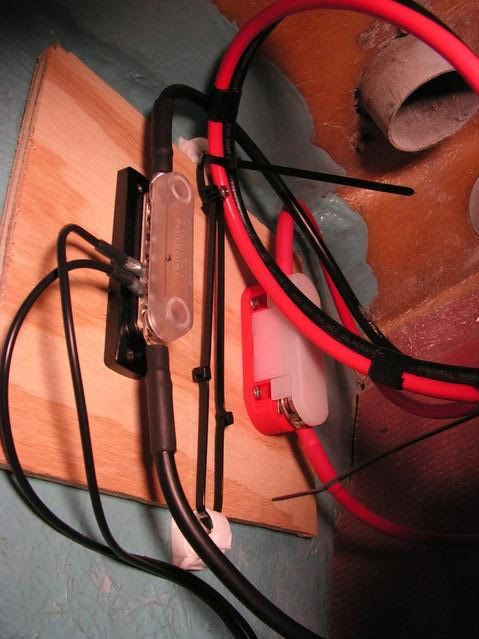
This is the amp for the MP3 player. The thing I like about the term. connections is it makes easy work out of connecting 2 different size wires together. The terminal block in this pics is a 12 gang, 4 connections for the front speakers and 4 for the rear. the speakers are not hooked up yet. The rest of the connections are for power and a on off switch. The amp itself was mounted to the under side of the deck because I had no room on the back if the dash.
boat066.jpg

This a piece of aluminum I fabricated for the mp3 connections and the cig. lighter plug. The switch turns the amp on and off to the right of that is the volume switch and right of that is the plug for the mp3 player. I will add a LED light to the right of the switch so a can tell at a glance if the Amp is on or off.

More pictures to come later
 

wambs8

Seaman
Joined
Aug 18, 2008
Messages
69
Re: "68" Mark Twain runabout 15 ft restoration with Pics

boat049.jpg

What you are looking at is the underside of the spot light. The previous owner removed the bracket and the connections for the spot light. They rusted out and stopped working. I found a pic on ebay of the spotlight so I fabricated everything under the dash. I had most of the item's on hand so it wasn't that expensive. I couldn't see spending $200.00 on a new spotlight that would rarely get used.
 

wambs8

Seaman
Joined
Aug 18, 2008
Messages
69
Re: "68" Mark Twain runabout 15 ft restoration with Pics

boat094.jpg

Connections I made for the bilge pump and 2 floats. The terminal block is temporarily connected to a piece of plywood until I get the interior painted. I will bend a piece of lexan to cover the block to keep it from getting damaged
boat097.jpg

mini neg Buss and The fuse that feeds the front fuse box. It sits on the inside of the splash well. In the future I would like to add a on board charger and maybe a second battery.
 

Psiclown

Petty Officer 1st Class
Joined
Nov 27, 2010
Messages
331
Re: "68" Mark Twain runabout 15 ft restoration with Pics

That electrical is CLEAN. Nice work. :)
 

IceWater

Seaman
Joined
May 30, 2010
Messages
60
Re: "68" Mark Twain runabout 15 ft restoration with Pics

Very nice work. Taking your time is clearly going to pay off.
 

fstorm08

Senior Chief Petty Officer
Joined
Aug 2, 2010
Messages
686
Re: "68" Mark Twain runabout 15 ft restoration with Pics

Nice Nice!! :)
 

wambs8

Seaman
Joined
Aug 18, 2008
Messages
69
Re: "68" Mark Twain runabout 15 ft restoration with Pics

Ya, taking my time with the rebuild but I would rather be out boating. Ordered my fuel tank and deck fill yesterday. I received my new rub rail insert. I am polishing the windshield now. I will post pics of windshield.
 

Bob_VT

Moderator & Unofficial iBoats Historian
Staff member
Joined
May 19, 2001
Messages
26,072
Re: "68" Mark Twain runabout 15 ft restoration with Pics

wambs8 You have a PM :)

Nice work!
 

wambs8

Seaman
Joined
Aug 18, 2008
Messages
69
Re: "68" Mark Twain runabout 15 ft restoration with Pics

PICT0139.jpg

The windshield plastic and aluminum trim is all polished up. I forgot to take a before picture. It looks like there is dirt on the windshield that is polishing compound that got slung all over the place from using the foam applicator on the drill. If you look to the lower left you will see a crack from PO:(. I drilled the ends of the crack to keep them from spreading. Its on the bottom section so its not in the line of site. Maybe one day I will have a windshield cutom made. All the used ones I have been able to find are in not much better shape.
 

wambs8

Seaman
Joined
Aug 18, 2008
Messages
69
Re: "68" Mark Twain runabout 15 ft restoration with Pics

PICT0157.jpg

Took apart my remote control to clean it. I have some Johnson white paint and primer that should be coming via UPS on Monday.

PICT0165.jpg

My method to get oil into the throttle and shift cables. Used a spout from a bottle of gear oil hung from the ceiling and keep adding oil until it flowed out the other end. Only doing this as a preventative measure. Not having any issues with the cables
 

wambs8

Seaman
Joined
Aug 18, 2008
Messages
69
Re: "68" Mark Twain runabout 15 ft restoration with Pics

PICT00083.jpg
PICT00053.jpg

The remote control was gone through cleaned, bead blasted and painted. I used the moeller brand primer,paint and clear coat. The paint goes on very thin. It looks better in these photos than in person. Bead blasting slightly etched the aluminum. :facepalm: When I do the motor I am thinking of getting it soda blasted.
 

boatnut74

Lieutenant Commander
Joined
Aug 29, 2010
Messages
1,835
Re: "68" Mark Twain runabout 15 ft restoration with Pics

Vey nice work!!
 

lakelover

Rear Admiral
Joined
Mar 26, 2003
Messages
4,386
Re: "68" Mark Twain runabout 15 ft restoration with Pics

Looks great, hope you don't have too many left over parts after reassembling that control.
 

wambs8

Seaman
Joined
Aug 18, 2008
Messages
69
Re: "68" Mark Twain runabout 15 ft restoration with Pics

Just a couple extra parts. Was surprised, there are a few companies out there that have replacement parts for this control.
 

wambs8

Seaman
Joined
Aug 18, 2008
Messages
69
Re: "68" Mark Twain runabout 15 ft restoration with Pics

009.jpg

Before
PICT00306.jpg

After

The steering column got the same paint as the remote control and I used the plastic polish on the steering wheel. I had to first use (000) fine steel wool on the wheel to get off the years of grunge. I found 1/4" chrome colored pin stripping at the auto parts store to replace the old stripping.
Not pictured is the rack and pinion gear. I took it apart, cleaned and re-greased it.

Not a lot going on with the boat right now. It is either too cold or raining. I am working on the base that the bow fuel tank will sit on.
 

lakelover

Rear Admiral
Joined
Mar 26, 2003
Messages
4,386
Re: "68" Mark Twain runabout 15 ft restoration with Pics

It's amazing what a good coat of paint will do. Looks great.
 

wambs8

Seaman
Joined
Aug 18, 2008
Messages
69
Re: "68" Mark Twain runabout 15 ft restoration with Pics

PICT00267.jpg

I had to cut this support to fit the fuel tank in. This is a 3/4" piece of plywood that I am fitting in to compensate for the cut out section. It will be tabbed to the existing piece of plywood. I didn't want to cut it but it was the only way to get this fuel tank in. I thought about moving the support about 1" to the rear but once I lower the cap onto the hull I would not be able to get the tank out again if I needed to. I will put a layer of 1708 on it to give it some more strength. I will be adding a trim piece to cover up the fuel tank.
PICT00423.jpg

I still have a little work to do with the belt sander. The fuel tank is 12 gallons. I wanted a 18 gallon tank but it never would of fit. I hope it doesn't affect the handling of the boat that much.
 

fastryker

Cadet
Joined
May 3, 2011
Messages
9
Re: "68" Mark Twain runabout 15 ft restoration with Pics

Yes, you are awesome at attention to details bro! I used to rig electronics and rewire yachts professionally in Florida and never saw nicer work! Even on the Pursuit and Tiara Boats new from the factory. You get a big thumbs up from me. And I'm like you, a perfectionist. By the way. I just purchased an old 1978 tri-hull Marquis Riviera I am going to restore to former glory and your pics and documentary are very inspirational to me! I hope I am able to do as good a job as you have done here. As the transom is rotted out and floor. Damn fine work brother! Hats off to you!
 
Top