76 Sea Ray Restoration/Upgrade

76SeaRay

Lieutenant Junior Grade
Joined
Aug 24, 2017
Messages
1,071
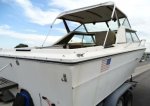
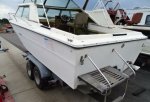
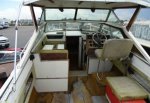
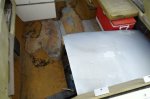
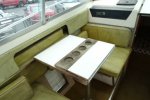
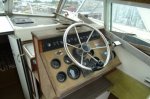
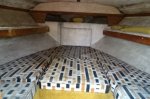
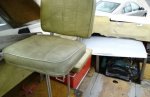
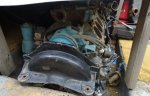
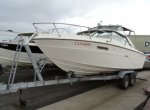
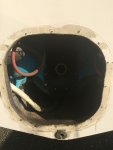
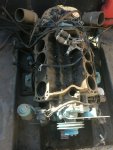
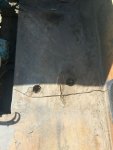
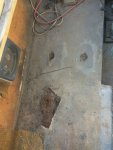
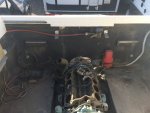
Not sure if this is the right forum to start. I just picked up this boat and trailer at auction like really cheap. The OMC engine is in pieces (unknown condition but all pieces appear to be in the boat), the tilt unit appears to be there (at least I think that is what it is called -- boot is missing), and the lower unit with prop is missing. It will need a lot of interior work and touch up to the hull for a lot of years of scrapes here and there.

So, the big question is; "what to do about the OMC engine and stern drive". Based upon what I read is some forums, it is best to sell of the parts and replace it with something else (mercruiser??). I am very handy with engines, transmissions, and all electrical wiring. Somewhat handy with pneumatics and/or hydraulics. Not at all handy with fiberglass or gelcoat.

​So, looking for advice on where to begin with the "drive train" so to speak...

Thanks for the input or redirection to another forum if needed...
 

Scott Danforth

Grumpy Vintage Moderator still playing with boats
Staff member
Joined
Jul 23, 2011
Messages
50,406
Welcome aboard.

we need pictures (see the tutorials)

regarding your "basket case" motor and drive. sell off the parts. it will cost you more $ to try to revive the motor and drive than it will to buy a rotten boat with a complete running motor and drive and transfer it. look to craigslist for "free boat, motor runs"

you are going to have to replace your transom, may as well replace it with a smaller opening for a mercruiser or volvo driveline

dont worry, once you get past the shock of having to completely gut your boat and the itch from grinding the fiberglass, actual 'glass work is easy
 

CrazyFinn

Petty Officer 1st Class
Joined
Dec 12, 2016
Messages
357
What size of Sea Ray is it?

I agree with Scott - sell the engine and drive parts for whatever you can get for them. Pick up an appropriate sized Mercruiser and put that in (Volvo would be good too, but parts are plentiful and easy to find for Mercruisers).

Based on the age of the boat, my guess is that the transom and stringers are due for replacement. When you're re-doing the transom, it's no big deal to make the hole the right size for a different drive.

And yes, please post some pictures.
 

76SeaRay

Lieutenant Junior Grade
Joined
Aug 24, 2017
Messages
1,071
Oh yeah, it is a 22 foot with the hardtop cabin. I got it to the storage yard yesterday and started unloading all the engine parts. Looks like there are a few extra parts. Ripped up the old indoor/outdoor carpet behind the cabin which was original I believe (ugly color too). Looks like the floor on the starboard side has rot so guessing you are right about replacing the stringers. The OMC is going to be parted out. I think it is a 76 235 V8 but will get the engine numbers off it if I can find them. Going to clean the cylinders and jump the starter to see if it will turn over. It has the all the engine parts but only the tilt unit for the outdrive. Trying to decide on a Chevy Engine in front of a Mercruiser outdrive or just go all Mercruiser on the restoration. I am more of a Chevy guy and have routinely rebuilt Chevy engines from early years up to 1992. Would like the restoration to be a fuel injected engine. I just don't know how different a Chevy marine engine is from a regular car engine. Guess I will pop over to the engine forums for that investigation.

The transom looks solid just too bad it has that giant hole. Based upon the YouTube video from FriscoBoater on his 79 Sea Ray, I think I can probably do the transom myself. The question will be how much do I need to replace to cover that big hole and how to cutout the transom without going through the outer skin. In his video, his outer skin was really thick and much of his transom was rotted so it came apart easily.. The transom on mine is much larger than his though and being solid may be a pain to separate.

So, I will know more in the coming months as I pull it apart and see how far forward I have to replace wood. Planning ahead (once I decide on the engine) I will need to see if someone has information on motor mount locations and spacing. Going to take a wild guess that you could get either OMC or Mercruiser on this boat so the stringers are set up to work with either motor mounts. But, could I be so lucky. Anyway, this looks like a year long project. The boat is in Denver Colorado right now since I am working here temporarily. I will be trailering it to Washington state in the spring some time. I have to work outside in a storage yard without power right now but when I get it to Washington, I have a three bay shop there.
 

76SeaRay

Lieutenant Junior Grade
Joined
Aug 24, 2017
Messages
1,071
Pictures coming soon.. Did some more work today cleaning the dirt and sun rotted tarp pieces out of the boat.. I see there are two holes on each side of the floor that appear to be the fill holes for the floatation foam under the floor.. Wondering if that foam will be ok to leave in there. Haven't pulled up the flooring yet to see what's there..
 

ondarvr

Supreme Mariner
Joined
Apr 6, 2005
Messages
11,527
If the foam is good it will be a miracle, we frequently tell people that if there's no rot or waterlogged foam in a boat that old you better buy a lottery ticket.
 

76SeaRay

Lieutenant Junior Grade
Joined
Aug 24, 2017
Messages
1,071
So, a question on the foam as the floor has to come out anyway. The factory appeared to have pumped foam into the cavity, hence the two holes on each side of the boat next to the engine bay. How do you replace it in restoration? Is there a foam available that you can pour in (self expanding) or do most people replace it with foam "bricks" cut to size and dropped in?
 

tpenfield

Moderator
Staff member
Joined
Jul 18, 2011
Messages
18,192
2-part urethane foam is available in various densities. 2 lb/cubic foot is good for general structural reinforcement and flotation. 4 lb/cubic foot density is used for installing fuel tanks or when more structural strength is needed.

Most folks order the 'kits' online, unless they have a fiberglass supply retailer nearby.

Most restorations involve replacing the structure (stingers, bulkheads, etc), then laying down the floor. Then holes are made in the floor for each 'chamber' in the structure. You will need one hole for pouring and at least one hole to let air out as the foam expands.

Mixing and pouring has to be quick (under 1 minute), because the foam liquid starts to expand. The specified densities and volume of the kits are based on the temperature being around 85 F degrees . . . hotter is better. Colder will not yield good results.
 

76SeaRay

Lieutenant Junior Grade
Joined
Aug 24, 2017
Messages
1,071
I think that is the same stuff I used way back in the late 70's to put foam insulation on my fiberglass hot tub.. Yup, it sets fast. I remember having some voids on my hot tub job. Does it reliably fill the space pouring through the holes or would it be better to pour it in before laying the floor and the trim it down flat?

Anyway, hot dusty day today doing more demo work.. Pulled off the appearance panels port and starboard where all the wiring, steering controls, throttle etc. run behind them. The support wood is rotted there so more fun... Looks like I will be pulling out seats, cabinets, captains control station and maybe the little galley to get at the whole floor. It looks like the water damage is from middle to the stern based upon what I see over the fuel tank.

Cleaning off the transom of wires, screws, brackets.. This boat has hydraulic trim tabs.. There is a pump mounted to the transom with hydraulic lines running through the transom to the hydraulic actuator cylinders.. Don't know if it works but would this system be worth keeping or should that be brought up to something new. Do they still use hydraulics for the trim tabs?

Thanks...
 

76SeaRay

Lieutenant Junior Grade
Joined
Aug 24, 2017
Messages
1,071
No Title

Picture time.. Will see if these upload ok..
 

Attachments

  • photo275514.jpg
    photo275514.jpg
    45.7 KB · Views: 1
  • photo275515.jpg
    photo275515.jpg
    60 KB · Views: 1
  • photo275516.jpg
    photo275516.jpg
    65.8 KB · Views: 1
  • photo275517.jpg
    photo275517.jpg
    48.6 KB · Views: 1
  • photo275518.jpg
    photo275518.jpg
    53.8 KB · Views: 1

76SeaRay

Lieutenant Junior Grade
Joined
Aug 24, 2017
Messages
1,071
No Title

A few more before demo.. Love the engine pic peaking out from under the car hood??.. Will add a couple of more tomorrow showing after the partial demo..
 

Attachments

  • photo275519.jpg
    photo275519.jpg
    67.3 KB · Views: 1
  • photo275520.jpg
    photo275520.jpg
    63 KB · Views: 1
  • photo275521.jpg
    photo275521.jpg
    52.4 KB · Views: 1
  • photo275522.jpg
    photo275522.jpg
    59.8 KB · Views: 1

76SeaRay

Lieutenant Junior Grade
Joined
Aug 24, 2017
Messages
1,071
No Title

Oops, one more.. Forgot the front shot sitting in the auction yard...
 

Attachments

  • photo275523.jpg
    photo275523.jpg
    40.6 KB · Views: 1

76SeaRay

Lieutenant Junior Grade
Joined
Aug 24, 2017
Messages
1,071
No Title

More pics showing the transom and floor.
 

Attachments

  • photo275542.jpg
    photo275542.jpg
    209.4 KB · Views: 1
  • photo275543.jpg
    photo275543.jpg
    214.5 KB · Views: 1
  • photo275544.jpg
    photo275544.jpg
    206.1 KB · Views: 1
  • photo275545.jpg
    photo275545.jpg
    232.9 KB · Views: 1
  • photo275546.jpg
    photo275546.jpg
    188.9 KB · Views: 1

CrazyFinn

Petty Officer 1st Class
Joined
Dec 12, 2016
Messages
357
From my experience with old Sea Rays (I have two of them now), that foam will need to come out, if only so you can properly replace the transom and stringers.

That's a nice boat. Have fun with it!
 

76SeaRay

Lieutenant Junior Grade
Joined
Aug 24, 2017
Messages
1,071
Demo continues. Have everything out of the inside on the port side up to the V birth bulk head. Next will be the steering/control station followed by the galley. V birth bulkhead will come after that I guess. Still haven't found an easy way (and maybe there is none) to get the floor pulled up away from the foam floatation. Just working on the piece over the gas tank in the center of the boat so far. Trying one of those really thin saw blades next sliding it between the deck and the gas tank to see if I can cut the foam.
 

76SeaRay

Lieutenant Junior Grade
Joined
Aug 24, 2017
Messages
1,071
Update. I was able to get the deck piece off the top of the fuel tank. The back foot or so of the deck was rotted but the front 3 feet or so was in good shape and didn't look like it had been wet at all. All of the stringers and deck support forward of amidships "ring" pretty good when struck with a hammer. So far, it looks like the rot is in the deck and the cross rib behind the gas tank. This is coincidentally right below the back edge of the hardtop where water will run off. Next I will "saw" the foam between the gas tank and stringers so I can get the tank out and check it for leaks. I also pulled out the V birth bulkhead on the port side. Still in the evaluation stage at this point to see what is going to be needed and still hopeful that most of the problem is with the decking and not down into the stringers. Going to see if I can pull the rest of the OMC engine out the weekend of the 23rd and get a better idea of the stringers around the engine mounts.

Unfortunately, the storage yard guy said I can't work on it any more in the storage lot..... No sense of humor... Will be glad when I get it up to my shop in southwest Washington... Anyway, my truck is up in Washington state with the transmission out and I am working here in Denver where I bought the boat, so, I have to rent a truck and pull it to a friend's lot when I want to work on it. That will slow the process. The things we do to accommodate boating..
 

76SeaRay

Lieutenant Junior Grade
Joined
Aug 24, 2017
Messages
1,071
Getting back to planning the transom rebuild. Still traveling this weekend but next weekend the old OMC block gets pulled out, power washed to get the oil and dirt out, and test drills done to assess where the bad wood ends.

So, you can see from the pictures the size of the OMC hole. My latest question is in filling the hull portion of that hole. Is it best to cut out the transom plywood and then fill the hole in the hull overlapping fiberglass on the inside of the hull or replace the plywood on the inside first and then fill in the hole in the hull against the new plywood? Hope this makes sense.

Also, I am planning to complete the hole and transom repair and then cut the Mercruiser keyhole on a clean transom. Is that the best way or should I replace the plywood on the inside, cut the keyhole in the plywood, and then fill in the hull to the edges of the keyhole?

Thanks..
 

CrazyFinn

Petty Officer 1st Class
Joined
Dec 12, 2016
Messages
357
Here's what I did on my boat... It wasn't an OMC hole, but rather a mutated, butchered hole with globs of silicone and other gunk that had been modified who knows how many times...

I carved out all of the wood from the inside right to the outer glass, made sure I had a smooth clean surface. Cut a cardboard template for the transom, and located the Mercruiser keyhole on that. I then made the new wood transom, glued it together, etc. while still out of the boat, and applied a layer of glass/poly resin to the side that was going against the existing outer skin. I then cut the keyhole in the plywood using my template. I didn't try to plug the big hole in the outer skin from the inside, as I wanted to keep the inner side of the skin as flat as possible. Applying the glass to the plywood before I installed it essentially would do the same thing once it was all installed.

I then installed the new transom in the boat - the keyhole cutout gave me a place to put clamps, etc to hold it in place. I used a poly resin PB mix with Cabosil and chopped strands to glue it in.

Once that was done, I tabbed it in, applied the layers of glass to the inside (right over the keyhole). I just cut out the keyhole again when it had cured.

On the outside of the boat, I cleaned the transom thoroughly, sanded the outer skin (it was 1/4" thick) to a taper around the hole, wiped it all down with acetone, and then filled it in as needed with pb and layers of glass. This is when I also filled in the multitude of other holes in the transom skin as well. Many of them already had the PB mix from the inside oozing out/hardened/filling the holes partially.

You can see before/after pics of that here: http://forums.iboats.com/forum/boat...ray-rebuild-and-mods-splashed-sept-2017/page6
 
Top