80 Glastron gt-150 rebuild

sphelps

Supreme Mariner
Joined
Nov 16, 2011
Messages
11,476
I would avoid that if possible .. Equal pressure on the whole transom is the key to a good lamination of new transom to skin ..
You don’t want to over tighten it . Just snug it up equally across the whole transom ..
 

78 glastron

Seaman Apprentice
Joined
Nov 23, 2018
Messages
32
I was finally able to to get some pictures. The delam is not as big as I thought. I’m more concerned about the wave of the transom from top to bottom. What it looks like is a pocket of adhesive the got trapped while the rest of the area was compressed around it.

I can’t post pics for some reason it pops up with an error about something disabled or something.

basically my transom looks like this
|
)
|
|
​​​​​​​|
 
Last edited:

archbuilder

Vice Admiral
Joined
Sep 12, 2009
Messages
5,697
I love these boat, I can't believe I just saw this thread. I almost bought one a while back.....like I need another boat! If I understand your issue it sounds more cosmetic, but maybe not. The pics will help us. Electronics are great.....when they work! When you do get some posted we can give you some better feedback. These are great little boats, you will be happy to get her back on the water!
 

78 glastron

Seaman Apprentice
Joined
Nov 23, 2018
Messages
32
Finally able to post pics again. What do you guys think?
 

Attachments

  • photo330129.jpg
    photo330129.jpg
    212.6 KB · Views: 8
  • photo330130.jpg
    photo330130.jpg
    456.1 KB · Views: 8

sphelps

Supreme Mariner
Joined
Nov 16, 2011
Messages
11,476
That's strange .. So where is the hollow part ? the area that sticks out the most ? Looks like you had a scrap piece of plywood accidentally stuck back there or something .LOL! What is the green tape for ?
 

78 glastron

Seaman Apprentice
Joined
Nov 23, 2018
Messages
32
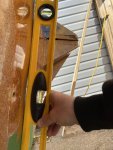
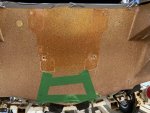
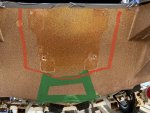
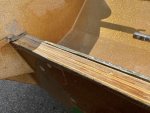
The area inside the green tape is the hollow spot. The bulge is between the upper and lower outboard mount holes.

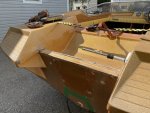
There is no wood behind it haha. Just my bad clamping. It looked alright when I clamped it but must have settled after I left it to set up.

I wish I caught it when it first happened as I would have just re did it then. But now everything’s tabbed in to stringers, decks on, expanding foam has been put in. I’m not very happy with how the transom turned out but hindsight’s 20/20 right.

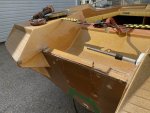
I figure I have 4 options:

1) leave it as is - probably not
2) tip out everything and start over - too expensive for that
3) cut the outside skin, remove excess adhesive, re-bond skin - only a small area would have to be removed.
4) fabricate a stainless plate and install with pb underneath to flatten it - seems like the easiest way but don’t feel it’s a good option.
 

sphelps

Supreme Mariner
Joined
Nov 16, 2011
Messages
11,476
If it were me i think option 3 at this point would be the way i would go ..There is a lot of force down low on the transom from the motor pushing down on it .. Grind the old gellcoat back a good bit around the cut out area to get good bond and taper the edges .. Then a few layers of 1708 overlapping the edges 5 of 6 inches Add a filler layer or too in the recess then fair and paint ...
Others may see it differently idk ...
 

78 glastron

Seaman Apprentice
Joined
Nov 23, 2018
Messages
32
That’s what I was thinking as well. I would obviously like to fix it from the inside but kind of past that point. If I was rich and retired sure I could start over haha.

This will be my plan of attack, I will leave a 4” flange around the outside of the transom and cut out the Center area. From there I will remove the old adhesive and taper the tabs back 12:1. I will also be able to kind of dig out under the flanges to aid in getting a flat bond this time.

should I re use the cut out skin if I don’t destroy it on removal or should I build it back out with 1708.
 

Attachments

  • photo330137.jpg
    photo330137.jpg
    1.6 MB · Views: 1

sphelps

Supreme Mariner
Joined
Nov 16, 2011
Messages
11,476
You probably could but grind the gell off ..
Say good bye to the sparkles ...:D
 

78 glastron

Seaman Apprentice
Joined
Nov 23, 2018
Messages
32
I was planning on re painting the boat next year anyway. The gel is pretty bad in some spots. I will be attempting to cut and buff it but having a painted area on the back I’m okay with. I’ll probably throw some black on it just to seal it. Had to paint the top cap for the transom anyway
 

78 glastron

Seaman Apprentice
Joined
Nov 23, 2018
Messages
32
Rebuild cap over transom GT-150

Hey all,

looking for some advise on how to fix the cap over the transom. It was cut out when trying to separate the cap from the hull. The cap was bonded to the transom in the splashwell area. There was a lot of filler between the old cap and transom to build it up where the motor hangs

So would I use 1708 and scarf it into the splashwell sides and front or layers of csm to build the area up? Or something else entirely.

I’ve also seen some forums where people say to not bond the cap to the transom in the splashwell area and some do?

thank you in advance
 

Attachments

  • photo340041.jpg
    photo340041.jpg
    143.3 KB · Views: 7
  • photo340042.jpg
    photo340042.jpg
    139.5 KB · Views: 7
  • photo340043.jpg
    photo340043.jpg
    140.6 KB · Views: 7
  • photo340043.jpg
    photo340043.jpg
    140.6 KB · Views: 7

GA_Boater

Honorary Moderator Emeritus
Joined
May 24, 2011
Messages
49,038
Please keep all your questions about your rebuild in this topic. We are easily confused when multiple topics are running around the forum when they are all specific to your rebuild.

Thanks.
 

Original Thor

Seaman
Joined
Jun 11, 2020
Messages
61
Nice boat.

I just finished my glastron restore here myself and made the same mistake on the transom myself just not quite as bad. But when I put my motor on it actually fit the hump like a glove. So I'm wondering if they slapped the motor on before it was fully cured and warped the mount.

For your transom cover there what if you got a piece of aluminum bent up to fit over top and pb it on with some stainless rivets to hold it on.
 

78 glastron

Seaman Apprentice
Joined
Nov 23, 2018
Messages
32
I could bend up a stainless “U” shape and either rivet it on or bolt it straight through the transom. that would be a lot better than the angle section that wasn’t even sealed where the cap and transom met from factory. would that thick chunk of PB be prone to cracking? It is fairly thick, 1/2” to 3/4” ish, don’t have the exact measurement. I could build up to the height with strips of csm.

as for the back skin that’s a big oops on my part. Just got carried away in the rebuild and didn’t stop to think forward. I will be cutting the section out and cleaning out behind it and re bonding it. Then I’ll scarf the sides of the cut 3-4 “ depending on the thickness of the glass and vacuum lay up some layers of 1708.
 
Top