'89 Arriva 2050 Restoration

todhunter

Canoeist
Joined
Sep 15, 2020
Messages
1,342
Spend the money on a dust deputy, a long shop vac hose (mie is 13ft, I think), and a remote control outlet. The long hose allows your vacuum to be out of the boat, giving you space to work. The remote outlet lets you control the vacuum that is now out of your reach, and the dust deputy means you'll almost never clog another shop vacuum filter.

Grinder with a flap disc is the way. Hold it in one hand, vacuum hose in the other, or get creative with your legs like Scott said. Build an air tight tent over the boat with painters plastic and painters tape. Duct in fresh air with a fan on low through the keyhole.
 

Scott Danforth

Grumpy Vintage Moderator still playing with boats
Staff member
Joined
Jul 23, 2011
Messages
51,317
I forgot to mention. I use a 6.5hp shop vac with 3 hoses coupled together. the shop vac sits outside the boat.
 

Crazy_Pilot

Seaman Apprentice
Joined
Oct 27, 2017
Messages
37
Spend the money on a dust deputy, a long shop vac hose (mie is 13ft, I think), and a remote control outlet. The long hose allows your vacuum to be out of the boat, giving you space to work. The remote outlet lets you control the vacuum that is now out of your reach, and the dust deputy means you'll almost never clog another shop vacuum filter.

Grinder with a flap disc is the way. Hold it in one hand, vacuum hose in the other, or get creative with your legs like Scott said. Build an air tight tent over the boat with painters plastic and painters tape. Duct in fresh air with a fan on low through the keyhole.
Already on the way. My woodworking neighbour lent me his separator, I have a 20 ft hose arriving today and put a switched extension cord together over the weekend. So far I've been doing the boot on the hose dance and shooting the dust into and while that gets 90% there's still the really light stuff that floats out of suction range.

The boat is already in one of those garage in a box tents and I'm thinking of putting a pair of box fans with air filters at one end to draw the inevitable floating dust and capture it.
 

Crazy_Pilot

Seaman Apprentice
Joined
Oct 27, 2017
Messages
37
I dissected a section of removed stringer for fun. It appears that solid boards were in style when this boat was made. My nose says it's some variety of cedar but I'm not a woodworker so that's just a guess. The glass was vaguely bonded on one face and not at all on the other.

IMG_20250701_175909.jpg

IMG_20250701_175924.jpg
 

Crazy_Pilot

Seaman Apprentice
Joined
Oct 27, 2017
Messages
37
Solid wood is bad
Agreed. They didn't even use clear boards, the spot where they keyed the ski locker bulkhead into the stringer went through a massive knot in the stringer and at first I was confused when a big chunk of round wood fell out. I'll be using 3/4 ply for the stringers when it goes back together.
 

Pmt133

Ensign
Joined
Jan 6, 2022
Messages
994
On my 84, I ended up using a carbide carving disc as it seemed most efficient for grinding.
One of these:
58126_W3.jpg

It worked well but you still had to hit some areas with a flap disc... IE didnt fit. 36 grit and down if you can find them, work better imo.

Just a comparison between the two, the metal disc does great. The dust collector attachments are crap. Too bulky to do intricate work like needed most of the time.
20240427_090649.jpg

My outer stringers were a similar solid board... if you wanna call them stringers even. They were tabbed in on one side with no cap. I think they were there for deck support and staples. When I rebuilt I replaced them with ply and made them structural.

You're going to be amazed how different the boat feels when you're done. Mine always felt solid but it was a totally different feeling after all that work. And with all the wet foam removed below the waterline, it rolls less when anchored up.

And I joked about how much lighter mine would be after I fixed everything... but with how much better built it is, I think it actually made no difference. I picked up no speed. A shame, I should've weighted it before getting it just to see.

Good luck. You're doing great.
 

Crazy_Pilot

Seaman Apprentice
Joined
Oct 27, 2017
Messages
37
On my 84, I ended up using a carbide carving disc as it seemed most efficient for grinding.

I've been thinking about those. Some of the tabbing in my boat is just insanely thick, a good 3/8-1/2 inch in areas. I hate the idea of leaving it there because it's so poorly done, but at the same time remembering that it's survived 30+ years and will take me ages to remove. If I could find something that would take it off in chips instead of dust that would be a big help. Some of the wood carving discs have a set of teeth that look like a horror movie prop.

It's a little bit fun to look at the construction forensically as it take it apart. The hull skin is woven glass. On top of that is a layer of neat (no glass/filler/etc) resin, with lots of air bubbles. Next is a very dry layer of chopped mat poorly bonded to the resin (I can chip it off with a chisel), and then a massively thick layer of resin rich chopped mat, and finally gel wherever that was used. I've taken the bilge and most of the transom back down to the base woven layer and will build it back up from there.
 

Pmt133

Ensign
Joined
Jan 6, 2022
Messages
994
I've been thinking about those. Some of the tabbing in my boat is just insanely thick, a good 3/8-1/2 inch in areas. I hate the idea of leaving it there because it's so poorly done, but at the same time remembering that it's survived 30+ years and will take me ages to remove. If I could find something that would take it off in chips instead of dust that would be a big help. Some of the wood carving discs have a set of teeth that look like a horror movie prop.

It's a little bit fun to look at the construction forensically as it take it apart. The hull skin is woven glass. On top of that is a layer of neat (no glass/filler/etc) resin, with lots of air bubbles. Next is a very dry layer of chopped mat poorly bonded to the resin (I can chip it off with a chisel), and then a massively thick layer of resin rich chopped mat, and finally gel wherever that was used. I've taken the bilge and most of the transom back down to the base woven layer and will build it back up from there.
I know the type. I used this for grinding off my transom.
58125_w5.jpg
While rotted, it was still constructed well enough and there was enough of a lack of room that it was way too time consuming to go with chop and pry. This worked great for that, getting cut tabbing flat and chipping away skins. It was my general demolition part after cutting the major section out.

I don't reccomend it on really thick glass though as it has a tendency to kick back. Got a few good cuts from this not from that but from moving while it was spinning down accidentally.
 

MikeSchinlaub

Chief Petty Officer
Joined
Jan 14, 2025
Messages
406
On my 84, I ended up using a carbide carving disc as it seemed most efficient for grinding.
One of these:
View attachment 409217
Man, I just bent mine today. My DA vibrated it off the swim platform and on to the ground. I haven't even had this one very long.

They don't work well on wood though, you'll still need a 36 geit roloc or flap disc for that.
 

Crazy_Pilot

Seaman Apprentice
Joined
Oct 27, 2017
Messages
37
Well another scorching hot weekend so what's better than getting suited up and turning fiberglass into dust? The tent turns into a greenhouse when the sun hits so I put the garden hose on top on a mist setting. Keeping it wet helped massively.

IMG_20250705_124621.jpg

The philosophy when this boat was build seems to have been "You don't have to do it well if you do it lots". My god the tabbing is ridiculous.

Some of the transom tabbing. I've been taking this off with a chisel, it just lifts off the roving.
IMG_20250713_201412.jpg

I sharpened a drywall spreader and have been tapping it under the tabbing to lift off big sheets. The first inch is barely bonded to the hull and peels away with barely any effort.
IMG_20250713_201650.jpg

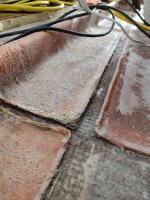
More absurdly thick, poorly bonded tabbing. In the piece on the right side of the picture you can see a lighter pink underneath the edge. All of that is free from the hull skin below.
IMG_20250713_201430.jpg

Dust management setup. The vacuum has a bag inside.
IMG_20250713_201814.jpg

My complement of demo tools (recip saw not in the picture). The surface grinder is great for dust control. It came with a very small adapter that choked flow but I made a new one on the 3D printer and it pulls really well.
IMG_20250713_201657.jpg

And this guy. This is the most terrifying tool I've ever held. It instantly vaporizes anything it touches and requires the utmost respect and care. Bump it into something and it'll carve a half inch deep slot before you know you've made a mistake. It does work brilliantly for striping off the thick tabbing though! The most frightening part is that it's a 5 inch disc so my 4.5 inch guard doesn't fit. I'm wearing doubled up gloves whenever it's running.
IMG_20250706_183720.jpg

My biggest enemy is the heat. Not so much for me but for the tools. The reason I have so many things out is that I can't run any of them more than a handful of minutes before they're getting hot enough to feel through my gloves. I rotate through them and hit different areas to spread out the abuse.

IMG_20250713_201340.jpg
 

Attachments

  • IMG_20250713_201430.jpg
    IMG_20250713_201430.jpg
    2.9 MB · Views: 0

Crazy_Pilot

Seaman Apprentice
Joined
Oct 27, 2017
Messages
37
We fun stuff is almost over is appears
Nah, still got lots of fun left. I've only just started ripping the bow seats apart, still have to pull out the wood strips buried in the chines, lots of grinding.... What I really need is a vacation where I can just work on this thing for a few straight days.
 

Crazy_Pilot

Seaman Apprentice
Joined
Oct 27, 2017
Messages
37
Well after a few weeks visiting family I can finally get back to the boat. Walking around in the hull I can feel the fiberglass flexing as I remove the old stringers and tabbing so I want to start putting some structure back before I go too much further into the demo. And for my own sanity I need to make something rather than just remove. At present I've got the transom ground down to the roving and the main stringers and tabbing removed. I've left the little mini stringers in place for now, these are above the trailer bunks so I like having them there to keep the hull a little more rigid.

I have a pile of window shims left over from previous projects so I decided to use those and a hot glue gun to make my template. I don't really like the pink foam route - it's a bigger mess, it's still a lot of cut and fit, and I'd rather be putting wood into the landfill than foam if I can help it.

IMG_20250831_231720.jpg

The first layer is 3/4. I'll be following this up with smaller layers of 1/2".
IMG_20250901_173555.jpg

The upholstery is also going to need attention soon so I've been doodling up new designs. Working in engineering gives me access to CAD software, so...
Seat Render 1.jpg
 

MikeSchinlaub

Chief Petty Officer
Joined
Jan 14, 2025
Messages
406
IMG_20250901_173555.jpg

Looking good. Some comments...

1. It looks like you have it marked for this, but I thought I would say it anyway. You should round these corners a bit. Fiberglass hates corners and you'll regret it when you're glassing. Same with the edges of the wood. Anywhere that glass will need to wrap around.

2. Grind this area some more. Get rid of all of that gel.

3. I would suggest pulling out this bit of wood, so you can glass directly to the hull here.

4. I would extend the ground area on the bottom a bit. Better to have more than you need than not enough.

5. When you glass this in, assuming there is a layer of roving on top, put a piece of csm over the edges. It will lay out smoother and look nicer, with less grinding, when you gel the inside.
 

Crazy_Pilot

Seaman Apprentice
Joined
Oct 27, 2017
Messages
37
Looking good. Some comments...

1. It looks like you have it marked for this, but I thought I would say it anyway. You should round these corners a bit. Fiberglass hates corners and you'll regret it when you're glassing. Same with the edges of the wood. Anywhere that glass will need to wrap around.
Oh absolutely. This is only the first layer, the edges will all get dressed once I have the two half inch plies bonded on.

2. Grind this area some more. Get rid of all of that gel.
For sure. I pulled out the wood block in there that backs up the trailer rings so there will be a bunch of work in those spaces as well and everything will be cleaned out. Would be so much easier with the cap pulled but that's just too much of a commitment right now.

3. I would suggest pulling out this bit of wood, so you can glass directly to the hull here.
That guy is the backing for the boarding ladder so it's got to stay. I will be glassing over it again to fix the voids that they left but I don't want to take the wood itself out.

4. I would extend the ground area on the bottom a bit. Better to have more than you need than not enough.
That's all coming out later. There is a little stub stringer in there that is giving the hull some stiffness on the bunks and I want to keep that for a while. Once the transom is in and the main stringers are bedded it'll get cut out and ground down.

5. When you glass this in, assuming there is a layer of roving on top, put a piece of csm over the edges. It will lay out smoother and look nicer, with less grinding, when you gel the inside.
Will do!
 

MikeSchinlaub

Chief Petty Officer
Joined
Jan 14, 2025
Messages
406
Mike, on #1 does that also include the edges so like maybe a sort of chamfer
Basically anywhere there is a sharp corner should be rounded.

Fiberglass wants to be straight. If you could get an individual strand from some csm, bend it in an arch, it will spring back straight. Around a rounded corner, the resin will hold it down. If you round the corners with a grinder, it will leave tiny points because you can't move your hands just perfect to make it smooth. Even those are enough to cause air bubbles, so finish by hand with some 80 grit. That should give a nice smooth round.

It's not as bad with cloth because the fibers are left long, and aren't stuck together with adhesive, although the resin breaks that down anyway.

A sharp corner also has less surface area for anyrhing to try to stick to.

@Crazy_Pilot After you have all the pieces together, cut out a half circle where the drain plug goes. When you set the transom in, fill that area with putty. This is so the drain and its screws aren't going through the wood, and if they leak it won't soak into the exposed wood.
 
Top