97 Sea Ray 210 cockpit liner

Joined
Feb 5, 2017
Messages
7
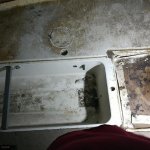
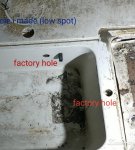
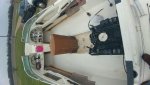
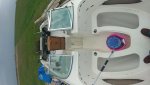
I can not find any information on my question, hoping to get a little insight from the experiences some of you may have had. I have a 1997 Sea Ray 210 BR. The floor is not soft but has some sag to it right behind the helm seat and on the port side in front of the rear seat, it does have slight give to it. Has anyone cut out the cockpit liner? What type of support is under it? I have removed the factory plugs i assume are there to place the foam in the hull but all i see is foam, dry foam to the edge of the plugged hole. Any insight would be helpful before i completely dismantle the boat for repair. Thanks in advance and happy boating!
 

tpenfield

Moderator
Staff member
Joined
Jul 18, 2011
Messages
18,564
We sure are seeing a bunch of Sea Ray boats on the restoration forum lately. Wonder if there is a epidemic in the making :D

Can you post some pictures. I know that in the mid-1990's the smaller Sea Rays still had the plywood floor rather than the cockpit liner. Usually the cockpit liner rests upon the stringer grid in a smaller boat (bowriders, runabouts, etc). Cruisers have the cockpit liner suspended above the cabin and supported by the bulkheads for the most part.

I would not cut out a cockpit liner, but rather dismantle the boat at the rubrail.
 
Joined
Feb 5, 2017
Messages
7
So i am having a difficult time getting the photo to upload. I actually used a holesaw and made an inspection hole(did not like to do it but made sure it was a small as possible). I found that the backing supports for the seat base were no longer attached on the side closest to the ski locker. I have found absolutely nothing rotten, but i am seeing where adhesion is an issue. 😔 i feel like its going to take dismantling the boat and removing the liner to complete the repair properly. The foam also has seem to shrunk about 1 inch from the bottom of the floor. I will be replacing the foam anyway.
 

tpenfield

Moderator
Staff member
Joined
Jul 18, 2011
Messages
18,564
You need to have at least 3 posts to be able to upload pictures. There is a set of instructions in the stickies on uploading photos.

If you drilled into the floor and hit the foam right away, then it does not sound like a "cockpit liner" . . . With a cockpit liner you would have drilled through the liner (i.e floor) and then the top of the stringer box in order to see the foam.
 
Joined
Feb 5, 2017
Messages
7
Ok i may have misunderstood what a cockpit liner is. My Sea Ray has a fiberglass finished with gelcoat floor that is one solid piece from the transom foward to under the bow seating, it makes up the bilge, the fuel tank mount, ski locker and is glued or is attached with resin to the hull around the entire boat. There are no seams and i cant find any wood or signs of wood anywhere but the transom. Thats the best i know how to describe it. I found the low spots in floor after removing all upholstery and carpet to replace it all(trying to get it in pristine condition for this season). I really appreciate your help.
 

tpenfield

Moderator
Staff member
Joined
Jul 18, 2011
Messages
18,564
You should be able to post pictures at this point, now that you have 3 posts. Pictures will really help.
 
Joined
Feb 5, 2017
Messages
7
No Title

Finally was able to get the pictures up.
 

Attachments

  • photo258425.jpg
    photo258425.jpg
    31 KB · Views: 2
  • photo258426.jpg
    photo258426.jpg
    28.3 KB · Views: 2

tpenfield

Moderator
Staff member
Joined
Jul 18, 2011
Messages
18,564
Pictures do help . . . looks sort of like a liner, but not completely. If you can post a few more that would help as well.

A few questions though . . .

Where the red arrows are, looks like a few inch high sidewall as part of the cockpit deck. What is beyond the sidewall?

Green arrow where you drilled the hole. . . Was it mostly plywood that you were drilling through or fiberglass/wood? 1 layer or 2 layers until you got into the foam chamber? What does the core/hole look like?

The yellow arrow . . . The ski locker looks like a fiberglass liner . . . the line where the yellow arrow points . . . is the ski locker and the adjoining deck/floor separate pieces or continuous?

SeaRay210.png

Also, you mentioned "factory plugs" . . . can you post some pictures of those areas?

Anyway, It is important to know how your boat is built before you start cutting . . . this boat may be a lot like FriscoBoater's Sea Ray 220 BR, which was restored on this forum about 5 years ago.
 
Joined
Feb 5, 2017
Messages
7
No Title

Yes the red arrows one is pointing to a lip that is part of the deck. The other is the actual hull of the boat(the resin color).

The green arrow is the hole i drilled. I found a couple pieces of wood glassed into the under side of the deck. I actually made the hole and can only see about 1/2 " of the wood, it does not go all the way to the ski locker. Looks like the glass broke around the wood allowing it to flex. All dry and solid wood there. Under that is foam about a half inch gap from bottom of deck to top of the foam.(not sure if the foam was also being used as some type of support)

There is no seam at the yellow arrow as that is just dirt. I found way more fine dirt imbedded into all the carpet than i was expecting. I have always made sure to keep it covered and cleaned after every weekend but with 2600 hours i guess it takes a toll on everything.

I am very familiar with friscoboater. I have actually seen alot of his posts and watched his Sea Ray repair via YouTube. I was very impressed with his repair. Hoping mine will not be as extensive! 😀

Inside the factory holes all i see is foam.
 

Attachments

  • photo258444.jpg
    photo258444.jpg
    44.2 KB · Views: 2

tpenfield

Moderator
Staff member
Joined
Jul 18, 2011
Messages
18,564
It does seem like some sort of a liner, just not the full 'clamshell' liner that a lot of the newer boats have. So, your repair will be a bit different than Frisco's repair. The cockpit floor (deck) is resting on the stringer grid. How do the stringers look as you go further aft, like along the fuel tank and into the engine compartment ?

What exactly are you looking to fix with the dismantling? Just the soft floor spots?

The foam on the top will be dry. It is a matter of the foam being dry at the lower regions of the foam against the hull surface. The nice thing is with those few access holes that you showed in the pictures, you could take a core sample of the foam to see if it is wet at the bottom versus dry at the top.

The foam serves a dual purpose of structural and flotation.
 
Joined
Feb 5, 2017
Messages
7
I wouldn't say the spots are soft. More like the floor has two low places that can be felt when walking in it. I believe i found the issue. There are wood reinforcements at the chair mount that were glassed into the deck. They have come loose. When i pry the boards back into position floor is level! Now to figure the best repair process.

Also had a former surveyor drill into it and found no rot or signs of soaked wood. Everything was solid! He checked in about 8 locations ( boat has had a couple inspections already he said) that were already drilled and made a couple more.
 
Joined
Feb 5, 2017
Messages
7
No Title

Just a little update.....boat is about 90% ready for the new interior. A little more clean up and a screw or two here or there. All the interior should be ready in 2 weeks. New alternator, starter, battery and cables, gauges fuel sender and a completely new audio system.
 

Attachments

  • photo258841.jpg
    photo258841.jpg
    48.8 KB · Views: 2
  • photo258843.jpg
    photo258843.jpg
    45.3 KB · Views: 2
Top