Sea Rider
Supreme Mariner
- Joined
- Sep 20, 2008
- Messages
- 12,345
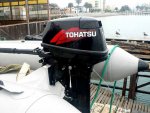
A Tohatsu Especial.-
Decided to write & post this handy ABC Sib-Rib Installation Guidelines so new and old boaters use it as a reference from where to start or re start if totally not satisfied with their current sib/rib engine set up general performance. To avoid forum posters posting different ideas, myths or getting out of the central theme by other useless comparisons, these guidelines will solely and exclusively shall be applied to all OB’s brands up to max 50 HP, tiller driven, with mechanical trim, tilt and handle clamp screw. Although full concepts are quite applicable to all outboard boats in general.-
How boating passion began : Started boating way back in 96 when first bought a second hand mint condition OMC made by Zodiac 305 Mt sib along a 2 strokes Evinrude 9.9 HP engine that came as a package. Next day went boating with a friend, our first time inexperienced sib assembly was done easily fast, the nice issue was that sib came along with a Zodiac yellow round pressure gauge, push type, fixed pointing needle, internal rotating dial with well-defined psi color segments.-
After sib’s inflation completion to factory recommended working psi with delivered gauge, was immediately launched to sea, engine was secured to transom, re inflation to top PSI was made after some minutes rest on water for overall pressure to stabilize; at that time didn’t know a thing about engine trim & tilt nor what was all about. So the theory about their working principles had to be checked along under way. At that time there was no Iboats and other nice online boating forums to ask, nor commercial digital cameras to post nice instant pics, nor Youtube to post videos. internet still was very incipient.
Went for a short spin testing combo at idle, medium throttle to test sib’s response and water behavior, once confident went full throttle, soon realized it was not fun going that way but rather straight into complete frustration due to trim being locked at first hole out transom and overall sib weight badly distributed. As a teenager, when going on cars at speed, liked to pull my hand out the window playing being a wing, rotating my wrist up and down and checking the wind effect on my extended hand. Soon realized that by maintaining my hand parallel to the road gave the best cutting effect with the least wind drag.-
Having experienced this effect before on air, now on water, trimmed engine perpendicular to water level and move my boating mate up front. Next I remembered after going full throttle was achieving a fast plane and running at top engine speed with a big smile from ear to ear. On our first outing didn’t experience any engine/transom height issues nor water splashes which didn’t know about due to being both, well factory matched OMC products. -
After a while sold the OMC 305 but stayed with the 9.9 which was shortly upgraded to a 15 HP, bought a brand new Quicksilver 330 sib. Same as with previous Zodiac 305 experienced no issues at all, well weight balanced and trimmed combo planed very fast with excellent top speed.
Years after was offered the dealership of a brand new European/Asian sib/rib manufacturing facility along Tohatsu sub dealership, that seemed a perfect product marriage, but not, perfect time when all my boating bummers started. As there were two new kinds on the block, had to get rid of the 305/15 HP combo package ASAP, being in mint condition was sold fast.-
As a personal starter ordered a 360 alum panel sib with a 2 strokes Tohatsu 18 HP, seconds later on its maiden voyage at just medium throttle experimented excessive water splashes over transom. Gee, thought being just a matter of trimming engine properly; played with all possible trim settings with no avail whatsoever taking into consideration that sib was previously deck weight balanced and OB perfectly trimmed.-
This horrible and frustating boating experience taught me that in order to achieve best boat plane and engine top performance you need to have 2 issues very clearly defined and understood which are : Sib/Rib Installation, Transom Height and lately discovered OB’s Brand Match.-
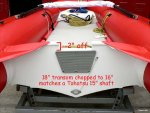
Sib/Rib : All have different lengths, hull shapes, widths & tube diameters & transom heights. Inflatable boats manufacturer doesn’t care which brand engine will be powering and living on your transom unless you request a special transom height build that perfectly matches your current engine brand. All our sib-ribs models are now factory transom height matched to use Tohatsu engines without flaws.-
Outboards : Although most brands have S, L, XL sizes, all lower legs have small physical design visible differences. OB’s manufacturer doesn’t care which sib rib brand will be powered by their engines. It’s a kind of love/match, miss match/hate sib/rib//engine/transom issue.-
In order to have these boating guidelines very clear to better understand their concepts, will be divided into 5 main topics which are : (1) Boat Balance, (2) OB’s LU Tech Issues (3) Engine Brand Transom Match (4) Trim Angle (5) Sib/Rib Engine Optimization,-
Note : For best effective test, you need to have a healthy prop & max engine HP rated for that size sib/rib, worst scenario 70/75% of the max rated HP. Don’t pretend to optimum test with lower HP OB’s or unhealthy engine & prop.-
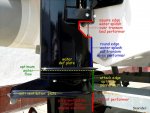
Glossary Terms : NFC (Natural Floating Condition ) BB (Boat Balance) WF (Water Flow) WDP ( Water Deflector Plate) AVP (Anti Ventilation Plate) WAE (Water Attack Edge) OTHM (Optimum Transom Height Match).-
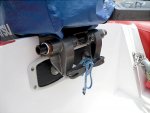
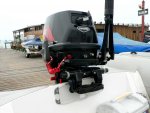
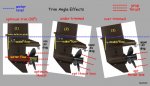
Sib/Rib Balance & trim : Float sib/rib alone completely empty with fuel tank the furthest will go towards bow (1) while resting at Natural Floating Condition (NFC) mount engine on middle transom and manual trim engine to remain perpendicular at (90?) and AV plate parallel to water level. All sib/ribs don’t have same transom built in angle, thrust rod position could vary accordingly in between sib/rib models.-
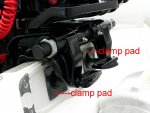
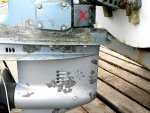
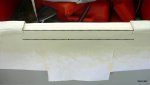
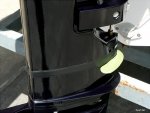
When correctly trimmed, the brand logo on cowl will remains parallel to water level (2) Once trim angle has been perfectly set, must remain untouched at that position at all boating water conditions and load, remember it’s a fixed manual trim OB. Tight engine clamps for rear of swivel bracket to remain parallel and resting nicely against transom’s rear plate. Some ribs have a upper transom edge that needs to be filled down for OB to remain at 90? angle and sviwel bracket at perfect aligment & rest against rear plate.-
Most boaters takes for granted that just needs to sit engine on middle transom and go boating soon afterwards, but sometimes that’s not so. If sib/ribs are correctly inflated, trimmed & well deck weight balanced and on first outing you have matched perfect engine/transom height achieving non water splashes outwards or backwards whatsoever, congrats, you’re a lucky boater.-
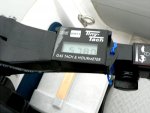
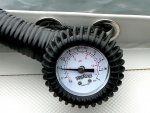
Water Test : Before launching, with gauge inflate sib/rib to 3.0 psi, once on water and after some minutes rest for overall tubes and keel pressure to stabilize, check pressure again, re inflate to same psi if needed (3) If having an air deck sib inflate to at least 10-12 psi to achieve good floor rigidity. Rib’s tubes needs less psi for good overall performance as ribs rides on its hull not on its tubes.-
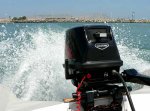
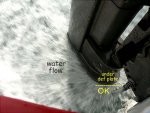
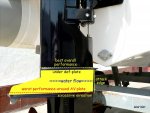
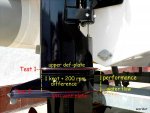
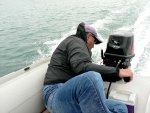
On flat calm glassy, no wind waters, sit boater mate up front towards bow to maintain sib/rib NFP. Tiller driver & spotter must sit inside deck next to transom. Full throttle, check if achieving transom water splashes to know at which lower leg's height is being produced, and if in need to optimize transom's height accordingly. Sorry folks, the only way to state of the art check water splashes issues is pulling driver/spotter head over transom (4). For boating perfection, it’s not I believe, I assume have a perfect match, I'll ask on the forums. it’s one time visual check and soon afterwards on land correction if applicable for boating perfection.-
When achieving general water splashes issues frustrated boaters usually starts to play with engine trim, a counterproductive wrong way to go. If you were correctly trimmed and weight balanced, you definitely have an engine/transom height issue, not a trim issue.-
Decided to write & post this handy ABC Sib-Rib Installation Guidelines so new and old boaters use it as a reference from where to start or re start if totally not satisfied with their current sib/rib engine set up general performance. To avoid forum posters posting different ideas, myths or getting out of the central theme by other useless comparisons, these guidelines will solely and exclusively shall be applied to all OB’s brands up to max 50 HP, tiller driven, with mechanical trim, tilt and handle clamp screw. Although full concepts are quite applicable to all outboard boats in general.-
How boating passion began : Started boating way back in 96 when first bought a second hand mint condition OMC made by Zodiac 305 Mt sib along a 2 strokes Evinrude 9.9 HP engine that came as a package. Next day went boating with a friend, our first time inexperienced sib assembly was done easily fast, the nice issue was that sib came along with a Zodiac yellow round pressure gauge, push type, fixed pointing needle, internal rotating dial with well-defined psi color segments.-
After sib’s inflation completion to factory recommended working psi with delivered gauge, was immediately launched to sea, engine was secured to transom, re inflation to top PSI was made after some minutes rest on water for overall pressure to stabilize; at that time didn’t know a thing about engine trim & tilt nor what was all about. So the theory about their working principles had to be checked along under way. At that time there was no Iboats and other nice online boating forums to ask, nor commercial digital cameras to post nice instant pics, nor Youtube to post videos. internet still was very incipient.
Went for a short spin testing combo at idle, medium throttle to test sib’s response and water behavior, once confident went full throttle, soon realized it was not fun going that way but rather straight into complete frustration due to trim being locked at first hole out transom and overall sib weight badly distributed. As a teenager, when going on cars at speed, liked to pull my hand out the window playing being a wing, rotating my wrist up and down and checking the wind effect on my extended hand. Soon realized that by maintaining my hand parallel to the road gave the best cutting effect with the least wind drag.-
Having experienced this effect before on air, now on water, trimmed engine perpendicular to water level and move my boating mate up front. Next I remembered after going full throttle was achieving a fast plane and running at top engine speed with a big smile from ear to ear. On our first outing didn’t experience any engine/transom height issues nor water splashes which didn’t know about due to being both, well factory matched OMC products. -
After a while sold the OMC 305 but stayed with the 9.9 which was shortly upgraded to a 15 HP, bought a brand new Quicksilver 330 sib. Same as with previous Zodiac 305 experienced no issues at all, well weight balanced and trimmed combo planed very fast with excellent top speed.
Years after was offered the dealership of a brand new European/Asian sib/rib manufacturing facility along Tohatsu sub dealership, that seemed a perfect product marriage, but not, perfect time when all my boating bummers started. As there were two new kinds on the block, had to get rid of the 305/15 HP combo package ASAP, being in mint condition was sold fast.-
As a personal starter ordered a 360 alum panel sib with a 2 strokes Tohatsu 18 HP, seconds later on its maiden voyage at just medium throttle experimented excessive water splashes over transom. Gee, thought being just a matter of trimming engine properly; played with all possible trim settings with no avail whatsoever taking into consideration that sib was previously deck weight balanced and OB perfectly trimmed.-
This horrible and frustating boating experience taught me that in order to achieve best boat plane and engine top performance you need to have 2 issues very clearly defined and understood which are : Sib/Rib Installation, Transom Height and lately discovered OB’s Brand Match.-
Sib/Rib : All have different lengths, hull shapes, widths & tube diameters & transom heights. Inflatable boats manufacturer doesn’t care which brand engine will be powering and living on your transom unless you request a special transom height build that perfectly matches your current engine brand. All our sib-ribs models are now factory transom height matched to use Tohatsu engines without flaws.-
Outboards : Although most brands have S, L, XL sizes, all lower legs have small physical design visible differences. OB’s manufacturer doesn’t care which sib rib brand will be powered by their engines. It’s a kind of love/match, miss match/hate sib/rib//engine/transom issue.-
In order to have these boating guidelines very clear to better understand their concepts, will be divided into 5 main topics which are : (1) Boat Balance, (2) OB’s LU Tech Issues (3) Engine Brand Transom Match (4) Trim Angle (5) Sib/Rib Engine Optimization,-
Note : For best effective test, you need to have a healthy prop & max engine HP rated for that size sib/rib, worst scenario 70/75% of the max rated HP. Don’t pretend to optimum test with lower HP OB’s or unhealthy engine & prop.-
Glossary Terms : NFC (Natural Floating Condition ) BB (Boat Balance) WF (Water Flow) WDP ( Water Deflector Plate) AVP (Anti Ventilation Plate) WAE (Water Attack Edge) OTHM (Optimum Transom Height Match).-
Sib/Rib Balance & trim : Float sib/rib alone completely empty with fuel tank the furthest will go towards bow (1) while resting at Natural Floating Condition (NFC) mount engine on middle transom and manual trim engine to remain perpendicular at (90?) and AV plate parallel to water level. All sib/ribs don’t have same transom built in angle, thrust rod position could vary accordingly in between sib/rib models.-
When correctly trimmed, the brand logo on cowl will remains parallel to water level (2) Once trim angle has been perfectly set, must remain untouched at that position at all boating water conditions and load, remember it’s a fixed manual trim OB. Tight engine clamps for rear of swivel bracket to remain parallel and resting nicely against transom’s rear plate. Some ribs have a upper transom edge that needs to be filled down for OB to remain at 90? angle and sviwel bracket at perfect aligment & rest against rear plate.-
Most boaters takes for granted that just needs to sit engine on middle transom and go boating soon afterwards, but sometimes that’s not so. If sib/ribs are correctly inflated, trimmed & well deck weight balanced and on first outing you have matched perfect engine/transom height achieving non water splashes outwards or backwards whatsoever, congrats, you’re a lucky boater.-
Water Test : Before launching, with gauge inflate sib/rib to 3.0 psi, once on water and after some minutes rest for overall tubes and keel pressure to stabilize, check pressure again, re inflate to same psi if needed (3) If having an air deck sib inflate to at least 10-12 psi to achieve good floor rigidity. Rib’s tubes needs less psi for good overall performance as ribs rides on its hull not on its tubes.-
On flat calm glassy, no wind waters, sit boater mate up front towards bow to maintain sib/rib NFP. Tiller driver & spotter must sit inside deck next to transom. Full throttle, check if achieving transom water splashes to know at which lower leg's height is being produced, and if in need to optimize transom's height accordingly. Sorry folks, the only way to state of the art check water splashes issues is pulling driver/spotter head over transom (4). For boating perfection, it’s not I believe, I assume have a perfect match, I'll ask on the forums. it’s one time visual check and soon afterwards on land correction if applicable for boating perfection.-
When achieving general water splashes issues frustrated boaters usually starts to play with engine trim, a counterproductive wrong way to go. If you were correctly trimmed and weight balanced, you definitely have an engine/transom height issue, not a trim issue.-
Attachments
Last edited: