Aluminum Starcraft Falcon project

MTboatguy

Fleet Admiral
Joined
Jul 8, 2010
Messages
8,988
If they are the pop rivets on the splash well, that a tool like that would be just fine for replacing them, they also make a manual model that works just fine to replace them., I thought you were talking the rivets in the hull.
 

Tnstratofam

Commander
Joined
Aug 18, 2013
Messages
2,679
For the rivets used in the splashwell and the floor a air riveter like the one you posted is fine. Ypu will want to use blind closed end rivets with an aluminum mandrel. You can oreder them from many different sites including iboats I think as well as rivetsonline. You shouldmdomsome research on bucking solid rivets so that you will know how to fix any that leak in your hull below the waterline while your deck is out.

As for me I have replaced damaged solid tivets in my Starcraft with closed end blind trivets below our waterline with no problems. Whan I do a complete tear down to replacd the deck I will probably replace those with solid rivets as I will have access to both sides with the deck out. Check out some of the other alluminum boat restos on here to get some good info on different stages of repairs. I have only replaced our transom, and done some leaking rivet repair so far on our boat, but have learned allot from all the knowledgeable people here.

There is a link to my transom repair in my sig line. It may have some useful info in it for you.

Almost forgot you do want to use a good marine sealant like 3m 4200(removable sealant) or 3m 5200 (permanent sealant) on the rivets you replace.
 
Last edited:

xGH0ZTx

Seaman
Joined
Jul 23, 2011
Messages
65
I am about half way through your transom repair thread and am finding it helpful
 

xGH0ZTx

Seaman
Joined
Jul 23, 2011
Messages
65
No Title

I used an eyebolt to assist in my transom removal. Didn't work the first time so I decided I needed to remove the drainp
holes in the splashwell FIRST :facepalm:
 

Attachments

  • photo223030.jpg
    photo223030.jpg
    52 KB · Views: 1

xGH0ZTx

Seaman
Joined
Jul 23, 2011
Messages
65
No Title

I used a cutting wheel on the gunnel (not sure if thats the term) and drilled out the rivets holding down the floor
 

Attachments

  • photo223031.jpg
    photo223031.jpg
    27.5 KB · Views: 1
  • photo223032.jpg
    photo223032.jpg
    326.8 KB · Views: 1

xGH0ZTx

Seaman
Joined
Jul 23, 2011
Messages
65
No Title

It smelled of waterlogged death beneath the floor... but now it's nice and cleaned out in there!

Now... how do I test for leaks? Do I just install the plug and fill her with the hose?
 

Attachments

  • photo223033.jpg
    photo223033.jpg
    47.6 KB · Views: 1
  • photo223034.jpeg
    photo223034.jpeg
    182.8 KB · Views: 1

lckstckn2smknbrls

Lieutenant Junior Grade
Joined
Sep 18, 2008
Messages
1,114
Yes, up to the splash rail. There is some adhesive holding the splash well in, after I drilled out the rivets I used a composite shim gently wedged in along the seam of the splash well and gunnel. I cut the gunnels back like you did too.
 

xGH0ZTx

Seaman
Joined
Jul 23, 2011
Messages
65
No Title

I put some water in the boat and the only rivets that were really leaking were these two. PO may have welded a spot near this rib? didn't get a pic of the weld yet but it seemed to hold water fine.

One other rivet seemed to be letting through a tiny bit of water as well as two spots in the seam along the bow...

Will gluvit applied to the ENTIRE interior of the boat (rivets and seams) fix these issues?
 

Attachments

  • photo223062.jpg
    photo223062.jpg
    21.7 KB · Views: 0

xGH0ZTx

Seaman
Joined
Jul 23, 2011
Messages
65
This is a pic from under the trailer...
Whats my next step? not a major leak just a drip

 
Last edited:

MTboatguy

Fleet Admiral
Joined
Jul 8, 2010
Messages
8,988
I wouldn't apply it to the whole interior, but I would take the time to hit the rivet head with a brush stroke or two of gluvit, as long as it is not going to be exposed to sunlight and there is really no need to go above the water line with your coating.
 

xGH0ZTx

Seaman
Joined
Jul 23, 2011
Messages
65
A few solid coats of the Gluvit should fix the drip though? Is that the best product for this application? I think I still have a little of my MarineTEX
 

MTboatguy

Fleet Admiral
Joined
Jul 8, 2010
Messages
8,988
I always use gluvit when I am working on aluminum riveted boats, great stuff, just make sure it is not exposed to the sun and it will seal it up.
 

Woodonglass

Supreme Mariner
Joined
Dec 29, 2009
Messages
25,929
I am NOT a Tin Boat guy but I am very familiar with the Gluvit Product. It is epoxy based and very viscous (runny). Since it is epoxy based, it must be protected from the suns UV rays. It's specially formulated to remain flexible when fully cured and it's also formulated to be "runny" so it can get into the tiny cracks and crevices where leaks occur. But it won't adhere where there's dirt and water. Make sure to clean the leaking areas well with abrasives and chemical cleaners to promote adhesion. Also use a heat gun to try and remove any moisture from the inner most cracks and crevices. Try to attempt to position the boat in such a way as to allow the resin to flow into the repair area in the best way possible and to remain in the area as it cures. Use tape to "Dam Up" the area if need be. It may take several hours for the resin to "Tack Up" enuf for it to stay in place. You may need to reposition the boat several times to accommodate different areas of repair. If you take the time and effort to do this then the Gluvit can and will be a very effect and permanent sealant for your boat. A little bit can go a long way.
 

MTboatguy

Fleet Admiral
Joined
Jul 8, 2010
Messages
8,988
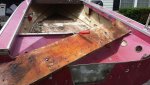
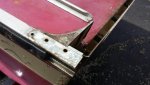
This area is a little concerning. Is this in the middle of a rib or near an end? Looks like a stressed area that could lead to further cracking of the rib.
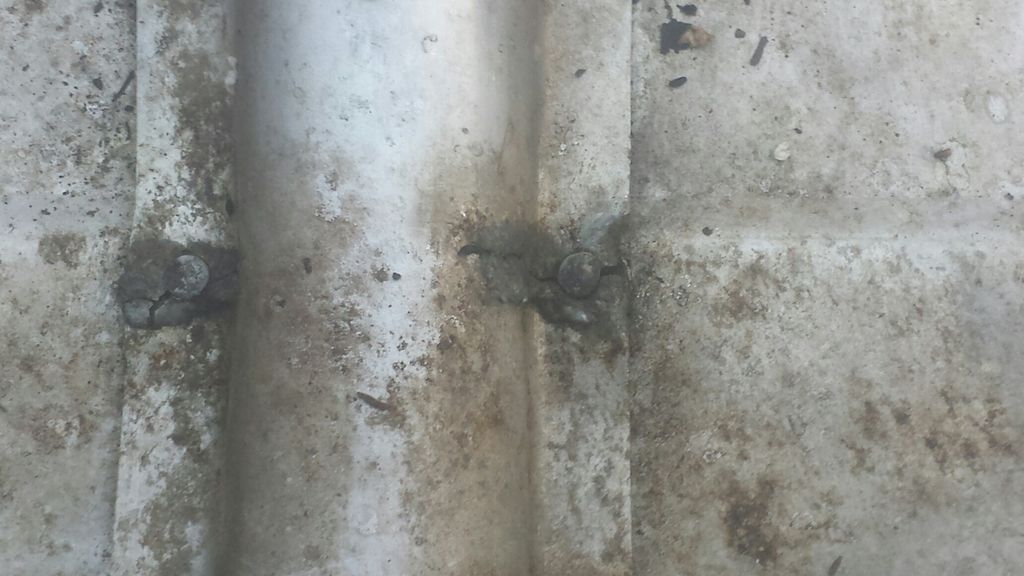
Looks like an area that may have taken a wack at one time or another, I would probably drill on either side and buck some new rivets in there to be sure.
 

xGH0ZTx

Seaman
Joined
Jul 23, 2011
Messages
65
It is towards the outer end of a rib. I have never bucked a rivet? When I pick up a hammer things end... poorly. I lack a delicate touch, but if that's the best way to fix it I can do some research. Looks like someone tried to do some repairs in that particular area before, not sure what the dark grey stuff is around the rivets.
 

Watermann

Starmada Splash of the Year 2014
Joined
Jan 12, 2013
Messages
13,822
The rib is cracked so you'll need to remove the rivets and make the repairs. I repaired a few cracked ribs in the SeaNymph and rather than use rivets I had to use SS machine screws due to the thickness of the splints and epoxy they were bedded in.

Clean it up some and post another pic.

IMAG0283.jpg
 

xGH0ZTx

Seaman
Joined
Jul 23, 2011
Messages
65
Ok. I will clean that area up and snap another pic. I also start prepping to install hardwoods in our house this week. I see that being a momentum killer but I will definitely be seeing this FALCON project through to the end and hopefully done right.
 

xGH0ZTx

Seaman
Joined
Jul 23, 2011
Messages
65
WATERMANN that looks like a great fix! Added reinforcement too seems smart. Can I ask you what materials you used for that? Would my excess MarineTex epoxy work in this application do you think?

also, I believe I saw you and your Sea Nymph on a YouTube video. Very impressive work!!!
 
Top