And Away We Go, Restarting The Rebuild

wooky30014

Petty Officer 1st Class
Joined
Jun 8, 2012
Messages
288
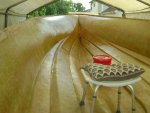
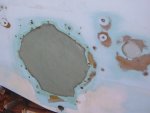
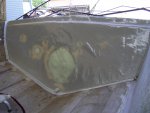
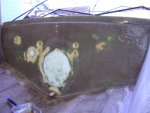
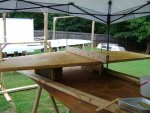
Another update. Between rain :rain: and other homeowner chores:violin::ballchain: I got some more done. Someone on another boat site suggested I get flapper wheels for the grinder, my memory of them is way different than what I picked up yesterday and today I got way more done than I thought I would. Started just forward of the stern on port side and just started grinding, hull side down to where the stringer was up to where the helm area is/was. I'll have to go back later and get a few spots with a wheel made for corners. Vac filter got clogged so I couldn't get all the dust up and yeah the bucket and butt muffin make things more comfortable

Port%20Side%20Getting%20There.jpg


Port%20Side%20Progress.jpg
 

Baylinerchuck

Commander
Joined
Jul 29, 2016
Messages
2,739
Following along now, somehow I missed all the posts until now......all caught up.

Yes, the flapper wheels are the way to go. I used a total of three from HF on my 20' chap. I used the 36 grit discs and they cut like a dream. 3 discs and two cheapo HF grinders bit the dust. Literally. Good luck on your build, I'm stowing away......
 

wooky30014

Petty Officer 1st Class
Joined
Jun 8, 2012
Messages
288
Following along now, somehow I missed all the posts until now......all caught up.

Yes, the flapper wheels are the way to go. I used a total of three from HF on my 20' chap. I used the 36 grit discs and they cut like a dream. 3 discs and two cheapo HF grinders bit the dust. Literally. Good luck on your build, I'm stowing away......

Welcome aboard chuck. Yeah I wished I'd known about them before I'd probably be a lot closer to being done . . . . . . . withe the grinding :lol: You CAN stow away but ya might wanna wait til I get the cabin built :fish2: Yeah that's right, while surfing :ranger: the other day on another site I popped into, there was a thread (yeah went through all 64 pages of them, searching for what others may have done along the ideas I have here) that this guy was in the process then of building a small cabin/helm extension on his boat. Mine was built as a runabout but a couple of years ago I got a free boat for the windshield and hardtop and also cut off and kept it's cabin portion but it's just SOOO heavy. I've got the idea of what to do now, 3/8 ply and glass it on, helm will be moved back about 3 feet or so and still have plenty of room for the two of us to fish, have shade, and a spot to lie down should the rigors of fishing or boat riding be "too much" for us :laugh:
 

gm280

Supreme Mariner
Joined
Jun 26, 2011
Messages
14,605
Of all the material I used when grinding the hull, flapper disks were the absolute best by far. I used 80 grit. And that was so I could control the finish a lot better. But whatever works for you is the best. I built a Dust Deputy setup for my vacuum and if traps the dust better then anything else I tried. The fine dust from grinding will certainly clog up the typical filters for shop vacs. And the amount of dust really is unbelievable as well. If I remember correctly one of the iboaters actually collect it all and it was amazing how much fiberglass dust was collected. I know I used a lot of trash bags when emptying the shop vac.

But keep it up and you will be rewarded for your persistence and hard work. :thumb:
 

wooky30014

Petty Officer 1st Class
Joined
Jun 8, 2012
Messages
288
Yeah, I think these are 60 grit and two things I noticed right off, removes material a lot faster and more important, doesn't "dig in" plus as you said better control. On the dust, I got a filter for "fine particles" and when it doesn't pick up the dust as good I know it's clogged. Just a gentle beating on a tree trunk way out back and the filter is ready for another round.

Not to worry, I won't give up on this project, it's raining again today and with the heat in the Tyvek suit I feel like I've been run over by a truck ("uncle arthir" doesn't help either), I actually wrung sweat out of my shirt and that was even working for an hour or so and taking a 20-30 minute break, plenty to drink. I knew starting out it wouldn't be a splash it next month deal
 

gm280

Supreme Mariner
Joined
Jun 26, 2011
Messages
14,605
Yeah, I think these are 60 grit and two things I noticed right off, removes material a lot faster and more important, doesn't "dig in" plus as you said better control. On the dust, I got a filter for "fine particles" and when it doesn't pick up the dust as good I know it's clogged. Just a gentle beating on a tree trunk way out back and the filter is ready for another round.

Not to worry, I won't give up on this project, it's raining again today and with the heat in the Tyvek suit I feel like I've been run over by a truck ("uncle arthir" doesn't help either), I actually wrung sweat out of my shirt and that was even working for an hour or so and taking a 20-30 minute break, plenty to drink. I knew starting out it wouldn't be a splash it next month deal

wooky, I know it is no consolation, but so many have gone before you with the same results. I can remember my grinding. And even with total head to toe coverage, I still felt like I had run a marathon and I won't even talk about sweating. Do you know what happens went you sweat and mix it with fiberglass dust. Well let's just say it isn't very pretty. However, once all that hard work is finished, the project takes a turn for the better. And odd how you will forget all about those sweaty dusty days pretty quick.

But do hang in there and keep up the work. But take a lot of breaks so not to succumb to heat exhaustion that can creep up on you without notice some times! And you have to drink plenty of water to stay hydrated. Oh, and keep posting pictures. We are all watching and wanting to see your progress. :thumb:
 

wooky30014

Petty Officer 1st Class
Joined
Jun 8, 2012
Messages
288
I'll do it, take breaks that is, the heat isn't as bad as it could be as I'm under a tarp but when the goggles get full of sweat rolling around it's time to stop for a bit. OH, any suggestion for the goggle fog, within minutes it's fogged up. I don't know the result of sweat and glass dust, so far no itchy at all
 

gm280

Supreme Mariner
Joined
Jun 26, 2011
Messages
14,605
I'll do it, take breaks that is, the heat isn't as bad as it could be as I'm under a tarp but when the goggles get full of sweat rolling around it's time to stop for a bit. OH, any suggestion for the goggle fog, within minutes it's fogged up. I don't know the result of sweat and glass dust, so far no itchy at all

I don't know about the fogging up issues. I used goggles that were vented and didn't seem to have that issue. You could go with safety glasses and then a full face shield to stop the fog up syndrome. :noidea:
 

wooky30014

Petty Officer 1st Class
Joined
Jun 8, 2012
Messages
288
These goggles are vented, 4 of them, 4 vents that is. I tried wax on wax off inside, didn't work
 

wooky30014

Petty Officer 1st Class
Joined
Jun 8, 2012
Messages
288
Hadn't thought about that, I got a fan with a stand, give that a try, Thanks
 

wooky30014

Petty Officer 1st Class
Joined
Jun 8, 2012
Messages
288
Been over a year since posting here and not pic friendly. Been some serious bumps in the road here but back to working on Riff Raft. We had to watch Mom continue to slip away with a misdiagnosis of Osteoporosis (WRONG) ended up being bone cancer and Stage 4 when they figured it out. We buried her 2 days before Thanksgiving 2017. Yeah the Holidays sucked this year because of that and Dad hurt his knee in a fall and was in a hospice just before Christmas. My Step-Mom being a retired Nurse helped some but Dad caught some bug at the hospice and he fought the good fight but with his age and other health issues he lost the fight a week after my birthday in April. THAT was the hardest thing I ever had to do watching him take his last breath.

I've got all the hull grinding done, motor hole closed up and new glass laid on the transom, and now the ply is ready to be glassed in. Let's hope the pic posting works. Nope, "file size exceeds"
 

jbuote

Lieutenant Junior Grade
Joined
Aug 17, 2016
Messages
1,001
Hi wooky30014 !

Sorry to hear it's been a rough year.
My condolences to you and yours.

Good to see you back at it! :thumb:

Pictures have to be less than 700kb in size to upload. It's been painful for all since the Photobucket issue.
I don't know if you have a way of resizing them, but in case it helps, I did a write up of a very basic way to resize images.
Other members have added to that as well, so maybe one of the methods will help.
https://forums.iboats.com/forum/oth...sues/10596928-how-to-resize-images-for-upload

Hope it's useful, and welcome back! :D
 

Dennischaves

Chief Petty Officer
Joined
Nov 9, 2016
Messages
439
Sorry
you had a tough year for
Hopefully things will get better
I just crop pictures on my phone to make them smaller
Seems to work
 

wooky30014

Petty Officer 1st Class
Joined
Jun 8, 2012
Messages
288
Let's try again, resized slightly and dropped file size by half, GEEZ

Thanks jb and Dennis. I went and resized and made a new folder just for i-boat pics
 

Attachments

  • photo296388.jpg
    photo296388.jpg
    913 KB · Views: 0
  • photo296389.jpg
    photo296389.jpg
    1 MB · Views: 0
  • photo296390.jpg
    photo296390.jpg
    753.9 KB · Views: 0
  • photo296391.jpg
    photo296391.jpg
    1 MB · Views: 0
  • photo296392.jpg
    photo296392.jpg
    1,009.2 KB · Views: 0
  • photo296393.jpg
    photo296393.jpg
    1.3 MB · Views: 0

wooky30014

Petty Officer 1st Class
Joined
Jun 8, 2012
Messages
288
Thanks jb and Dennis, I resized and made a new folder just for iboat pics

Oh, the wood "stem" (?) up in the bow was sealed and glassed in, just gotta do some cleanup on that when I get up there for a layer of glass to finish casing it in for good
 
Last edited:

jbuote

Lieutenant Junior Grade
Joined
Aug 17, 2016
Messages
1,001
Looks like it may have just been a brace of sorts where the 2 sides of the hull come together at the bow.. :noidea:

I haven't done any restores yet, but I've been watching, reading and learning here..
I have a late 60's Cruisers Inc tri hull I'm considering restoring.

Maybe Baylinerchuck or Woodonglass would know for sure..

(Well, not really a maybe about it.. I'm sure they'd know... :D)
 

wooky30014

Petty Officer 1st Class
Joined
Jun 8, 2012
Messages
288
Up in the bow there was some sort of gizmo that I took out and where the wood piece is now has the bow pulling eye through it. I figured a longer piece of wood would spread the pulling force over a larger area and encasing it in glass and epoxy will ensure it never gets wet or rots. I hate to say this but some of the stuff I've found on this boat looks like an amateur job (from the factory). I'll fix all that
 

jbuote

Lieutenant Junior Grade
Joined
Aug 17, 2016
Messages
1,001
RIGHT!! Backing for the bow-eye... :facepalm:
This is why I'm reading and learning.. (I knew that.. Just didn't think.. haha!)

Oh well..
I'm going to tag along from here anyway if you don't mind..
Never too much info to absorb or learn. :D
 
Top