Another Transom question. (Splashwell, and overlap)

Schtoopid

Petty Officer 3rd Class
Joined
Jul 23, 2016
Messages
77
Hey folks.
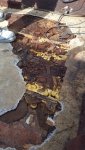
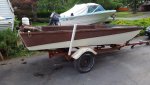
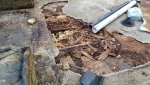
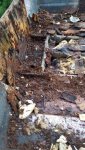
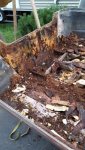
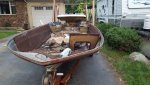
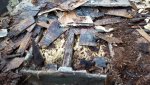
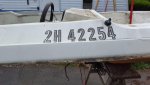
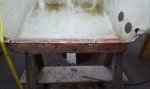
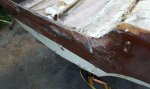
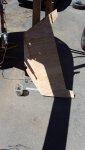
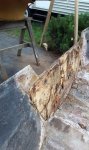
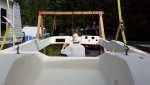
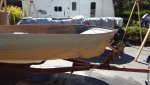
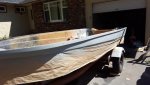
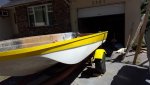
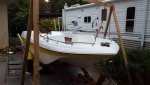
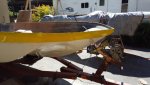
Rebuilding a boat. Transom and stringers rotted.. (actually, every single piece of wood on the entire boat looks like wet sawdust)

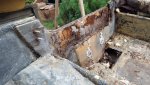
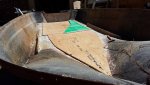
Question is, in rebuilding the transom, when I put the cap back on the boat, do I glue the splashwell to the transom like it was from the last guy?

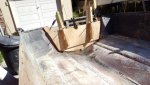
There is also a piece of metal he bent over the transom to work as a support for the motor.. Do I put that back on? or just mount the engine to the fiberglass.

Thanks!

Dave
 

Woodonglass

Supreme Mariner
Joined
Dec 29, 2009
Messages
25,929
Welcome to iBoats. Got any Pix? If you build the transom and stringers correctly there's no need for any metal plate re-enforcement. No need to Glue the cap either unless the cap is designed for it. Pix will help us to advise you.
 

Schtoopid

Petty Officer 3rd Class
Joined
Jul 23, 2016
Messages
77
Pictures worth a thousand words, but still gotta add some.

"Lip" on splashwell is about 2"
20160723_203229.jpg 20160723_203236.jpg 20160723_203258.jpg 20160723_203252.jpg 20160723_203244.jpg
 

Attachments

  • 20160723_203244.jpg
    20160723_203244.jpg
    127 KB · Views: 1

Corjen1

Lieutenant Junior Grade
Joined
Aug 24, 2013
Messages
1,237
So I would say yes...you need to re-glass it back together. My GT splashwell/transom is very similar to yours. When I stabbed the top cap the final time, I mixed up a big batch of PB, smeared it all over the mating surfaces. then I re-glassed the inside corners/seams from the inside with strips of 1708.
 

gm280

Supreme Mariner
Joined
Jun 26, 2011
Messages
14,605
I have to admit, the first picture had me going for a while until I figured you had it angled 90 degrees. I couldn't make out what I was looking at there for a while. However, I have to agree with the above suggestions as well.
 

Schtoopid

Petty Officer 3rd Class
Joined
Jul 23, 2016
Messages
77
Dammit.. I didn't wanna do that.. its annoying to get under there with glass.
I'm thinking I'll glass a piece of wood to the top/back of the splashwell, and glass 2 layers to the back of the transom, and then just put on some PL when I put the cap back on.
I just wanted to be able to pull the cap off again if I had to.
 

Schtoopid

Petty Officer 3rd Class
Joined
Jul 23, 2016
Messages
77
Thanks WOG.

So I don't have to search for it, can you give me your PB recipe here?

My plan is to glass the first layer of plywood for the transom on both sides with unwaxed.
PL Premium it to the back of the boat.
PB/fillet the edges after it dries.
Tab it in.
Glass the second layer of plywood on both sides with unwaxed.
Let dry.
PB it to the first layer
Fillet the edges with PB after it dries
Tab it to the first layer, and to the boat.
Place one more layer of 1708 over the entire transom area.

Does this sound reasonable?
Do I need to worry about the height difference between the tabbing of the first layer when putting the second layer of plywood on?

Thanks.
Dave
 

Schtoopid

Petty Officer 3rd Class
Joined
Jul 23, 2016
Messages
77
Er, or should I glue the 2 pieces of wood together first, and then glass over the entire thing?
 

Schtoopid

Petty Officer 3rd Class
Joined
Jul 23, 2016
Messages
77
No Title

Mod suggested I post pictures of the completed project.
 

Attachments

  • photo252493.jpg
    photo252493.jpg
    89.9 KB · Views: 1
  • photo252494.jpg
    photo252494.jpg
    86.5 KB · Views: 1
  • photo252495.jpg
    photo252495.jpg
    111.8 KB · Views: 1
  • photo252496.jpg
    photo252496.jpg
    112 KB · Views: 1
  • photo252497.jpg
    photo252497.jpg
    164.1 KB · Views: 1
  • photo252498.jpg
    photo252498.jpg
    147.9 KB · Views: 1

Schtoopid

Petty Officer 3rd Class
Joined
Jul 23, 2016
Messages
77
No Title

page 2
 

Attachments

  • photo252499.jpg
    photo252499.jpg
    97.9 KB · Views: 1
  • photo252500.jpg
    photo252500.jpg
    96.2 KB · Views: 1
  • photo252501.jpg
    photo252501.jpg
    99 KB · Views: 1
  • photo252502.jpg
    photo252502.jpg
    128 KB · Views: 1
  • photo252503.jpg
    photo252503.jpg
    103.7 KB · Views: 1
  • photo252504.jpg
    photo252504.jpg
    168.3 KB · Views: 1
  • photo252505.jpg
    photo252505.jpg
    51.9 KB · Views: 1
  • photo252506.jpg
    photo252506.jpg
    51.3 KB · Views: 1
  • photo252507.jpg
    photo252507.jpg
    75.6 KB · Views: 1
  • photo252508.jpg
    photo252508.jpg
    74.9 KB · Views: 1
  • photo252509.jpg
    photo252509.jpg
    87.1 KB · Views: 1

Schtoopid

Petty Officer 3rd Class
Joined
Jul 23, 2016
Messages
77
No Title

Page 3
 

Attachments

  • photo252510.jpg
    photo252510.jpg
    61.4 KB · Views: 1
  • photo252511.jpg
    photo252511.jpg
    87.1 KB · Views: 1
  • photo252512.jpg
    photo252512.jpg
    57.9 KB · Views: 1
  • photo252513.jpg
    photo252513.jpg
    101.9 KB · Views: 1
  • photo252514.jpg
    photo252514.jpg
    79.2 KB · Views: 1
  • photo252515.jpg
    photo252515.jpg
    121.6 KB · Views: 1
  • photo252516.jpg
    photo252516.jpg
    66.4 KB · Views: 1
  • photo252517.jpg
    photo252517.jpg
    90.9 KB · Views: 1
  • photo252518.jpg
    photo252518.jpg
    88 KB · Views: 1
  • photo252519.jpg
    photo252519.jpg
    108 KB · Views: 1

Schtoopid

Petty Officer 3rd Class
Joined
Jul 23, 2016
Messages
77
No Title

page 4
 

Attachments

  • photo252520.jpg
    photo252520.jpg
    74.9 KB · Views: 1
  • photo252521.jpg
    photo252521.jpg
    76.6 KB · Views: 1
  • photo252522.jpg
    photo252522.jpg
    83.5 KB · Views: 1
  • photo252523.jpg
    photo252523.jpg
    85.4 KB · Views: 1
  • photo252524.jpg
    photo252524.jpg
    81.4 KB · Views: 1
Top