Avanti 175FS to Restore or Not?

JC612000

Seaman Apprentice
Joined
Mar 14, 2014
Messages
34
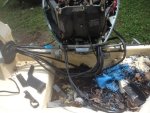
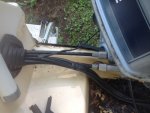
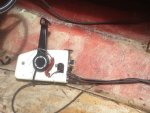
I've been lurking on this forum for a while now, and decided to start a thread. It may be long, or very short, but anyways, I haven't seen much discussion on any type of resto of a fish and ski. This boat was my grandfather's who passed away last year. I purchased it along with the trailer and motor for $500 from his estate. I've never owned a boat bigger than a conoe, but love being out on the water and love to fish as well. It has not been in the water for a long time.....probably 10+ years. It was full of water when I got it, so everything is rotted of course. I've spent only one day so far and that was dedicated to deconstruction. I plan on ripping the rest out in the near future and coming up with the game plan, that I was hoping to get some advice on. Anyway, I'll try and add a few pics to show you what I'm working with. Looks like floor replacement, possibly stringers as well and transom fix.


.
 

jbcurt00

Moderator
Staff member
Joined
Oct 25, 2011
Messages
25,151
Unused for more then 10yrs, AND full of water when you got it indicates that it is a full rehab, little chance of having good stringers, transom or deck. It'll be great to see you rehab your grandfathers boat.
 

JC612000

Seaman Apprentice
Joined
Mar 14, 2014
Messages
34
You are right JB, everything is pretty rotten so far. Hope I can stick with this and find time to work on it, pretty much the only reason I'm attempting is because it's a family boat. I'm decent with wood working and somewhat mechanically inclined, but never messed with fiberglass. Not sure how I'm going to tackle this transom. Definitely have to get the cap off or cut the back of the cap off or something. Just finished a day and a half of demo......If I could get some pictures posted I would.

Guess this is what I get for owning a mac
 

JC612000

Seaman Apprentice
Joined
Mar 14, 2014
Messages
34
Oops.....sorry for the re-posts. I think there are some bugs in the forum.
 
Last edited:

jbcurt00

Moderator
Staff member
Joined
Oct 25, 2011
Messages
25,151
the pix problem may be the forum software, not you or your mac

Try using photobucket, it's a free 3rd party pix hosting site.
 

JC612000

Seaman Apprentice
Joined
Mar 14, 2014
Messages
34
Well, I think I was trying to upload pics that were just too large. Anyhow, Here are some demo pics. Removed seats, gas tank, battery box, foor, and foam on one side. Next up, need to deonstruct the console and the front.

Was able to take apart some of the rub rail, looks like the cap should unscrew as I have seeon on other restorations, but this is going to be a large cap because it incorporates the front and rear fish platforms and live/bait wells.


JC612000

Seaman Apprentice
Joined
Mar 14, 2014
Messages
34
:joyous::joyous:Darn duplicate posts....I'll eventually get the hang of this forum
 
Last edited:

jbcurt00

Moderator
Staff member
Joined
Oct 25, 2011
Messages
25,151
Again, it's probably not you, it's software hangups that make it appear as though your post/reply didn't post because there's this big error box.

When you get that error message, you can generally ignore it. Just click OK then right click the screen somewhere that isn't a clickable icon or text window, and select Reload/Refresh. Or use the refresh/reload round-about symbol at the end of the web browser's address window.

Your post is most likely at the bottom when the Topic reloads.
 

JC612000

Seaman Apprentice
Joined
Mar 14, 2014
Messages
34
No Title

Well, it looks like my pics are gone. Going to have to set up that photobucket account. I've made some progress on my demo and I'm just about ready to remove the cap. Rub rail is off and all I need to do now is take the outboard off. I have a couple of questions, if anyone can help me out.

1. What sort of precaution should I take removing the cap? I plan to get 4 guys to lift it and set it on blocking, approximately ground level. Is ther any possibility that the cap or the hull at the cap interface will lose it's form and make it difficult to fit back up?

2. This is really a rookie question, but oh well. That's why we have forums. The controls and steering go through the cap to the outboard. Need some information on this. Do I remove at the motor?

Any guidance, or link to information would be appreciated. Ready to get the cap off so I can finish out the demo and get to work on the transom.
 

Woodonglass

Supreme Mariner
Joined
Dec 29, 2009
Messages
25,929
Is this an Inboard or Outboard motor? Yes you must take a lot of measurements before removing the cap and then during the restoration ensure that the hull remains in it's original shape so the cap will fit back on. You can do this with wood bracing or nylon straps. Almost every major restoration thread here on the forum will have pics and descriptions of this process. Do a search and I'm sure you'll find plenty of examples.
 

JC612000

Seaman Apprentice
Joined
Mar 14, 2014
Messages
34
No Title

Thanks, I'll check around the forums to get an idea of securing the hull, straps sound good. It is an outboard, I've added some pics to my profile and tried to link them this time.

This is what I think I have to do:

1. Remove Control Cables by removing the retainer screws at the motor.
2. Steering - Remove from the steering tube and tilt tube? Steering is frozen up, so not sure how easy this will be.
3. Gas - No problem
4. speedometer tube - No problem
4. Oil, has a power wire to oil tank from outboard. Looks like something that should be equipped with a disconnect in the future to make it easier to get off.
5. Wires from motor to instrument cluster (tach, etc). Not sure here. Guess I have to trace them into the motor and disconnect.
6. I think there is another too going to the trim control.
 

Attachments

  • photo203296.jpg
    photo203296.jpg
    49.1 KB · Views: 0
  • photo203297.JPG
    photo203297.JPG
    114.5 KB · Views: 0
  • photo203298.JPG
    photo203298.JPG
    139.8 KB · Views: 0
Last edited:

JC612000

Seaman Apprentice
Joined
Mar 14, 2014
Messages
34
Well, looking at my last post......hard to believe it has been a year since I've provided any kind of update. I haven't gotten to the point where I wanted to be, hoped to be floating by the end of this summer. Things are calming down at work and around the house, so I've been motivated to get on this project. Since my last post, I've moved my boat to my house, removed the outboard and worked on it over the winter. Still some work, but it is running now. I removed the cap late last year and stored it for the winter. Now I'm finishing the demo of the stringers and transom. Here are some pics for proof! Reviving this post, because I know I'll need some wisdom in the months to come.

Outboard running:


Cap Removal - Homemade Gantry and a Cherry Picker


Stored Cap in the Garage on my 4x8 Trailer


Hull Ready for storage
 

littlerayray

Lieutenant
Joined
Feb 17, 2013
Messages
1,456
Can't wait to see it completed its gonna look awesome keep the pics coming.

Just remember sentimental value is sometimes worth more then dollar value
 

JC612000

Seaman Apprentice
Joined
Mar 14, 2014
Messages
34
Thanks Ray, got some demolition complete this week. Still need to remove center stringer and then it's on to grinding!! Trying to make sure I work on it during the week, even if it's just an hour or so in the evening, because I seem to end up fishing on Saturdays!

Demo work


Getting there


Almost all wood removed


Should be working on the boat, but the river called my name
 

JC612000

Seaman Apprentice
Joined
Mar 14, 2014
Messages
34
Questions about my transom. There was a layer of fiberglass between the two sections of plywood. Will it still be ok to bond them together and glass in the combined section? I assume this is a marginal difference.

Also, what's up with the 2x4 running perpendicular across the width? Haven't seen this on other boats. It would make some sense if the cap was supported here, but it didn't appear to be when I removed the cap, there was a small gap.

Refer to the first pic in the post above for a visual. Thanks for any input, have a great Monday!!!
 

JC612000

Seaman Apprentice
Joined
Mar 14, 2014
Messages
34
Worked on removing the keel stringer this evening, a lot of good, but wet wood to remove. Still have some chiseling and grinding to get it all out.


JC612000

Seaman Apprentice
Joined
Mar 14, 2014
Messages
34
So, I did a little grinding this evening, and have questions. Times like this I realize I have no clue what I'm doing :facepalm:. I chiseled out the remaining wood and put a 36 grit disc on the grinder, working on the keel area. How do I know when I've ground enough? Looks like this stinger was set in epoxy and has a considerable amount surrounding it, do I grind all of this out? At least 1/4" of material around the wood. I worked a small area out until I came across a dull colored area. Do i stop here? Want to make sure I'm on the right track before I go too far. Some pics above (before) and below (after). Any guidance/feedback appreciated.


JC612000

Seaman Apprentice
Joined
Mar 14, 2014
Messages
34
Ok....I researched some other threads. Looks like taking it down to the "dull" surface is what I need to do. There is a ton of resin in the bilge area and the bow area of the hull is really embedded, so I guess I'll be grinding these areas for a while. Here's a shot of the front:


JC612000

Seaman Apprentice
Joined
Mar 14, 2014
Messages
34
Really unsure about my "progress" today. Ground down to gel coat in the transom area, so I know that's wrong!

1. I have various depths of grinding in this area of the bilge, plan was to grind down to dull pink color. Is this right? The area that was ground through the hull seemed to only have resin chipping out until I reached the gel coat.
2. Using a 4 inch angle grinder with 36 grit flapper wheel, slow going. Maybe I should upgrade to a bigger grinder?

Any advice would be appreciated!


JC612000

Seaman Apprentice
Joined
Mar 14, 2014
Messages
34
Friendly reminder to make sure your jack is up and secure before moving the boat. This is what happens when you get in a hurry.

 
Top