Can't get starboard engine to run after a bunch of work.

ttownthomas

Petty Officer 1st Class
Joined
Jun 7, 2019
Messages
204
I am restoring a 1972 Bertram 25 with twin Mercruiser 165 L6's. I recently ran all new fuel plumbing from the tank to the engines and removed the mechanical steering and replaced with hydraulic (mostly done). Replaced old trim pumps with alpha pumps and relocated them into a forward area and have removed or repaired a bunch of wiring in the engine compartment and helm area. Here are some pics of the engine and battery wells:

49577394537_db116d5e70_b.jpg


49576656983_6f73c1b173_b.jpg


49576721983_b9cf1f4a39_b.jpg


I finally got around to running her again today after all the work got completed and I can't get the Stbd engine to stay running. I was back there and in the helm area monkeying around for about 2 months on and off getting this work done and I am thinking I may have knocked something loose in the electrical system.

The engine turns over and fires when the ignition key is turned to start but seems to be running slightly too high of an rpm but when the key returns to the on position the engine dies right away.

During the survey this engine also had an issue "finding neutral" and I wonder if that and this may be related to the shift interrupt system?

I did check to make sure I have fuel at the carb so it is definitely an electrical related problem...

Any pointers?
 

Scott06

Admiral
Joined
Apr 20, 2014
Messages
7,180
The 12 v to ignition is supplied off the starter during starting, then through the key and a resistance wire to reduce voltage to 9 v to the coil. Check what voltage u have at the plus terminal of the coil when key is in run.
 

Scott Danforth

Grumpy Vintage Moderator still playing with boats
Staff member
Joined
Jul 23, 2011
Messages
51,365
go back to basics

these engines are the ones that Fred Flintstone learned to drive with

the engines need compression, spark and fuel to run

service the points
ensure the dizzy is timed correctly
make sure you have fuel

sounds like you have a points gap and timing issue
 

alldodge

Moderator
Staff member
Joined
Mar 8, 2009
Messages
43,325
Agree check power at the coil in run

engine also had an issue "finding neutral"

Also disconnect the shift interrupter switch just to rule it out if it is casing any problems. The switch should not be the issue, but disconnect it just to remove a piece out of the equation

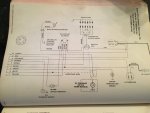
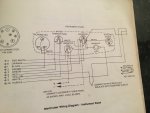
Old L6 wire eng.jpgOld L6 wire helm.jpg
 

ttownthomas

Petty Officer 1st Class
Joined
Jun 7, 2019
Messages
204
Thanks for the feedback. Weather permitting I will take a stab at it tonight. What creates the resistance in the "resistance wire"? Is it an inline resistor or a shielded cable of sorts?
 

alldodge

Moderator
Staff member
Joined
Mar 8, 2009
Messages
43,325
Thanks for the feedback. Weather permitting I will take a stab at it tonight. What creates the resistance in the "resistance wire"? Is it an inline resistor or a shielded cable of sorts?

Its the wire it self, same as spark plug wires are made to have so many ohms per foot, the ignition wire is also made with resistance built in. It can be bypassed for testing, but should not be left that way.

If wire does go bad, it can be replaced with a regular wire and add a ballast resistor inline
 

Scott Danforth

Grumpy Vintage Moderator still playing with boats
Staff member
Joined
Jul 23, 2011
Messages
51,365
its resistor wire. nearly every car from the beginning with points until the mid 70's had either a ballast resistor or a length of resistor wire. Napa has resistor wire on a spool. they also have ballast resistors
 

ttownthomas

Petty Officer 1st Class
Joined
Jun 7, 2019
Messages
204
OK. Mixed news. Y'all were correct. (Thank you) I had no power at the positive terminal in the run key position. Its nice to have a second motor right there working as a test mule. I started at the switch and worked my way backwards to the beginning of the harness under the console, had 12v everywhere. Then I skipped back to the motor end and tested for continuity a the harness connection. It was good. Couldn't find anything wrong so I put it all back together and presto. 12v at the positive connection.....But I only had 8 at the other coil....So I started her up anyway. Ran but terribly. Was missing like crazy. reconnected the spark plug wire that was not connected (must have knocked it loose). That wire had almost no tension but it ran better but still not right. I had a set of plug wires in a box, installed them and it still runs poorly. Blowing something out the exhaust. Looked like black smoke but it was dark out....Decided to call it a night.

Will the 12v at the coil cause poor running or just wear out the points faster?
 

Scott Danforth

Grumpy Vintage Moderator still playing with boats
Staff member
Joined
Jul 23, 2011
Messages
51,365
file the points - use either a points file, or your wifes fingernail file
gap the points - 0.018" or the thickness of a matchbook cover
verify the dwell and adjust as needed - to about 32 degrees of dwell
set the timing - about 6 BTDC

(should take about 3-5 minutes if you have the tools ready)

then figure out the 12 VDC vs 8 VDC (hint, its the ballast wire)
 

achris

More fish than mountain goat
Joined
May 19, 2004
Messages
27,468
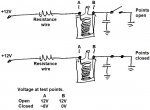
Voltage at the coil + will depend on whether the points were open or closed at the time you measured. (See below)...

Chris......

points.jpg
 
Last edited:

ttownthomas

Petty Officer 1st Class
Joined
Jun 7, 2019
Messages
204
I know this must feel like a support group for ametuer mechanics.....Thank y'all.

OK...So it looks like there are no timing marks on my harmonic balancers? Is it possible that I will have to find TDC to set the timing? And my distributor cap has 2 screws that thread into fixed holes. Dosent even seem like the timing can be adjusted on it.....
 

alldodge

Moderator
Staff member
Joined
Mar 8, 2009
Messages
43,325
You need a copy of Manual Number 2
The timing chanin cover should have degree markings on it. The vibration damper will have a grove in it. A timing light would be connected to cylinder number 1. There is one bolt holding the distributor in place, loosen it slightly, just enough so the distributor can be turned by hand with some force.

Start the motor and oint timing light at damper and turn distributor until the mark shows 6 BTDC at 650-700 rpm
 

achris

More fish than mountain goat
Joined
May 19, 2004
Messages
27,468
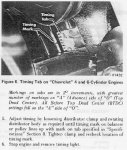
Balancer will have just a single mark, the lines are on the tab that is secured by some of the timing cover screws.
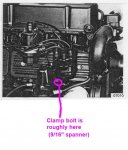
Timing is adjusted by loosening the clamp that holds the distributor body in the engine block and turning it, slightly... Then tighten the clamp down again.

Chris.....

timing2.JPG

clampbolt.JPG
 

ttownthomas

Petty Officer 1st Class
Joined
Jun 7, 2019
Messages
204
I have the shop manual. I was not adjusting the distributor correctly. Therefore, when the mark didn't move I assumed I was not looking at the right thing. Looks like both engines are set at 2 DBTDC. Will try again. Thank you
 

achris

More fish than mountain goat
Joined
May 19, 2004
Messages
27,468
I have the shop manual. I was not adjusting the distributor correctly. Therefore, when the mark didn't move I assumed I was not looking at the right thing. Looks like both engines are set at 2 DBTDC. Will try again. Thank you

That's a bit late, and could easily explain the poor running. 6° BTDC is spec (and later 165s ran at 8° BTDC).

Chris.........
 

Scott Danforth

Grumpy Vintage Moderator still playing with boats
Staff member
Joined
Jul 23, 2011
Messages
51,365
I know this must feel like a support group for ametuer mechanics.....Thank y'all.

with dizzy cap off and rotor off.....

file the points. new, old, doesnt matter...... file them always prior to setting the gap. anyone tells you you dont need to file them never worked on a points ignition and especially never had my father teach you.

you file the new points to get the manufacturing crud off the contacts...... you file old points to get the craters and peaks filed down to accurately gap

then, with the points shoe on cam lobe, set the gap. get close to the .018". feeler gauges, match book cover, dollar bill folded twice..... doesnt matter as much as the next step

then with your dwell meter connected to the coil, you crank the motor over and check dwell while cranking. adjust as needed, opening the points gap more if you need to lower the dwell, and closing them if you need to increase the dwell. this is one of the most important steps with points and you can not accurately set timing without this step. too little dwell and your timing is advanced and you do not get enough coil saturation. to much dwell and your timing is retarded.

now, install your rotor and your cap. fire up the motor and set the timing to 6 BTDC.

then go boating.


after you store the boat for winter, corrosion from moisture in the air will have covered the points. file, gap, adjust dwell, set timing every spring.
 
Top