Can't get starboard engine to run after a bunch of work.

ttownthomas

Petty Officer 1st Class
Joined
Jun 7, 2019
Messages
204
Well...I replaced the white resistance wire with a NOS quicksilver resistance wire. Prior to install I tested the resistance of the new wire and it was about 2ohms. I unwrapped the harness back to the lug connecting it to the white key on wire and wired it up. Still getting 5ish volts at the coil. Pretty much the same reading as before. Then it started raining and I packed it in for the night.
 

alldodge

Moderator
Staff member
Joined
Mar 8, 2009
Messages
43,325
When the points are open I get 8v on the better running motor and only 5 on this one

This tells me there is a coil issue, or something that is connected to the + side of the coil has an issue. Your motor should have a white wire (you just replaced) and a Tan wire going to the starter.

If the NOS wire is disconnected from the coil, and the key is turned to ON, do you read 12V?

If 12V is present, reconnect wire to + side and then remove all wires on - side of coil. Turn key ON and do you have 12V?

If you have 12V, then was the condenser replaced?
 

ttownthomas

Petty Officer 1st Class
Joined
Jun 7, 2019
Messages
204
Is the condenser the same as the coil? I know the coil "condenses" the voltage....So I assume yes

EDIT. Google answered this for me.
 
Last edited:

achris

More fish than mountain goat
Joined
May 19, 2004
Messages
27,468
Is the condenser the same as the coil? I know the coil "condenses" the voltage....So I assume yes

EDIT. Google answered this for me.

No, condenser is the old name for the capacitor. The round silvery thing that is inside the distributor cap next to the points.

Chris.....
 

ttownthomas

Petty Officer 1st Class
Joined
Jun 7, 2019
Messages
204
If the NOS wire is disconnected from the coil, and the key is turned to ON, do you read 12V?

Yes

If 12V is present, reconnect wire to + side and then remove all wires on - side of coil. Turn key ON and do you have 12V

Yes

If you have 12V, then was the condenser replaced?

I don't know. But this coil and distributor and cap all appear to be older than the good running engine.

Here are photos of what I have
 

Attachments

  • photo325938.jpg
    photo325938.jpg
    297.4 KB · Views: 0
  • photo325939.jpg
    photo325939.jpg
    312.2 KB · Views: 0
  • photo325940.jpg
    photo325940.jpg
    285.3 KB · Views: 0
  • photo325941.jpg
    photo325941.jpg
    335.9 KB · Views: 0
Last edited:

alldodge

Moderator
Staff member
Joined
Mar 8, 2009
Messages
43,325
Why don't you think its the coil?

With the wires disconnected from the Negative side of the coil, you get a full 12V. If the coil was shorting out, or causing a larger drain, the voltage would be lower.

You could try one more thing to verify
Connect all wires back up. Remove distributor cap and make sure points are open.
Loosen connection where the 2 wires connect to the points, and remove wire to condenser, retighten distributor wire on points
Turn key ON and there should be 12V

If there was 12V, touch condenser wire to original connection. Voltage should still be 12V. The condenser does not draw power thru the coil

Here is how the points system works
 

achris

More fish than mountain goat
Joined
May 19, 2004
Messages
27,468
Why don't you think its the coil?

There's more coils replaced in a day than fail in a year!

In more than 40 years working on all manner of cars and boats, I've seen 2 dead coils.

Chris.......
 

Scott06

Admiral
Joined
Apr 20, 2014
Messages
7,180
Why don't you think its the coil?

while coils do fail more often than not it is something else. If you google it or look in merc manual I’m sure you can find ohm ranges for primary and secondary windings to vet coil. The few times I have had bad coils(one VW, one 1975 Envinrude15) they ohm Ed out bad easy to rule out. Alternatively swap coil from good engine to bad, if problem goes away it’s the coil.
 

tank1949

Lieutenant Commander
Joined
Apr 4, 2013
Messages
1,911
Perhaps you have tried this, or not? If you have one good running motor, swap good parts with motor that doesn't work, especially coils and notice what happens. Write down what you have done! TRUST ME! Return good part back to good running motor.
 

Willit float

Cadet
Joined
Mar 15, 2020
Messages
7
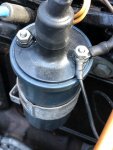
I went through something similar on mine. The coil was failing, it would start run fine, then start miss stall etc. I’ve seen about 6 failed coils over the decades. This could be various things, getting good info here. Mark the wires on pos and neg both coils. Swap coils and test run with water hooked up to outdrive.
On mine after replacing coil, points, condenser, rotor, cap etc. I thoroughly rebuilt my carb at the same time. It then ran fine.
Your manual shows and others have stated desired voltage to coil both with start and run positions.
You stripped back the resistor wire and re ran and sounds like that did not make any changes.
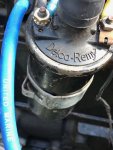
****Swapping coils make sure they have the same number and indicate if internal or external resistor. Simply performing an ohm test on the coil would show a constant fail but not intermittent. Coils are cheap, I upgraded the distributor to electronic breakerless points.
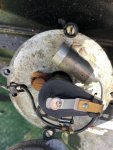
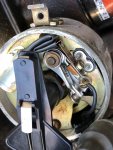
Also, check your distributor run out, with the power off at the main source, pull the cap. Remove the rotor and test top shaft side to side wiggle. Mine was shot, it had excessive horizontal play which caused impossible point accuracy.
 
Last edited:

ttownthomas

Petty Officer 1st Class
Joined
Jun 7, 2019
Messages
204
I replaced the cap, rotor, points and condenser. Set the points gap to .016 and the motor runs much better but still rich. When I set my points gap this is how Im doing it. Is this right:

File points
bump starter until the points lever is riding right on top of a cam lobe
put the .016 shim in-between the points
screw down screw to hold points in place

First time I got dwell (measured with dwell setting on multimeter) of around 40 then did it again and got around 27. Spec per fsm is 31 to 34 degrees. Is there a fine adjustment method I'm missing?
 

alldodge

Moderator
Staff member
Joined
Mar 8, 2009
Messages
43,325
After you tighten the points down, the feeler gauge is reinserted to check its set correctly. The spring tension on the points it self will close the points.

Increase gap decrease dwell, decrease gap increase dwell
 

ttownthomas

Petty Officer 1st Class
Joined
Jun 7, 2019
Messages
204
After you tighten the points down, the feeler gauge is reinserted to check its set correctly. The spring tension on the points it self will close the points.

Increase gap decrease dwell, decrease gap increase dwell

I am doing it correctly then....its just fiddly i guess. Any tricks to getting the points to rest right on top of the cam lobe? I'm Already using a starter button.
 

alldodge

Moderator
Staff member
Joined
Mar 8, 2009
Messages
43,325
Easiest way I found, is loosen dizzy bolt, adjust turn to set points, then turn dizzy back. Start and reset timing
 

Willit float

Cadet
Joined
Mar 15, 2020
Messages
7
Duh. Of course. This makes perfect sense. Thank you

Yes, I put a piece of tape to identify the position alignment or mark a black line for the distributor, loosen it and turn it to get a smooth accurate lobe. Now I said earlier that my bushing was worn causing the gap to be impossible to get accurate because of the wiggle. So I got a new electronic distributor and it is great.
 
Top