Cutting a new transom--sterndrive-Aluminum boat.

ab59

Ensign
Joined
May 10, 2017
Messages
979
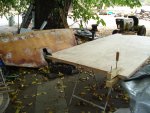
I have the makings for a new transom . I bit the bullet and paid the price for 3/4" Marine ply since good exterior is close to 50 bucks a sheet and by the time i bought all the spar , oil and other things to make it work i could just buy the marine ply and not waste my time .
Anyway it's time to draw the pattern and cut the new tsm . I clamped both pieces together but now i'm wondering if i should cut one at a time or go ahead and try to cut both at once. My concern in cutting one at a time is that they would not be identical in their cut where in if i cut them both at once hey should be pretty much the same but much harder to cut .
When i cut my side panels i left the line and used a hand grinder to bring them to size , this burned and sealed the edges and i believe that it should help keep moisture out as well as make the edges smooth and rounded. Maybe i should do this to the trans as well.
So , i am curious about what those who really know think , cut one at a time or cut both at once ?


DSC02564.JPG
 

Attachments

  • DSC02564.JPG
    DSC02564.JPG
    1.3 MB · Views: 2
Last edited:

oldrem

Commander
Joined
Nov 7, 2013
Messages
2,002
I cut mine after for the same reasons. Even with marine plywood, you still need to treat it. The only real differences are the number and quality of the inner layers.
 

ab59

Ensign
Joined
May 10, 2017
Messages
979
Oldrem---i'm not quite sure of what you mean by saying that you cut yours " after " . does that mean that you cut two separately and then glued them together ?
I plan on shooting some kind of sealer on the transom when done. i'm pretty sure i have a little spar around here someplace for it. The original just looks like they sprayed it with some grey primer on the engine side and as you can see they put nothing on the backside where it is up against the ;aluminum skin.
 

oldrem

Commander
Joined
Nov 7, 2013
Messages
2,002
I glued first, then cut. The best is to use the OTF (Old Timers Formula) then spar over that if you want the new transom to last a long time. Factory does the bare minimum to cut costs.
 

Woodonglass

Supreme Mariner
Joined
Dec 29, 2009
Messages
25,929
If you have a router, I'd cut one and get it to fit the way you want using sanders etc. OR I'd use 1/4" Masonite to make the pattern from. Once you have it, use the pattern and Draw a line aound it on the marine plywood and then use a jig saw to cut it about 1/8" outside the line. Now use a Flush Trim pattern cutting bit in your router and it will make a PERFECT duplicate of the first one.

https://www.ebay.com/itm/1pcs-3-4W-X...kAAOSwv-ZaNqr6
 

ab59

Ensign
Joined
May 10, 2017
Messages
979
Well , It's a funny thing but i have never owned a router ! The last time i used one was my freshman year in High School and that was around 1969 so i don't know if it would be a good idea for me to relearn on my new transom :noidea:. I do have a Roto Zip that is kinda like a mini router but the last time i used it ( about 15 years ago ) i did not get good results and control is a problem .
I like the idea of cutting one at a time and fitting the first one of the drive and transom . I started marking all the through holes for mounting but stopped when i thought about the holes need to line up exactly with the holes in the skln so guess that i will trace one out cut it , drill 2 of the drive mount holes and hang the one inside and drill out the holes before glueing . Then i can just punch out the the holes in the second half using the first as the pattern.
I dunno. Now I keep thinking about a router . :)
 

Woodonglass

Supreme Mariner
Joined
Dec 29, 2009
Messages
25,929
Routers ARE a very high speed tool and they DO have a bit of learning curve. All routers when held in the working configuration of Bit Down spin in a clockwise rotation. You ALWAYS move the router into and around the wood in a COUNTERCLOCKWISE direction. The pattern bit IS one of the easiest to use since it has a guide bearing and you're only removing 1/8 inch of material. Make sure the cord and all clothing are Out of the way. Also the bit is adjusted so that the guide bearings lower edge is about 1/8" above the bottom edge of the pattern board. (See Pic) The darker wood on top is the Pattern. I use Double stick carpet tape to attach the pattern to the plywood.


PatternOnTop.jpg
 

ab59

Ensign
Joined
May 10, 2017
Messages
979
DSC02562.JPGDSC02563.JPGDSC02560.JPG There is a slight angle cut into the bottom of the keyhole for some reason and i'm not sure that it should be there. MTboatguy said that he thought it was a mis adjusted jig at the factory. You guys have any opinion on this ? Should I cut the angle into the bottom of the keyhole or cut it straight ??
 
Top