disconnecting Volvo Penta motor from outdrive????

mmetzger1028

Petty Officer 2nd Class
Joined
Aug 28, 2014
Messages
135
Hey all!

Im going to be pulling my Volvo Penta AQ260, it will be my first time, and I am not sure how Im supposed to go about disconnecting the engine from the bell housing? Any advice/pictures would be greatly appreciated.

Thanks!
 

jeffnick

Senior Chief Petty Officer
Joined
May 24, 2004
Messages
695
I pulled my 260A with the housing attached. I pulled the outdrive first.

IMAG0894.jpg


IMAG0753.jpg
 

mmetzger1028

Petty Officer 2nd Class
Joined
Aug 28, 2014
Messages
135
Thanks for the pics Jeff!

And thanks for the awesome link Scott! PS I love your first step "Drink a Beer" hahaha! Nice!

Volvos are some of the easiest drives to remove, replace, and align.

first off, which drive do you have.

if we assume a DP, the steps to remove with boat on land are as follows (at least for my boat):

drink a beer
grab some plastic bags and a marker
remove shift cover
disconnect shift cable, place parts in labeled bag
remove bellows clamps from outdrive (may have to slightly raise the drive to access)
disconnect raw water line from drive
lower drive onto a block of wood
pull steering pin from helmet (put parts in bag)
remove trim/tilt pins (put parts in bag)
remove bolts retaining pivot pins
use approriate volvo slide hammer to remove pivot pins (put parts in bag)
offer your buddy a beer
both of you take a side, pull the drive backwards rotating on the block of wood.

put the drive on your drive stand.


now to remove the motor:
disconnect the batteries
remove the connections at the starter, and the ground leads on back of engine (label with black marker and tape)
disconnect the throttle cable
disconnect the wiring connector
disconnect the exhaust connections
disconnect the 1.25" supply line from the transom shield / power steering cooler
disconnect the power steering lines at the pump. cap off accordingly

go out back to the transom shield and undo the large clamp ring and outer o-ring (put parts in bag)
remove lag bolts securing motor mounts to stingers

connect engine hoist

lift slightly, slide forward slightly and tilt as required

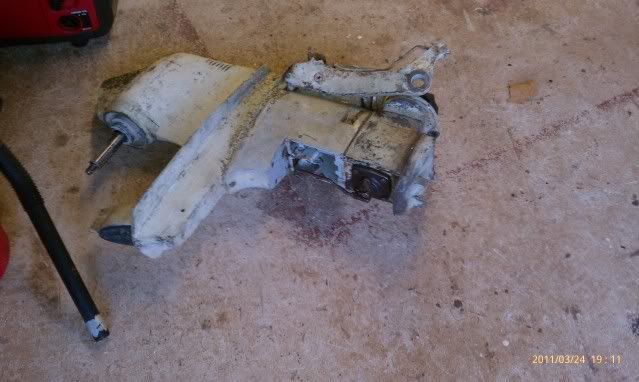
now the drive is off and the motor is out

now you can take care of the rotten motor mounts you found
now you can clean and inspect the bilge
now you can properly service the drive
now you can replace the raw water connector on the drive (dont worry, their cheep)
now you can inspect the flywheel adapter bearings
now you can inspect the drive coupler
now you can repair/replace whats broken in your motor

installation is reverse of removal.
drive alignment is makeing sure that both sides and top of flywheel housing alignment marks are within 1-1/2 mm of each other. (I try for 1/2mm)
check alignment as you are tightening the clamp ring and motor mounts
 

Scott Danforth

Grumpy Vintage Moderator still playing with boats
Staff member
Joined
Jul 23, 2011
Messages
50,425
yes, as you pull it out, it will look like Jeff's pic above
 

jerryjerry05

Supreme Mariner
Joined
May 7, 2008
Messages
18,089
You don't have to remove the drive to take the motor out.
Unhook the motor at the bellhousing and make sure the fuel and electrical are all undone.
There's a pesky ground wire under the motor that needs to be done, I always missed that until I had everything hanging.
Make sure the motor doesn;t twist or angle as you pull it up.
Then hook up the lift and pry the motor forward.
The bellhousing,It has a shaft about 1 and 1/2in long that goes into the damper/coupler on the flywheel.
Once that clears, it should lift right out.
When reinstalling, you need to put downward pressure on the drive.
It raises the bellhousing a very tiny bit and the motor will slide right back in.
Just make sure you don't turn the motor over while it's out.You can ,but it's better if you don't.
It will align better if you don't.
 

jerryjerry05

Supreme Mariner
Joined
May 7, 2008
Messages
18,089
No Title

Didn't have this pic when I did the last post.
 

Attachments

  • photo209986.jpg
    photo209986.jpg
    3.5 KB · Views: 0

mmetzger1028

Petty Officer 2nd Class
Joined
Aug 28, 2014
Messages
135
Got it out, thanks for all the help! Lil tough getting it to separate from the bell housing but with a lil vigorous giggling she pop'd right out.
unnamed.jpg unnamed-2.jpg unnamed-1.jpg unnamed-3.jpg unnamed copy.jpg
 

mmetzger1028

Petty Officer 2nd Class
Joined
Aug 28, 2014
Messages
135
Got the engine out of the truck in the shed and in the stand. Started the rebuild process. Though now I am just going to go with a new long block crate engine. So not sure what to do with this stuff now....
unnamed-4.jpg unnamed-7.jpg unnamed-8.jpg unnamed-6.jpg unnamed-9.jpg unnamed-5.jpg unnamed-10.jpg
 

jerryjerry05

Supreme Mariner
Joined
May 7, 2008
Messages
18,089
That "stuff" on the front of the harmonic balancer is needed, water pump.
Take it apart and sand blast it.
The pump is brass so don't over do.
Take the cover off the pump and check for wear.Post pics of the inside and the cover.
Replace the exhaust while your at it.
IF?? it has any age it's probably time.
 

Saline Marina

Petty Officer 2nd Class
Joined
Sep 9, 2014
Messages
162
The "covers" like rocker covers, oil pan are going to be needed plus their fasteners. Intake manifold needs to be thoroughly cleaned. The exhaust is your call but I'd recommend replacement. You will probably need a press-tool to remove the harmonic balancer/crank pulley. Personally I like a parts washer but you may not have that. Avoid scotchbrite at all costs as the grit can get entrained in the oil side of the engine and ruin things. Scrapers (like bronze putty knives) and stainless steel or bronze "toothbrushes" are your friends. I would avoid sandblasting any sheetmetal with glass beads as it will warp due to residual stresses added by the blast media. I would avoid blasting any assembly you will not take apart down to a complete set of individual parts on the bench as you will never ever get all the gritty media out of it. That said sandblasting can be a valuable tool. I would ziplock bag every set of fasteners plus a scrap of paper in each one describing the contents. My memory is compromised and projects can get delayed, causing a lot of head scratching about what went where. A nice set of digital photos from many angles can resolve a lot of details about hose, cable, and wire harness routings, little brackets, etc. A "factory reman" where there is an organized process is a really good engine from what I've found. Usually those have some sort of warranty attached to them to back up the confidence in the process. Good luck with the project!
 
Top