Failed hull repair...need advice/1981 Ranger 320-V Commanche

BWT

Petty Officer 1st Class
Joined
Apr 30, 2011
Messages
363
Re: Failed hull repair...need advice/1981 Ranger 320-V Commanche

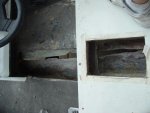
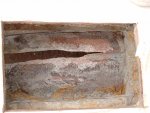
Not really, the process itself hasn't changed, just the size of the repair. To gain access to the area under the aft seat and the forward step an easy way to do this and cover it back up when finished is to use a couple of large plastic deck plates. Most are round but they also make rectangle shaped ones. Essentially it's a flat white frame that gets screwed to the deck / surface and has a removable lid. This will save alot of glass and gel work for covering up the access areas. Just make sure to know what the cut out size for the plates is before diving in.

I would do what I outlined above to the exterior side start to finish. Then when that has cured you will now have a solid surface / backer for doing the inside grinding and repairs. It's the same process, just different working conditions. On the inside areas I would make sure to get a couple layers of 1708 in there for added strength. Layups should go as follows:
- 1.5oz csm
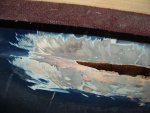
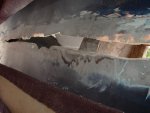
- 1708 (if the crack is on a chine, the 1708 will not take a sharp curve / bend.) try taking 2 pieces and laying them into the crack to form a V (one piece on each side of the split edges butting together to form the V. When that has cured take some of Oops filler and somewhat fill in this crack giving you more of a rounded fillet rather than a hard angle. Then lay glass on top of that bridging the whole works.
- cms, 1708 and 1 more csm.

The surface that you're glassing onto has to be clean and dry otherwise the resin won't cure or bond. Scuff everything up with 60 grit and clean with acetone. Dont be shy with the paper towel;) I'm confident that you can do this, like I said just take your time and think things through before actually doing them..

Let me know if you have any further Q's..
Good luck~

BWT
 

RDJuhl

Petty Officer 2nd Class
Joined
Jun 5, 2010
Messages
121
Re: Failed hull repair...need advice/1981 Ranger 320-V Commanche

I think I am making progress...but will let you experts be the judge. Spent most of the day cutting into the deck so I could access the repair from the top side as well as the bottom. Attached are some photos.

I was unable to gain access to the top side of the very front of the split...it falls right under the console...grrr. I will have to simply patch this area from the bottom side.

I have also ground back from each side of the split a couple inches or more.
Let me know what you think.
I am going shopping for the supplies I need to start patching.
 

Attachments

  • DSCF0158.jpg
    DSCF0158.jpg
    147.1 KB · Views: 0
  • DSCF0159.jpg
    DSCF0159.jpg
    148.4 KB · Views: 0
  • DSCF0160.jpg
    DSCF0160.jpg
    145.6 KB · Views: 0
  • DSCF0161.jpg
    DSCF0161.jpg
    147.3 KB · Views: 0
  • DSCF0162.jpg
    DSCF0162.jpg
    146.3 KB · Views: 0
Last edited:

Yacht Dr.

Vice Admiral
Joined
Feb 26, 2005
Messages
5,581
Re: Failed hull repair...need advice/1981 Ranger 320-V Commanche

I think I am making progress...but will let you experts be the judge. Spent most of the day cutting into the deck so I could access the repair from the top side as well as the bottom. Attached are some photos.

I was unable to gain access to the top side of the very front of the split...it falls right under the console...grrr. I will have to simply patch this area from the bottom side.

I have also ground back from each side of the split a couple inches or more.
Let me know what you think.
I am going shopping for the supplies I need to start patching.

You have a perfect example RDJ of an Interpreted repair.

This repair needs to be done Correctly .. or it could result in loss of life or property ..

I dont really like posting "how to fix this" for repairs like this .. it should be brought to a Pro and Seriously inspected.

That IS a LOT of work .. Its a Tear Fracture on the a Strake .. not common at all for a simple impact repair..

Also .. you need to ditch the Drill Grinder .. and get yourself a real 4.5" angle grinder ( from your pics the profile grind dictated you used a drill with a disk attachment ;) ). your regular grinder will save you Serious time on grinding.. if you Indeed as I suspect used a drill grinder .. that must have sucked bad ).

As far as a pro to fix .. your looking at 3-5 grand ( just based on your pics and further inspection of loose stringers etc. ).

Good luck .. take more pics and ask away :) .

YD.
 

RDJuhl

Petty Officer 2nd Class
Joined
Jun 5, 2010
Messages
121
Re: Failed hull repair...need advice/1981 Ranger 320-V Commanche

I did use a 4 1/2 inch angle grinder. I think the grinding wheel was 1/4 inch wide. Is there a better width to use for this task?
It is "possible" I did not take as much time on the grinding as I should have.

I appreciate the comments regarding the severity of this repair. I paid $2800 for the boat and motor a year ago, so am simply unwilling to shell out even $1000 this repair. I am a casual boater...so will make do the best I can. If the seam leaks...I will probably salvage the boat and motor.

I have learned a lot over the past year on this forum, and appreciate "everyone's" advice...
 

Yacht Dr.

Vice Admiral
Joined
Feb 26, 2005
Messages
5,581
Re: Failed hull repair...need advice/1981 Ranger 320-V Commanche

I did use a 4 1/2 inch angle grinder. I think the grinding wheel was 1/4 inch wide. Is there a better width to use for this task?
It is "possible" I did not take as much time on the grinding as I should have.

Stone disk possible that worked well.. :)

Your not going to go above your 1k ( so far ) in materials .. but you Will have extensive repair INside and Out ( IMO ).

This is a major undertaking for a DIY'er .. just from the location of the repair alone.

YD.
 

BWT

Petty Officer 1st Class
Joined
Apr 30, 2011
Messages
363
Re: Failed hull repair...need advice/1981 Ranger 320-V Commanche

You did a great job with the grinding. Most people doing this for the first time tend to lose their nerve and stop before they should.. This appears to have been taken back far enough. That being said it does somewhat add to the complexity of the job. Patching the hole isn't going to be the big issue, due to it's location (on an edge of a strake / chine) getting that profile back again is going to be a bit of a process. I think you can certainly do it, but you'll need to think and plan a few steps ahead.

Originally the edge of the strake was molded as part of the hull. I think trying to copy that is a little beyond the scope of this discussion. IMO I think the best way to approach this is going to be to repair the hole and build a solid edge (rather than molded) to match the exterior profile. This is the step where you'll need to use your imagination a bit. For patching the hull, I would start with the interior. Take a piece of heavy plastic and tape this to the outside of the hull as tightly as possible with the strongest tape you can find (if you clean the area that you'll be laying the tape onto with acetone you'll get a much better stick) I usually use shrink wrap tape. You want the shape of the plastic to mimic the contour of the hull. Pull this tight and tape the he** out of it.

From the inside take a sheet of csm ripped (not cut) just larger than the opening. You'll want the whisps to catch the edge of the fiberglass all the way around. Start by wetting out the edges with a brush to hold it in place and carefully wet out the rest of this piece. Let this set up until it's stiff (probably 30-40 min depending on temp). Next layup another layer of csm slightly larger than the previous, followed by a 1708, cms, 1708, csm and final layer 1708. By the time the last 2 layers are going on, the size of these pieces should be larger than the area that was ground by a few inches (or more). For these build layers a roller can be used rather than a brush, however I still like to have a brush handy for pushing out air bubbles in the laminates. Without a fin roller you'll just have to look very closely at each layup and work the bubbles out best you can; lightly tape with the brush and "walk" the bubbles out towards the edge. You'll need to make sure that the glass is COMPLETELY wetted out; dry spots are bad :(

Let this set for an hour or so; time to start with the exterior. Pull the tape, plastic, etc and clean any residue off. Follow the same process as the interior until you have glass that is sitting just a little proud of what would be the finished round profile (minus the strake edge). You'll want the last 2 layers to be csm. Coat with gelcoat (inside and out) along with some PVA when tacky to allow full cure. Let this sit for the night. I would guess that layup time would be about 4 hours or so for someone doing this for the first time.

I'll post part 2 tomorrow night; building the strake edge :)

Good luck! I'm going to be working in the yards tomorrow and won't be online again until night time. If you have Q's post away and I'm sure someone will jump in ;) Remember pics!
 

RDJuhl

Petty Officer 2nd Class
Joined
Jun 5, 2010
Messages
121
Re: Failed hull repair...need advice/1981 Ranger 320-V Commanche

I think I owe all the "experts" who chimed in with advice an update.
First, a quick summary.
1 - A couple weeks ago, I discovered that a prior hull repair had a "small leak"...resulting in a few gallon of water draining out each trip to the lake.
2 - Following others advice, and a closer inspection, the "small leak" turned into much more.
3 - I discovered that the foam between the hull and the floor of the boat was saturated with water.
4 - I cut a "trench" in the floor about 4 feet long, and pulled out all the wet foam.
5 - I removed the prior repair, inside and out. It appears that the prior repair consisted of squeezing bondo into the crack from the outside only. After removal of all the bondo, I had an opening in my hull about 4 feet long, and 1/4 inch to 1 1/2 inches wide.
6 - I then fiberglassed the inside with several layers of fiberglass
7 - I then fiberglassed the outside of the hull with several layers of fiberglass
8 - I used some spray foam in a can (from a home supply store) to fill the inside areas of the hull where I pulled out the wet foam
9 - I attempted to use some gel coat on the hull...which turned into a disaster, as it gelled before I could apply. I followed the directions closely, even reduced the amount of hardener...I suspect the gel coat was "defective".

The good news...we did take the boat on our "long weekend", and it did not leak a drop!!! I could not have accomplished this without the wise advice, guidance, and cautions from all of you who contributed to this chain.

The bad news...the bottom of the hull looks terrible (fiberglass repair is lumpy, and gel coat did not apply correctly). I am also planning to drill a core sample on the opposite side of the floor to see if the foam is saturated on the other side of the boat as well. If it is, I then need to make some decisions...such as...should I take the boat to the nearest junkyard...or should I fix it. If I decide to fix it, I need to figure out how to turn the boat over so I can do the repair "properly", grind/sand the repair smooth and applying new gel coat.

Attached are a couple more pictures...and by all accounts, I really hate to post one of them, but feel obligated to provide an update to those of you who offered advice.
DSCF0168.jpgDSCF0163.jpgDSCF0165.jpgDSCF0170.jpg
 

Woodonglass

Supreme Mariner
Joined
Dec 29, 2009
Messages
25,929
Re: Failed hull repair...need advice/1981 Ranger 320-V Commanche

WOW!! You really need to do some Grindin on your glass work on the exterior of the hull. Use a 41/2" gringer and 36 grit to start the swithch to 60 and fiish with 100 to smooth it all out. You had some issues with your glass work it appears. When you get it all smoothed and faired your gelcoating should go alot better.
 

RDJuhl

Petty Officer 2nd Class
Joined
Jun 5, 2010
Messages
121
Re: Failed hull repair...need advice/1981 Ranger 320-V Commanche

Yes...several issues with the glass works. Mainly from working upside down...and being a first timer! Many lessons learned for "next time" :)
 

RDJuhl

Petty Officer 2nd Class
Joined
Jun 5, 2010
Messages
121
Re: Failed hull repair...need advice/1981 Ranger 320-V Commanche

Hi Everyone,
Spring is here in Wisconsin...and this boat is out of winter storage. I am now planning to complete the repair I started late last summer.
I plan to grind down and smooth the "rough fiberglass repair" that I did last fall, then paint it. Woodenglass has a thread where he uses Valspar Tractor paint. He indicates that a person can color match using Acrylic Artist Oil paint and mix with the "Base" color.

I have a question on this...I can find tinted Valspar Tractor paint that is dark blue...but it needs to be just a bit darker. Do I use the Dark Blue, then mix in some Acrylics Artists Oil paint...or do I need to start with a "base color" of Valspar tractor paint and then mix in the Artists oil paint? (Note - I am not having any luck finding a base color of Valspar tractor paint. Here is a link to Woodenglass's instructions:

http://forums.iboats.com/showthread.php?t=384982&page=10&p=3302799#post3302799

Thanks for any advice.
 

Woodonglass

Supreme Mariner
Joined
Dec 29, 2009
Messages
25,929
Re: Failed hull repair...need advice/1981 Ranger 320-V Commanche

If you want to darken the Valspar Ford Tractor Blue, Then Get some Black and White acrylic enamel artists paint in tubes or a quart of Valspar Black and White paint. Squeeze out a tablespoon of white and 3 tablespoons of Black. thin it with two tablespoons of Acetone. This will give you a Dark Grey. Mix this into a cup of the Blue and see if it's dark enuf. If not add another tablespoon of Black thinned with a teaspoon of Acetone. Keep track of the ratio and then you'll be able to repeat it.
 

RDJuhl

Petty Officer 2nd Class
Joined
Jun 5, 2010
Messages
121
Re: Failed hull repair...need advice/1981 Ranger 320-V Commanche

Thanks Woodenglass...your willingness to help all us "rookie boat owners" is much appreciated!
 
Top