First time pulling a riser with questions about condition w pics

Lou C

Supreme Mariner
Joined
Nov 10, 2002
Messages
13,168
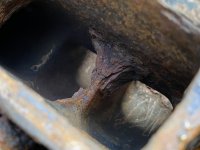
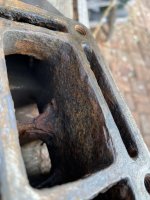
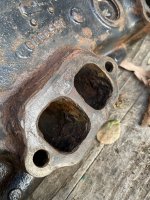
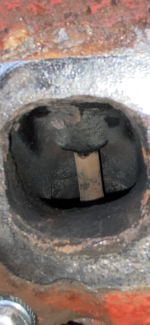
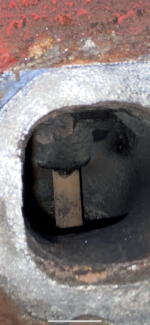
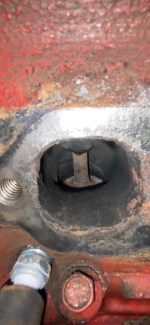
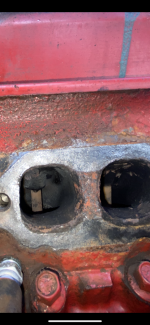
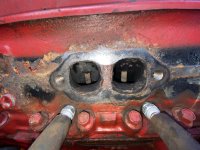
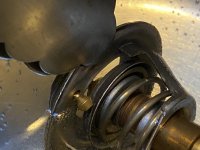
When you blow those pix up you see a lot of pitting, on the sealing surfaces. Remember that sealing surface is what keeps water out of the cyls. Usually you can't see the pitting until you get all the gasket material off and take a good close look. These surfaces should look like smooth shiny cast iron. I would either get them milled on a sanding machine or replace both the manifolds and elbows. If you get Barr Marine aftermarket for the Volvo the kit is about $750 for everything including new bolts & gaskets. Here's a pic of what these look like when new....I found that the casting of the Barr parts was very good, the paint was kind of thin so I'd paint them with a couple of coats of Rustoluim black they will stay rust free longer.
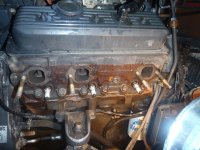
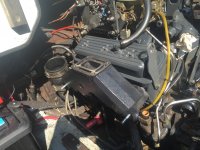
Here's what they should look like to seal right:
see the headless bolts, I used those to keep the manifolds/gaskets lined up when installing.
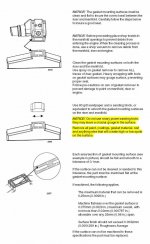
Look at Volvo's specs for the condition of the sealing surfaces...
Then their gaskets require the use of the copper based spray sealer...
I used the gaskets that came the Barr kit they are a thick composition gasket, and coated both sides with Permatex Aviation sealer and no leaks.
When installing the elbows, to keep it all lined up you can use the same trick with 2 headless bolts, take the standard bolts, go to a hardware store, get 2 longer bolts for the manifolds, and elbows. Then cut the the heads off and cut a slot in the end of the headless bolt for a screwdriver slot to make it easy to remove. This helps keeping the parts lined up esp with the elbow gaskets coated with sealer they like to slide around.
 

Attachments

  • Exhaust install wiht headless bolts to line it all up.JPG
    Exhaust install wiht headless bolts to line it all up.JPG
    2.4 MB · Views: 17
  • volvo penta exhaust installation instructions.jpg
    volvo penta exhaust installation instructions.jpg
    120.5 KB · Views: 14
  • exhaust manifold torque specs.jpg
    exhaust manifold torque specs.jpg
    48.2 KB · Views: 14
Last edited:

BRICH1260

Lieutenant
Joined
Jul 6, 2011
Messages
1,385
I know money is always a factor but if you can, I would just replace all the manifolds and risers. But definitely replace the risers.
 

MalibuMike

Petty Officer 2nd Class
Joined
Dec 29, 2020
Messages
137
Thank you for all your input. Upon further reading, I think I’m going to replace the manifolds . I was so focused on the water passageways that I overlooked this item in the throat of the exhaust port. While I believe the water jackets are clear enough to circulate water, it appears to me that water may have entered the exhaust portion causing this sort of rust flaking on the partition. You can also see some extensive pitting on the exhaust throat and the flat surface ( the wall) above it is slightly thinner than all the other areas on top.
Would you agree that in photo one, that type of rust flaking would be caused by water intrusion? Or could that just be natural degradation? With all the reading I did, it seems like all the exhaust portions should just be black and sooty, but not rusty with flakes.
 

Attachments

  • FBB6AB29-0B36-4C6A-BB6E-1301BFC437FB.jpeg
    FBB6AB29-0B36-4C6A-BB6E-1301BFC437FB.jpeg
    2 MB · Views: 14
  • 07E1A1BD-7D64-4971-9100-355A37A9F13E.jpeg
    07E1A1BD-7D64-4971-9100-355A37A9F13E.jpeg
    1.7 MB · Views: 14
  • D2491EF1-7BA1-45B4-A08E-CDED73DDCC98.jpeg
    D2491EF1-7BA1-45B4-A08E-CDED73DDCC98.jpeg
    2.3 MB · Views: 13
Last edited:

Lou C

Supreme Mariner
Joined
Nov 10, 2002
Messages
13,168
Yep we couldn't see that in the original pix due to shadows but for sure they were leaking and for sure replace the whole works. Your engine will appreciate it! This job if let go, will result in at least having to do a valve job in a season or 2. Rusty valve stems, rusty valve seats, low compression. BTW, take a good pic of your cyl heads where the exhaust ports are so we can see how your exhaust valves look....this is mine some years back see how the exhaust ports are grey/dark grey, no rust on the exhaust valves...this is what you want...the rust on the outside of the cyl head is just from the old gasket....
 

Attachments

  • OMC 4.3 during manifold replacement 6-2011.jpg
    OMC 4.3 during manifold replacement 6-2011.jpg
    126.2 KB · Views: 15

MalibuMike

Petty Officer 2nd Class
Joined
Dec 29, 2020
Messages
137
Yep we couldn't see that in the original pix due to shadows but for sure they were leaking and for sure replace the whole works. Your engine will appreciate it! This job if let go, will result in at least having to do a valve job in a season or 2. Rusty valve stems, rusty valve seats, low compression. BTW, take a good pic of your cyl heads where the exhaust ports are so we can see how your exhaust valves look....this is mine some years back see how the exhaust ports are grey/dark grey, no rust on the exhaust valves...this is what you want...the rust on the outside of the cyl head is just from the old gasket....
I order two new Sierra manifolds today off Amazon at a really great price and free two day shipping. $220 each and local shops were $280 each and have two new risers ready to go when they show up. Heading to the boat tomorrow to get pics of valves and stems in the ports to asses conditions. Thanks for all your help. It was a process to understand all this. I may also pull the heat exchanger since it was fun watching the Rydlyme eat away at stuff. Seems like a good idea to knock out a few maintenance items since the boat is used with no indication of when some of these items were done.
 

Lou C

Supreme Mariner
Joined
Nov 10, 2002
Messages
13,168
I order two new Sierra manifolds today off Amazon at a really great price and free two day shipping. $220 each and local shops were $280 each and have two new risers ready to go when they show up. Heading to the boat tomorrow to get pics of valves and stems in the ports to asses conditions. Thanks for all your help. It was a process to understand all this. I may also pull the heat exchanger since it was fun watching the Rydlyme eat away at stuff. Seems like a good idea to knock out a few maintenance items since the boat is used with no indication of when some of these items were done.
Whichever ones you buy take a look at the mating surfaces before installing. Some of the imported manifolds and elbows are not machined accurately enough to make a water proof seal. I used a straight edge and feeler gauges to check mine. Look at the Volvo Penta specs I posted in this thread. I would use OE VP gaskets and follow their instructions as far as sealer and torque specs.
 

MalibuMike

Petty Officer 2nd Class
Joined
Dec 29, 2020
Messages
137
Got some photos of the exhaust ports. I’m hoping these valve stems and valves look normal for their age. The valve stems just have a very light oxidation that is on the surface but no pitting or measure rusting. It appears that the previous manifold gasket was not the right type and allowed some surface rust to form between the two middle exhaust ports. The Sierra gasket that I purchased for the new manifolds, have gasket material dividing these two exhaust ports.
 

Attachments

  • 26F2C127-9C7D-42BC-B26C-99F04371483D.png
    26F2C127-9C7D-42BC-B26C-99F04371483D.png
    6 MB · Views: 11
  • 38B5B81B-336A-4E8A-B120-E0D9D29F64CF.png
    38B5B81B-336A-4E8A-B120-E0D9D29F64CF.png
    5.9 MB · Views: 11
  • 10FC0545-6A2A-4D5B-B857-1DCF71D0DBD3.png
    10FC0545-6A2A-4D5B-B857-1DCF71D0DBD3.png
    6.7 MB · Views: 11
  • ABA4D876-993F-4D6A-BF3C-5318CFA5DEB6.png
    ABA4D876-993F-4D6A-BF3C-5318CFA5DEB6.png
    6.4 MB · Views: 10
  • AA3ED2EA-D3A2-41B5-8680-B9C6D1F7A347.jpeg
    AA3ED2EA-D3A2-41B5-8680-B9C6D1F7A347.jpeg
    3 MB · Views: 11

Lou C

Supreme Mariner
Joined
Nov 10, 2002
Messages
13,168
I’m not really seeing a problem there except the engine may be running a bit rich or maybe burning a bit of oil. Looks like you caught it before any damage was done. Aren’t you glad you checked?
 

MalibuMike

Petty Officer 2nd Class
Joined
Dec 29, 2020
Messages
137
I’m super glad I am checking everything and squaring away as much as possible. On a fuel injected engine, what can cause hey is cylinder to run rich? With the computer scanner, could that kind of information be pulled from the computer?
 

Lou C

Supreme Mariner
Joined
Nov 10, 2002
Messages
13,168
Might be as simple as a clogged dirty flame arrestor & spark plugs that need to be replaced. See how the exhaust ports on the pic of my engine are a lighter grey?
 

MalibuMike

Petty Officer 2nd Class
Joined
Dec 29, 2020
Messages
137
Might be as simple as a clogged dirty flame arrestor & spark plugs that need to be replaced. See how the exhaust ports on the pic of my engine are a lighter grey?

The spark arrester probably hasn’t been cleaned in 20 years so I’m gonna put it in a bath of barnacle Buster and take a small bristle brush and clean it. It has of a lot of aluminum oxide if that’s what the rust is called.The spark plugs are Champion 1703’s and I’m not even sure they are the right type.
 

Lou C

Supreme Mariner
Joined
Nov 10, 2002
Messages
13,168
for the flame arrestor I'd use carb cleaner and dry with compressed air.
plugs, it depends on if it's a pre vortec or vortec engine. Does the intake manifold have 8 (Vortec) or 12 bolts (pre Vortec) holding it down?
 

MalibuMike

Petty Officer 2nd Class
Joined
Dec 29, 2020
Messages
137
Just tested the thermostat in pot of boiling water. It "looked" new but the results were not what I expected. Its a 158F thermostat. At 168F it started to open a very small amount.....the very first signs of anything at all. At 178F it was about 40% open. At 184F it was at max opening. It did not open anywhere close to 158F. Should a 158F thermostat be a lot more open before the temp has to climb that high? I would think so.
But I just read this from Stant "The thermostat is usually fully opened at 15 - 20 degrees (F) above the opening temperature."
I guess my 158F should be fully open at 173 to 178F. Going to replace it anyway. Maybe the springs get old and not as accurate as the age.
 

Attachments

  • IMG_2773.jpg
    IMG_2773.jpg
    2 MB · Views: 1
  • IMG_2774.jpg
    IMG_2774.jpg
    1.8 MB · Views: 1
  • IMG_2778.jpg
    IMG_2778.jpg
    1.2 MB · Views: 1
  • IMG_2779.jpg
    IMG_2779.jpg
    1.2 MB · Views: 1

dingbat

Supreme Mariner
Joined
Nov 20, 2001
Messages
16,404
Just tested the thermostat in pot of boiling water. It "looked" new but the results were not what I expected. Its a 158F thermostat. At 168F it started to open a very small amount.....the very first signs of anything at all. At 178F it was about 40% open. At 184F it was at max opening. It did not open anywhere close to 158F. Should a 158F thermostat be a lot more open before the temp has to climb that high? I would think so.
But I just read this from Stant "The thermostat is usually fully opened at 15 - 20 degrees (F) above the opening temperature."
I guess my 158F should be fully open at 173 to 178F. Going to replace it anyway. Maybe the springs get old and not as accurate as the age.
The bi-metal regulates the opening and closing of the stat. A worn spring would allow the stat to open prematurely

The stat is under pressure in use. if you put 10-15 psi on the head of the stat would it open at a lower temperature?
 

Lou C

Supreme Mariner
Joined
Nov 10, 2002
Messages
13,168
You can tell you have the half closed cooling system, in raw water cooling no way would it look that clean. If I recall properly on the OMC style stats and housings (which is what Volvo used in this time period) they start to open at the rated temp and should open to 5/32nds minimum approx 20* higher. Sounds like yours was getting kinda lazy.
 
Top