Force 125HP misfiring, running rough...

Status
Not open for further replies.

fmt2bx

Petty Officer 1st Class
Joined
May 27, 2015
Messages
217
Update 07/17/15

Today I was able to get the time to do the timing light check, here are the results:

#1,#3,#4 ok , #2 had no spark.
-swap plugs, #2 no spark.
-Swap coil #2 still no spark
- Swap CD boxes and #2 still no spark!!!

PS: during each test, #1, #3, #4 checked ok.

So from my limited experience and reading of the manual, it looks like the problem would come from the Trigger (?). I try to inspect the plugs of the CD boxes but I can't see anything wrong with them, if there is a faulty pin in there I can't tell, there isn't any corrosion or obvious problem. Also re-checked all the wires under the protective sleeve and same, all looked ok.

So if trigger it is, I have to remove the flywheel and I wanted to know if it was something that required lots of tuning afterwards or just remove and replace deffective part?
Also, where could I find the flywheel extractor tool? Should I change the Stator as well?
A quick search of this forum showed that triggers and stators are available, still need to find out which model is the correct one for the motor.

I also check for fuel blowback earlier and I couldn't see anything noticeable, here is the video (note: turned out to be on 3 cylinders only).

https://youtu.be/N6y86ulpxwI


At least with all of your guys help I was able to go this far. Hopefully, I can fix this.

Thank you all so much for your help.


Cheers
FMT
 

SkiDad

Lieutenant Commander
Joined
Jul 18, 2010
Messages
1,518
i used one of these to do mine but I got the better bolts and washers per the guys there - i can't remember the specs but they were a certain grade to hold up under the pressure. i think grade 8. I think they might have been 1/4 x 20 size. http://www.oreillyauto.com/site/c/d....oap?ck=Search_N2409_-1_-1&pt=N2409&ppt=C2371

You tighten it all up evenly and then smack center with a small sledge - then re tighten each again and repeat. There is a flywheel key that keeps your timing in check - when done you tighen the flywheel nut to 90 foot lbs. I think the nut is 1-1/16 or around there - i remember buying a special socket to fit it.

but before you do all of this check out: outboardignition.com - it will help you test the trigger and stator wires so you know what to buy if anything. look under the correct year and see the PDFs. Yours is the earlier 1986 model - same as the 1985 models.
 

fmt2bx

Petty Officer 1st Class
Joined
May 27, 2015
Messages
217
i used one of these to do mine but I got the better bolts and washers per the guys there - i can't remember the specs but they were a certain grade to hold up under the pressure. i think grade 8. I think they might have been 1/4 x 20 size. http://www.oreillyauto.com/site/c/d....oap?ck=Search_N2409_-1_-1&pt=N2409&ppt=C2371

You tighten it all up evenly and then smack center with a small sledge - then re tighten each again and repeat. There is a flywheel key that keeps your timing in check - when done you tighen the flywheel nut to 90 foot lbs. I think the nut is 1-1/16 or around there - i remember buying a special socket to fit it.

but before you do all of this check out: outboardignition.com - it will help you test the trigger and stator wires so you know what to buy if anything. look under the correct year and see the PDFs. Yours is the earlier 1986 model - same as the 1985 models.

Great stuff Skidad, thanks. When you say there is a flywheel key, I assume that it is inside the flywheel not something that I have to do, right?
How did you hold the flywheel in place while removing top nut? Strap wrench?
 

Jiggz

Captain
Joined
Oct 23, 2009
Messages
3,909
Before going any further check resistance on each set of trigger wire first. Use extension wire with small alligator clips to keep the reading while you move around the wires and also the control lever and watching if the resistance changes. If it does, this is an indication there is a broken wire which hopefully is fixable. Obviously, even with this diagnosis you still need to remove the flywheel. And yes if you dismount the trigger you will re-set the timing which is really not that hard. To make it even easier mark the current timing rod position as it is right now before dis-assembly.
 

fmt2bx

Petty Officer 1st Class
Joined
May 27, 2015
Messages
217
Before going any further check resistance on each set of trigger wire first. Use extension wire with small alligator clips to keep the reading while you move around the wires and also the control lever and watching if the resistance changes. If it does, this is an indication there is a broken wire which hopefully is fixable. Obviously, even with this diagnosis you still need to remove the flywheel. And yes if you dismount the trigger you will re-set the timing which is really not that hard. To make it even easier mark the current timing rod position as it is right now before dis-assembly.

Jiggz,

Thanks. How do you check the resistance of each set of trigger? I have been trying to follow the instructions from the manual but I am not reading any resistance anywhere. I am using a digital ohmmeter. I must be doing something wrong obviously but I can't figure out what exactly.
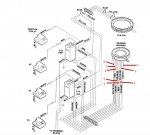
If you have a sec, here is a diagram of the electrical system, between what and what am I checking the resistance?
Thanks Force wire diag.jpg
 

fmt2bx

Petty Officer 1st Class
Joined
May 27, 2015
Messages
217
Update: Finally after some more reading I was able to check the trigger and stator resistance.
Trigger:
WhiteGreen/ to Orange (1)= 50 ohms
Red to White (1)= 50 ohms

WhiteGreen to Orange (2)= 50 ohms
Red to White (2)= 0

Here short video.
https://youtu.be/Nq0XbSjMqXk

On that last one, the reading stayed a Zero even while engaging throttle handle, moving wires around. I tested the resistance prior to plug, just in case it was a faulty pin connection but still Zero.

Stator:

Yellow/Blue (1)= 789
Yellow/blue (2)= 797
All Yellow to GND =open
All Blue to GND= Open

Stator looks like within range.


Next step is taking the flyWheel off and go from there.
 
Last edited:

Jiggz

Captain
Joined
Oct 23, 2009
Messages
3,909
You are on the right track. After you removed the flywheel you will have a better access to the full length of the trigger wires in question. Sometime the break could be in the laminated wiring or it could just be right where it comes out of the lamination. If it's not fixable obviously the next step is to replace the trigger unit.
 

Glastron_V210

Petty Officer 1st Class
Joined
Jan 28, 2009
Messages
324
Sounds like trigger to me. One last test you can try is to build a DVA as per this video:

https://www.youtube.com/watch?v=juhri_NxQcQ

the value of C1 and R2 are not critical, although C2 has to be a high voltage cap if you want to test the stator. I'm using a 10uF 300V cap and a larger value 5mega ohm resistor. All this circuit does is capture the peak voltage of the waveform you are measuring.

Anyway, if you build it you can check the trigger coil output. If you have a scope, just check it directly.

But, really, it's just a coil of wire. Shorted or open is no good, so you're pretty safe!

I pulled the flywheel nut by finding a bolt that fits into the bottom of the flywheel (there are balance holes or something in the bottom. then rotate until it contacts the block. DO put a piece of wood in between the bolt and block.

My nut was not on tight, but the flywheel was. I used a puller, a small amount of heat and tapped with a hammer/4x4 from the bottom (soft smack, not all out war).


Chay
 

fmt2bx

Petty Officer 1st Class
Joined
May 27, 2015
Messages
217
Sounds like trigger to me. One last test you can try is to build a DVA as per this video:

https://www.youtube.com/watch?v=juhri_NxQcQ

the value of C1 and R2 are not critical, although C2 has to be a high voltage cap if you want to test the stator. I'm using a 10uF 300V cap and a larger value 5mega ohm resistor. All this circuit does is capture the peak voltage of the waveform you are measuring.

Anyway, if you build it you can check the trigger coil output. If you have a scope, just check it directly.

But, really, it's just a coil of wire. Shorted or open is no good, so you're pretty safe!

I pulled the flywheel nut by finding a bolt that fits into the bottom of the flywheel (there are balance holes or something in the bottom. then rotate until it contacts the block. DO put a piece of wood in between the bolt and block.

My nut was not on tight, but the flywheel was. I used a puller, a small amount of heat and tapped with a hammer/4x4 from the bottom (soft smack, not all out war).


Chay

Chay,

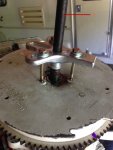
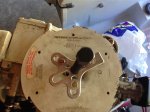
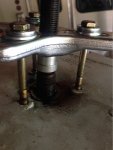
Thanks. I have removed the flywheel nut, kinda stuck now with the flywheel puller, not going anywhere really. When you say "tapped with a hammer/4x4 from the bottom (soft smack, not all out war)", you mean you had a 4x4 under the edge of flywheel and tapped it?
I tried heat and it won't budge. Was thinking of placing a piece off wood on top of center bolt of puller and tapping it.
Worried of damaging the flywheel tho.
Thanks again. Screen Shot 2015-07-18 at 5.24.03 PM.jpg Screen Shot 2015-07-18 at 5.24.14 PM.jpg Screen Shot 2015-07-18 at 5.24.30 PM.jpg
 

SkiDad

Lieutenant Commander
Joined
Jul 18, 2010
Messages
1,518
Make sure you are strait. Looks like one of your bolts is in more, But could be the picture. you want to turn the center screw till it's tight and then whack it pretty hard with a sledgehammer. Tighten again. Then repeat.
 

Glastron_V210

Petty Officer 1st Class
Joined
Jan 28, 2009
Messages
324
This can be a challenge! Make the puller as tight as humanly possible. Then, yes I used heat (Not a ton, maybe a minute flat out with the propane torch) and tapped upwards on the edge of the flywheel from underneath with a 4x4 and meduim size hammer. Tap right away when the flywheel is still hot or you may as well not have used heat at all.

I tried the whack the bolt thing...didn't work for me, hence the 4x4 approach.

It didn't fly off or anything...it very grudgingly gave way. Give it a few taps, then check and tighten the puller some more, repeat. sometimes it's hard to tell if you got a little bit on it or not.

You don't want to hit it too hard, but let's be honest, unless you get the flywheel off you don't have an engine anyway, so where is the downside?

Chay
 

fmt2bx

Petty Officer 1st Class
Joined
May 27, 2015
Messages
217
Thanks for the tips guys!
Wont be able to work on it until Wed. Cant wait to get this thing removed and fixed the boat.
 

fmt2bx

Petty Officer 1st Class
Joined
May 27, 2015
Messages
217
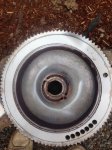
Got it !!!!!!! Flywheel is now off!!!

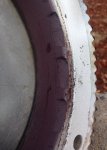
Looks like some of the permanent magnets are chipped. Don't know if it is that bad.

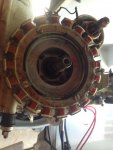
I checked the Trigger and I cannot see any broken wires in the exposed part. Must be internal then.

I got a new stator, trigger and rectifier. Arrived today.

If someone could tell me what they think about the damage on the magnets. I was thinking about putting a small amount of epoxy on the damaged area to avoid any more chunk to break lose and short the stator.

I will clean the flywheel area and start to re-install trigger and stator tomorrow.

Cheers.

1.jpg 2.jpg 4.jpg 3.jpg
 

Glastron_V210

Petty Officer 1st Class
Joined
Jan 28, 2009
Messages
324
Yeesh. I do not like the looks of that. No idea how that would perform. Not sure what your options are to replace it...new (used) flywheel or if it's a press in part you can buy.

Chay
 

Glastron_V210

Petty Officer 1st Class
Joined
Jan 28, 2009
Messages
324
Yeesh. I do not like the looks of that. No idea how that would perform. Not sure what your options are to replace it...new (used) flywheel or if it's a press in part you can buy.

Chay
 

fmt2bx

Petty Officer 1st Class
Joined
May 27, 2015
Messages
217
Yup! Don't like it either. Like it was right on the edge and not really deep, I just applied a tiny bit of epoxy to prevent the magnet to chip some more. I am looking at flywheel on eBay.

I installed the new stator, trigger and rectifier. Fired up the motor, all spark plugs checked ok.

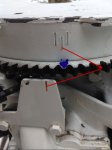
Looking at how to check timing now. If I have the timing light on spark plug #1, at idle, should the center flywheel mark line up with the mark on engine plate?


Thanks


image_226225.jpg
 
Last edited:

SkiDad

Lieutenant Commander
Joined
Jul 18, 2010
Messages
1,518
No, You don't set it while it is running. You set it while cranking the engine with the spark plugs out and grounded and full throttle. I'm not giving much detail but Frank has a video at the top of the forum that will explain it. Look at the 5 cylinder he has. The center mark is 30 degrees. The one to the right is 28. There is also a video of a force 120 on YouTube that explains it.
 

fmt2bx

Petty Officer 1st Class
Joined
May 27, 2015
Messages
217
No, You don't set it while it is running. You set it while cranking the engine with the spark plugs out and grounded and full throttle. I'm not giving much detail but Frank has a video at the top of the forum that will explain it. Look at the 5 cylinder he has. The center mark is 30 degrees. The one to the right is 28. There is also a video of a force 120 on YouTube that explains it.

Thanks Skidad, Towards the end of Franks video he says something about doing the timing while engine running. If I understood right, while running you should be at 30 deg (center mark), at cranking it should be at 28 deg.
Now i don't know if RPM is relevant while timing with engine running (i don't think it does).
With the white flywheel I can't barely see the timing light reflecting. :mad-new:
 

fmt2bx

Petty Officer 1st Class
Joined
May 27, 2015
Messages
217
Timing done!!! :bump2:

All is checking good in the driveway, i'll go tomorrow to test it out on the lake.
 
Status
Not open for further replies.
Top