how to replace shaft oil seal housing on a 2007 SX-M 1.6 outdrive

StingrayMike

Petty Officer 1st Class
Joined
Aug 17, 2014
Messages
355
Been around for abit, i have gotten alot of good info, but now i need some help.
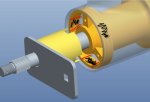
my shaft oil seal is leaking, but i cannot remove the shaft housing, my local volvo mechanic has never taken one off, and does not know what tool to use.
he recomended cutting a pipe and put some nipples on it.
if so what do i turn it? Is it reverse threaded?

thanks
 

StingrayMike

Petty Officer 1st Class
Joined
Aug 17, 2014
Messages
355
Thanks for the link. I tried to open it before, but once i get into the manual, it closes down the browser on my tablet. Guess I need to try it on my wife's laptop. Hopefully it will work :)
 
Last edited:

Fun Times

Moderator
Staff member
Joined
May 16, 2009
Messages
9,128
Hi there, welcome to iboats!:) What shaft are you wanting to remove? The input shaft on the upper unit or prop shaft on the lower unit?

To remove the prop shaft assembly, you're going to need tool part number 3850707. It will turn counter clock wise.

Lower unit disassembly,
http://boatinfo.no/lib/volvo/manuals...rive.html#/150

Upper unit disassembly,
http://boatinfo.no/lib/volvo/manuals...drive.html#/94

mr3GiW8TE-ofSkwLCyBxw7A.jpg
 

StingrayMike

Petty Officer 1st Class
Joined
Aug 17, 2014
Messages
355
Thanks for the pic and part number. I dont need to remove the prop shaft itsself,but just change out the oil seal. Its the shaft that the prop attaches too.
Hi there, welcome to iboats!:) What shaft are you wanting to remove? The input shaft on the upper unit or prop shaft on the lower unit?

To remove the prop shaft assembly, you're going to need tool part number 3850707. It will turn counter clock wise.

Lower unit disassembly,
http://boatinfo.no/lib/volvo/manuals...rive.html#/150

Upper unit disassembly,
http://boatinfo.no/lib/volvo/manuals...drive.html#/94

mr3GiW8TE-ofSkwLCyBxw7A.jpg
 

Dave-R

Chief Petty Officer
Joined
Mar 18, 2008
Messages
441
Hello Mike: I just replaced my propshaft seal last week on my Volvo sx. I made a carrier bearing removal tool from a 10" long 2" diameter pipe. Worked like a charm for me . I removed the torx screw and the retaining bolt and clip. Then used the pipe I notched carefully to fit the carrier bearing housing, and unscrewed it counter clockwise from the drive. I tapped out the seal, and took the housing to a Volvo dealer where I bought a seal (28$) and they pressed it on for me for free. They also explained that when I re-assemble the drive to check the rolling torque, which I did. Make sure you don't loose the shim that comes out with the carrier bearing housing, or your gears will not be properly pre-loaded. I also replaced the O-ring on the housing and bought new o-rings for the plugs. Before I took it apart I marked where the torx screw bit into the carrier bearing housing, and after re-assembly it was in the same spot. No leaks, and the drive feels very smooth. I looked at the manual and thought I could do the job. I made an adaptor also to pressure test the drive. My drive was already off and on the bench, but I think it would have been easier if left on the boat. Dave-R
 

StingrayMike

Petty Officer 1st Class
Joined
Aug 17, 2014
Messages
355
Thanks Dave,
thinking of doing the same thing, just need to get the pipe:)
appreciate the insight on the shims and the rolling torque. I will post the results when i get it done.
Hello Mike: I just replaced my propshaft seal last week on my Volvo sx. I made a carrier bearing removal tool from a 10" long 2" diameter pipe. Worked like a charm for me . I removed the torx screw and the retaining bolt and clip. Then used the pipe I notched carefully to fit the carrier bearing housing, and unscrewed it counter clockwise from the drive. I tapped out the seal, and took the housing to a Volvo dealer where I bought a seal (28$) and they pressed it on for me for free. They also explained that when I re-assemble the drive to check the rolling torque, which I did. Make sure you don't loose the shim that comes out with the carrier bearing housing, or your gears will not be properly pre-loaded. I also replaced the O-ring on the housing and bought new o-rings for the plugs. Before I took it apart I marked where the torx screw bit into the carrier bearing housing, and after re-assembly it was in the same spot. No leaks, and the drive feels very smooth. I looked at the manual and thought I could do the job. I made an adaptor also to pressure test the drive. My drive was already off and on the bench, but I think it would have been easier if left on the boat. Dave-R
 

StingrayMike

Petty Officer 1st Class
Joined
Aug 17, 2014
Messages
355
Hello Mike: I just replaced my propshaft seal last week on my Volvo sx. I made a carrier bearing removal tool from a 10" long 2" diameter pipe. Worked like a charm for me . I removed the torx screw and the retaining bolt and clip. Then used the pipe I notched carefully to fit the carrier bearing housing, and unscrewed it counter clockwise from the drive. I tapped out the seal, and took the housing to a Volvo dealer where I bought a seal (28$) and they pressed it on for me for free. They also explained that when I re-assemble the drive to check the rolling torque, which I did. Make sure you don't loose the shim that comes out with the carrier bearing housing, or your gears will not be properly pre-loaded. I also replaced the O-ring on the housing and bought new o-rings for the plugs. Before I took it apart I marked where the torx screw bit into the carrier bearing housing, and after re-assembly it was in the same spot. No leaks, and the drive feels very smooth. I looked at the manual and thought I could do the job. I made an adaptor also to pressure test the drive. My drive was already off and on the bench, but I think it would have been easier if left on the boat. Dave-R
Alrighty Dave,
went and bought a piece of pipe , cut the notches. Fits nice
tomorrow will drill out holes for a pry bar.....
we will see
 

Dave-R

Chief Petty Officer
Joined
Mar 18, 2008
Messages
441
Mike if you have a pipe wrench, that is what I used. My drive was on the bench and I supported the end of the pipe with a 2X4 underneath the tail end. Then used the pipe wrench close to the drive. Came out quite easy, but I'm not around salt water. Make sure you removed the bolt and tab, and also the torx screw. If you can, I would take a rolling torque reading before you remove the carrier housing. Good luck. Dave-R
 

StingrayMike

Petty Officer 1st Class
Joined
Aug 17, 2014
Messages
355
Mike if you have a pipe wrench, that is what I used. My drive was on the bench and I supported the end of the pipe with a 2X4 underneath the tail end. Then used the pipe wrench close to the drive. Came out quite easy, but I'm not around salt water. Make sure you removed the bolt and tab, and also the torx screw. If you can, I would take a rolling torque reading before you remove the carrier housing. Good luck. Dave-R
Ibwas thinking the same thing about the pipe wrench. Looks like the PO didnt do any kind of maintenance, hopefully it will be easy
 

StingrayMike

Petty Officer 1st Class
Joined
Aug 17, 2014
Messages
355
N
Ibwas thinking the same thing about the pipe wrench. Looks like the PO didnt do any kind of maintenance, hopefully it will be easy

jot goibg so good. Cant get it off. My pipe wrench is a bit too small, so cant get a good grip.
also i drilled out the end of the pipe to fit a pry bar through. The bar is 1/2" square, about 3'long. Still no budge.
j have supported the pipe as well.
do you think that the pipe is too long, so instead of rotational force, i am applying downward? The pipe is 21"
 

Dave-R

Chief Petty Officer
Joined
Mar 18, 2008
Messages
441
My pipe was a 12" nipple. I did support the end with a block of wood, to keep it from pulling off the carrier. I also had a 18" pipe wrench. Mine came off without a lot of pressure. Dave-R
 

StingrayMike

Petty Officer 1st Class
Joined
Aug 17, 2014
Messages
355
Cut the pipe down to the length of the shaft, and got a bigger pipewrench. No luck.
imhave beat on the wrench with a sledge, even heated up the carrier with a torch. She is stuck!!
Im at a loss :(
My pipe was a 12" nipple. I did support the end with a block of wood, to keep it from pulling off the carrier. I also had a 18" pipe wrench. Mine came off without a lot of pressure. Dave-R
 

Corian35

Cadet
Joined
Apr 16, 2013
Messages
16
The seal is inside of the bearing housing. You have to remove the bearing housing to get this seal out. my one drive this housing came out no problems the other drive was a PITA. I had to cut the outer ring in three spots to relieve the tension so I could turn the hub out. I made my own tool (see link below). Make sure the small set screw is removed. I used a sawzal to cut the ring. Sort of have to be careful not to cut a lot into the lower unit. I just cut enough to get a small pry bar to pop out the cut sections. Once these came out the bearing hub un screwed with no issues. The torque on the hub is around 225 ft-lbs. Need to make sure the rolling torque on the drive shaft is correct to get right bearing pre-loads.

Let me know if you have any questions.


http://forums.iboats.com/forum/engi...olvo-penta-cobra-sx-outdrive-prop-shaft-seals
 

StingrayMike

Petty Officer 1st Class
Joined
Aug 17, 2014
Messages
355
I am at that point now. Already made a tool, but no matter how much torque, would not budge.
already cut out the top ring, now working on the base.
i have geen around boats for a LONG TIME, never had anything like this, but the PO, did have the boat in salt water constantly since newm(2007) so abit of saltwater welding would be expected. And since he had all the maintenance done at his local marina (with the outdrive fluid dip stick and drain plugs bottom painted over, I am sure it was done correctly
The seal is inside of the bearing housing. You have to remove the bearing housing to get this seal out. my one drive this housing came out no problems the other drive was a PITA. I had to cut the outer ring in three spots to relieve the tension so I could turn the hub out. I made my own tool (see link below). Make sure the small set screw is removed. I used a sawzal to cut the ring. Sort of have to be careful not to cut a lot into the lower unit. I just cut enough to get a small pry bar to pop out the cut sections. Once these came out the bearing hub un screwed with no issues. The torque on the hub is around 225 ft-lbs. Need to make sure the rolling torque on the drive shaft is correct to get right bearing pre-loads.

Let me know if you have any questions.


http://forums.iboats.com/forum/engi...olvo-penta-cobra-sx-outdrive-prop-shaft-seals
 

Corian35

Cadet
Joined
Apr 16, 2013
Messages
16
I marked up a photo of where to cut the hub. This is where I cut the ring and then removed the sections and the hub spun out with no issues. Hope this helps if there was any confusion. The nice thing is if you nick the inside of the lower unit it wont effect the function or seal of the hub.
 

Attachments

  • hub-cut.jpg
    hub-cut.jpg
    37.3 KB · Views: 9

StingrayMike

Petty Officer 1st Class
Joined
Aug 17, 2014
Messages
355
I don't see any pics. I wont be able to make any progress until this weekend. Hopefully i can get the hub out without any damage to the outdrive housing.
I marked up a photo of where to cut the hub. This is where I cut the ring and then removed the sections and the hub spun out with no issues. Hope this helps if there was any confusion. The nice thing is if you nick the inside of the lower unit it wont effect the function or seal of the hub.
 

Fun Times

Moderator
Staff member
Joined
May 16, 2009
Messages
9,128
I don't see any pics. I wont be able to make any progress until this weekend. Hopefully i can get the hub out without any damage to the outdrive housing.
Does this help you to see the photo from Corian35?
fetch
 

StingrayMike

Petty Officer 1st Class
Joined
Aug 17, 2014
Messages
355
Nope, no pic. Just a small box with a question mark.
not needed though. I was able to FINALLY get the carrier off :)
no damage to the lower outdrive housing either. Flushed out all the particulates that got inside. Ordered a new carrier, oring, and bearing, should be here in a few days. Hopefully be back in the water this coming up weekend.
 
Top