I screwed up. electric trolling motor connection help

jrm7997

Cadet
Joined
Nov 14, 2020
Messages
9
Good morning all.

As the title says I screwed up. My brother gave me a broken early 1980s Mercury Thruster plus trolling motor. Before i took the wires off the motor I took a picture but i didn't look close enough or write down the location of the wires. My problem is that I have just spent a couple hours looking for connection info online and i keep coming back to two resources.

The first is a site that wants you to register and give them credit card info. so you can download a service manual. I cant get myself to give CC info to do that.

The second is your site. I always feel bad posting when i probable wont be able to help the forum much in the future but I'm at a dead end. So I'm asking for help determining where my motor wires connect. I have

A #12 Yellow
A #12 Red
A #14 Yellow with a red stripe
A #14 Yellow with a blue stripe

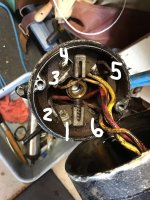
Attached is the picture i took before pulling the wires. I cant trust the locations i see because some of the wires go under the plate and back up. I have labeled the connections 1 - 6.

1 and 4 are the brush connections. no brainer.
2 is pretty obviously the #12 red so i would think that 3 is the #12 yellow even though it looks like a smaller yellow and could be. See my problem?
Its 5 and 6 that are the problem. Further inside the cone are/is a coil. The two smaller wires are connected to them and I don't know what the coil/coils are for and don't want to accidentally hook them up backwards.

If anyone knows the answer to where the wires go, what the coils do, how to test before I connect, know where I can find a service manual or a picture of the page showing the connections etc etc etc.

Frustrated yours :)
Jim And thanks in advance for your help.
 

Attachments

  • junk elect trolling.jpg
    junk elect trolling.jpg
    1,022.5 KB · Views: 6

Mark ofs

Petty Officer 3rd Class
Joined
Aug 2, 2020
Messages
75
Hi Jim,
Hope this helps...

"RC" deck mount remote control foot pedal
"DM" deck mount manual steering model
"TM" transom mount manual steering mode
Mercury Thruster Schematic.PNG
 

skuhleman

Seaman
Joined
May 26, 2011
Messages
60
I have one around that vintage, but I have never taken the motor apart. If you have a picture of what all to take apart ill do it and post a pic of what I find inside.
 

jrm7997

Cadet
Joined
Nov 14, 2020
Messages
9
I have one around that vintage, but I have never taken the motor apart. If you have a picture of what all to take apart ill do it and post a pic of what I find inside.

Hi Jim,
Hope this helps...

"RC" deck mount remote control foot pedal
"DM" deck mount manual steering model
"TM" transom mount manual steering mode
View attachment 329013

Awesome. Or is it "you are awesome" This tells me a ton. Now i know what the coils are for and why they placed them down there. They are to create the different speeds and are in the bottom for water cooling.

Unfortunately, the quality of the picture is too pixilated and i cant read the colors although i don't think it will matter. Actually, now that i think about it, i don't think it shows which wire goes on which coil but if i get them backwards I could open the top end and change them on the rotary switch.

Thanks for taking the time to post this.

Skuhleman. If its working I'm not too sure you would want to do that. There are two o-rings and a thin cork gasket that is pretty tender. If however, you do take it apart id love to know the wire connection colors around the brushes. Attached are some pictures of the parts lined up. To take just the bushings end off you remove the propeller (right hand thread) then undo the top and bottom bolts. They are the long ones. If you do the two short ones you will break the seal of the cork gasket and all the oil will come out.

I just thought of something else. Mark ofs, does your manual tell how much oil goes in the gear case and the weight of it? Don't worry if its too much bother Its not going to hurt if i put in a little too much oil in. BTW, is your manual a digital version :)

In the pictures you will see new brushes ($5 from an electronics store), O-rings from a local fluids shop and I made my own bushing (bottom right with the tye wrap). unfortunately made of brass instead of bronze because I dont have any bronze around the shop.

Thanks again
 

Attachments

  • Photo 1.jpg
    Photo 1.jpg
    505.3 KB · Views: 4
  • Photo 2.jpg
    Photo 2.jpg
    502.3 KB · Views: 4
  • Photo 3.jpg
    Photo 3.jpg
    508.6 KB · Views: 4

Mark ofs

Petty Officer 3rd Class
Joined
Aug 2, 2020
Messages
75
Glad it was a help, This is from the original "Operation & Maintenance Manual" that came with my father-in-laws boat back in '86, so this is a hard copy. The manual states under lubricants....

From Authorized Dealer: Quicksilver Multipurpose Lubricant or 2-4-C Lubricant.
Obtain Locally: Automatic Transmission Fluid (A.T.F.)

No quantities are given. Thank's for the pictures and information, hopefully I won't have to go there for a while!
 

jrm7997

Cadet
Joined
Nov 14, 2020
Messages
9
Glad it was a help, This is from the original "Operation & Maintenance Manual" that came with my father-in-laws boat back in '86, so this is a hard copy. The manual states under lubricants....

From Authorized Dealer: Quicksilver Multipurpose Lubricant or 2-4-C Lubricant.
Obtain Locally: Automatic Transmission Fluid (A.T.F.)

No quantities are given. Thank's for the pictures and information, hopefully I won't have to go there for a while!
ATF? not what i would have thought. I started cleaning it up and putting it together today along with adding drip spouts to the RV. Finally got too cold to be in the garage. I might get it finished tomorrow but more likely next week.

Thanks
 

Mark ofs

Petty Officer 3rd Class
Joined
Aug 2, 2020
Messages
75
ATF? not what i would have thought. I started cleaning it up and putting it together today along with adding drip spouts to the RV. Finally got too cold to be in the garage. I might get it finished tomorrow but more likely next week.

Thanks
Surprised me too! Know that cold feeling...had to start the wood stove in the garage the other week to get some work done...
 

jrm7997

Cadet
Joined
Nov 14, 2020
Messages
9
Surprised me too! Know that cold feeling...had to start the wood stove in the garage the other week to get some work done...
So where are you at? Any skiing nearby? Heading up to Sun Peaks in a week. Time to self isolate for a couple weeks then go crazy skiing.
 

jrm7997

Cadet
Joined
Nov 14, 2020
Messages
9
All done, back together and running much better. Here are some FYIs for the next person looking to do this.

Pull the front (brush end BE) and back (Gear/prop end GE) halves off the center magnet (MA) area. You need to reseal both ends with an o-ring. When i pulled mine apart there was sealant on both o-rings, where the GE goes into the MA and in the gear housing there is a cork gasket between the planetary gear and back portion of the case. I used an orange gasket maker material because i had it. :)

To get the brushes in I drilled a small hole through the brush holder (as far towards the wire as i thought strong enough) and into the brushes. I then put a thin wire into them to hold the brushes back.

Push the connecting wires as far into the cone as you can. Push the armature as far towards the front as you can and still get the end of the armature into the brushes and brass/bronze bushing (i lubricated the bushing with Molidium grease before installing). While holding the armature into the brushes/bushing have someone pull the two wires. I then let go of the armature and pushed the front cone into the MA. While holding it there I duct taped it into place while assembling the GE. I think the main amount of push back comes from the wires. They are old and stiff. IF newer the cone might go in much easier.

Putting the GE on is as simple as putting on the gasket material, lining up the long bolts and tightening them up.
 

Mark ofs

Petty Officer 3rd Class
Joined
Aug 2, 2020
Messages
75
So where are you at? Any skiing nearby? Heading up to Sun Peaks in a week. Time to self isolate for a couple weeks then go crazy skiing.
In NH, Mt Sunapee run by Vail Resorts is within half-hour drive, but there are many others around. Thanks for the summary post of the process!
 

jrm7997

Cadet
Joined
Nov 14, 2020
Messages
9
In NH, Mt Sunapee run by Vail Resorts is within half-hour drive, but there are many others around. Thanks for the summary post of the process!
Vail took over whistler/Blackhome a few years ago. Sun peaks is very different. Less trendy more hillbilly with excellent vertical and cold snow. whistler/Blackhome gets wet “coastal” snow. SP if you are a skier.
wet “coastal” snow.
 

jrm7997

Cadet
Joined
Nov 14, 2020
Messages
9
Vail took over whistler/Blackhome a few years ago. Sun peaks is very different. Less trendy more hillbilly with excellent vertical and cold snow. whistler/Blackhome gets wet “coastal” snow. SP if you are a skier.
wet “coastal” snow.
Next project is a Honda ct90 engine and transmission rebuild. I think. A big job to take on. But......... maybe.
 
Top