Kansas City PM38 Build [Splashed 2017]

SGoergen

Petty Officer 3rd Class
Joined
Jul 12, 2016
Messages
91
Thanks for all the compliments! This has been a really fun project so far.

That looks awesome! I like how you went all the way up in the bow with your cloth. I didn't do that on mine. How did the cloth do for you on the sides? That's where I had the most trouble with mine. That's going to be a beautiful boat!

I let the cloth sit on the hull for about 24 hours before applying any epoxy, it let the cloth relax a little and conform to the sides. When I got to the edge I worked my way down the sides rather than acrossed, it helped keep the cloth tight around the edge. It was a little challenge at first, but seemed to work well once I figured it out. The cloth going all the way up the bow was probably the hardest, I had to work from the stem band out both sides and keep the cloth tight to the hull.

I haven't found a windshield yet, the plans don't really say what to look for. Where did you end up getting yours?

Scott
 

SGoergen

Petty Officer 3rd Class
Joined
Jul 12, 2016
Messages
91
did you pre-coat the plywood with resin prior to applying the fabric?


I applied an epoxy seal coat to the plywood and let that set up, the thought was to allow the plywood to soak up some epoxy, that way it wouldn't be sucking it out of the cloth when the time came. Then had some runs to sand out and minor fill to do, once those were taken care of I did a light sanding of the hull followed by coarse scotchbright pad to scuff the surface and give the next coat something to grip. I cleaned the surface and layed out the cloth, letting it sit and relax a while (it was folded in the package). Once the cloth had relaxed, I used the dry method, applying resin directly to the dry cloth, wetting it out and working it out from the centerline with a squeegee. Working from the center allowed me to "walk" any air pockets out to the edges of the cloth and helped keeping the cloth tight to the hull.

I trimmed it out today, sanded a few high spots and applied a second fill coat of epoxy to fill the weave. Once that sets up, in the next day or so, I plan to apply a 3rd finish coat of epoxy, then its on to sanding ............. and more sanding.

Scott
 

pekstrom

Chief Petty Officer
Joined
Dec 31, 2015
Messages
490
Thanks for all the compliments! This has been a really fun project so far.


I let the cloth sit on the hull for about 24 hours before applying any epoxy, it let the cloth relax a little and conform to the sides. When I got to the edge I worked my way down the sides rather than acrossed, it helped keep the cloth tight around the edge. It was a little challenge at first, but seemed to work well once I figured it out. The cloth going all the way up the bow was probably the hardest, I had to work from the stem band out both sides and keep the cloth tight to the hull.

I haven't found a windshield yet, the plans don't really say what to look for. Where did you end up getting yours?

Scott

The one they used on the original prototype of the boat isn't made anymore. But I did find one out on eBay. Mine is 60" wide and looks to be a perfect fit on mine. I searched for 'vintage plexiglas windshield' and a couple show up now. I got one like this:

http://www.ebay.com/itm/Nos-Vintage...ash=item58ed87cc8b:g:DzAAAOSwA3dYjT6H&vxp=mtr

The problem with this listing though is that you get none of the hardware or the seal for the bottom of the windshield. If you want one like it I'd suggest keeping an eye out there. It took a while for the one I got to show up. I think I bought mine from this same seller.
 

Woodonglass

Supreme Mariner
Joined
Dec 29, 2009
Messages
25,929
Sounds like a good layup for the glass work on the hull. She's gunna be a "Beaut" when your done.:encouragement:
 

SGoergen

Petty Officer 3rd Class
Joined
Jul 12, 2016
Messages
91
This thing is looking amazing! Where in KC are you? Only boat at Truman?


Thanks! I live south of Kansas City, near Adrian, MO. Truman lake is less than an hour, so it is on of the "go to" places for weekend camping. We also go to Pomme De Terre quite a bit, a little further drive but the state park is really nice. This year we are planning to extend out a little further and include Stockton and Table Rock.

You located in the Kansas City area?

Scott
 

hvymtl939

Chief Petty Officer
Joined
Feb 6, 2017
Messages
495
Thanks! I live south of Kansas City, near Adrian, MO. Truman lake is less than an hour, so it is on of the "go to" places for weekend camping. We also go to Pomme De Terre quite a bit, a little further drive but the state park is really nice. This year we are planning to extend out a little further and include Stockton and Table Rock.

You located in the Kansas City area?

Scott

We're in Olathe, on the southwest side of the metro. Hillsdale lake is about 20 minutes for us, and Clinton 30. We also have a small local lake that is about 3 minutes away that we spend a lot of time at. We went to Lake of the Ozarks last year, and Tablerock before that, and had great times at both. Definetly look forward to getting out to each at least once this summer, and would like to check out Truman as well, since it's only and hour and a half or so. My uncle to me out to Stockton years ago, but that's the only time I've been. I'm never been to Pomme De Terre, but have heard it's great. Might have to put it on the list as well.
 

SGoergen

Petty Officer 3rd Class
Joined
Jul 12, 2016
Messages
91
No Title

It's been a little bit, so time for an update. I have been busy working on the boat, finished all the epoxy application to the bottom side and spent what seems like weeks, sanding!

The skid rails are built and installed, they went on pretty easy. I pre-drilled the screw holes prior to covering the glass with primer, it allowed me to see the screw lines for the bottom battens and alignment was pretty easy.

I now have primer on the bottom up to the splash rails. The plan is to finish the bottom, flip the boat back over and work the top side. Once the top decking in ready for primer, I'll prime the deck and the sides of the boat all at once.

I also glassed the transom, wrapping the glass around the back corners and took a little extra time to crawl under the boat and epoxy seal the bottom side of the top decking.

Hoping to get it flipped back over this weekend and start finishing the decking.

As of right now, I am hoping the weather warms up in the next few weeks and I can spray the final paint once the boat is out of the basement.

I did start collecting parts and steel for the trailer, hoping to get started on that as soon as the weather cooperates!

Here are some pics.

Scott
 

Attachments

  • photo260164.jpg
    photo260164.jpg
    100.3 KB · Views: 0
  • photo260165.jpg
    photo260165.jpg
    78.5 KB · Views: 0
  • photo260166.jpg
    photo260166.jpg
    63.7 KB · Views: 0
  • photo260167.jpg
    photo260167.jpg
    103.9 KB · Views: 0
  • photo260168.jpg
    photo260168.jpg
    105.8 KB · Views: 0
  • photo260169.jpg
    photo260169.jpg
    109.7 KB · Views: 0

ssdale

Starmada Splash of the Year 2016
Joined
Nov 4, 2011
Messages
285
Scott you are making this fellow Missourian Proud! Keep up the superb effort. I'm following Pek's build too. Sweet looking projects.
 

jbcurt00

Moderator
Staff member
Joined
Oct 25, 2011
Messages
25,143
Looks great

Never noticed the hull is stepped? In the 3rd pix you posted? Is Pek's?
 

SGoergen

Petty Officer 3rd Class
Joined
Jul 12, 2016
Messages
91
Looks great

Never noticed the hull is stepped? In the 3rd pix you posted? Is Pek's?

Yes, the step in the hull is part of the original design. It's supposed to reduce surface tension and help the boat come up on plane more efficiently.

Scott
 

pekstrom

Chief Petty Officer
Joined
Dec 31, 2015
Messages
490
It's been a little bit, so time for an update. I have been busy working on the boat, finished all the epoxy application to the bottom side and spent what seems like weeks, sanding!

The skid rails are built and installed, they went on pretty easy. I pre-drilled the screw holes prior to covering the glass with primer, it allowed me to see the screw lines for the bottom battens and alignment was pretty easy.

I now have primer on the bottom up to the splash rails. The plan is to finish the bottom, flip the boat back over and work the top side. Once the top decking in ready for primer, I'll prime the deck and the sides of the boat all at once.

I also glassed the transom, wrapping the glass around the back corners and took a little extra time to crawl under the boat and epoxy seal the bottom side of the top decking.

Hoping to get it flipped back over this weekend and start finishing the decking.

As of right now, I am hoping the weather warms up in the next few weeks and I can spray the final paint once the boat is out of the basement.

I did start collecting parts and steel for the trailer, hoping to get started on that as soon as the weather cooperates!

Here are some pics.

Scott

Scott,

She looks awesome! Can't wait to see her flipped over. What color scheme are you going to use? Were your sides going to be blue as well?
 

pekstrom

Chief Petty Officer
Joined
Dec 31, 2015
Messages
490
Scott, not sure if you are interested, but just came across this post on eBay for a windshield just like mine. It doesn't have the rubber seal for the bottom edge but it has all the screws and brackets.
 

gm280

Supreme Mariner
Joined
Jun 26, 2011
Messages
14,605
That is some impressive work there. I have to see this to the end. :thumb:
 

SGoergen

Petty Officer 3rd Class
Joined
Jul 12, 2016
Messages
91
No Title

Got the boat flipped back over! Now I have begun working on filling and sanding the top deck. Going to take a little while but I am getting close to applying primer.

WoodonGlass, I have been looking at different paints. I am looking to stay with the orange/gray/white colors in the seats and probably add some black into the mix somewhere. I found Kubota Orange in Rustoleum Farm and Implement paint, is it safe to assume this would work with your paint mixing instructions? I found some of the Majic Hardener, just wanted to double check the mix would be compatible. Should I use mineral spirits as a thinner or buy the Majic Reducer?

Scott
 

Attachments

  • photo261555.jpg
    photo261555.jpg
    117.6 KB · Views: 0
  • photo261556.jpg
    photo261556.jpg
    98.4 KB · Views: 0

SGoergen

Petty Officer 3rd Class
Joined
Jul 12, 2016
Messages
91
No Title

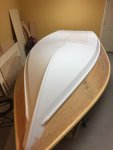
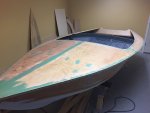
Since the boat was right-side up, it was a good time to finish off the transom.

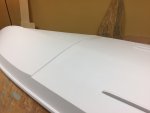
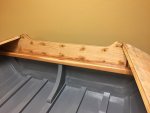
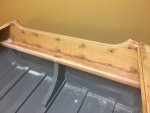
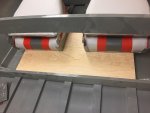
I added a second layer of 1/2" marine ply to the top section of the transom to add some thickness for the motor clamps. I extended the sides a little bit, the plan is to give the stern eyes some meat to grab on to. It's all glued, screwed, filled and glassed in place. There was also fiberglass cloth added to the top edge of the transom to insure the edge is sealed up good.

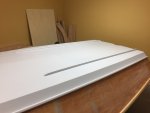
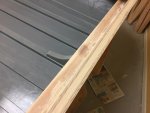
I still have another coat or 2 of epoxy to add for fill, weave has to have very light coats of fill due to being vertical.

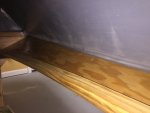
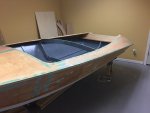
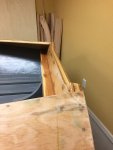
The plans for the boat show a transom motor board, I am assuming this is simply to stiffen the transom where the motor actually mounts. It doesn't really say how this is attached to the transom. Should it be mounted permanently with epoxy, or something temporary so it could be replaced easily? Looking on the web some appear to be glassed in place, others are simply screwed on.

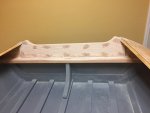
Another issue I noticed, the position of the transom brace is going to be very close to the outboard mounting bolts. Being I am using a Mercury 25hp, it only has 2 mounting bolts that are low on the mount, so it relies on the clamps and bolts. I haven't tried to position the motor yet, but the bolt holes may fall on the edge of the transom brace based on measurements. Any ideas on how to deal with that if it ends up that way? I double checked the position of the brace and it's per the plans.

PEK, you are using the same motor on your build, can you see if yours is the same way?
 

Attachments

  • photo261557.jpg
    photo261557.jpg
    118.9 KB · Views: 0
  • photo261558.jpg
    photo261558.jpg
    147.1 KB · Views: 0
  • photo261559.jpg
    photo261559.jpg
    128.1 KB · Views: 0
  • photo261560.jpg
    photo261560.jpg
    129.5 KB · Views: 0
  • photo261561.jpg
    photo261561.jpg
    135.9 KB · Views: 0

SGoergen

Petty Officer 3rd Class
Joined
Jul 12, 2016
Messages
91
No Title

I had extra time waiting on transom epoxy to set, I started working on the seat mounting. I ended up going with an angled platform that will sit on the bottom battens. It will attach to the frame just behind the seats and I am planning on installing a block on the keel to attach the front. Being the seats mount from the bottom, the plan is to be able to remove 3-4 screws and the whole thing will come out of the boat with the seats still attached. So far I have the main structure built, seat locations nailed down but need to finish up the mounting. Once the mounting is done, I'll epoxy coat it and wrap it in marine carpet.

Scott
 

Attachments

  • photo261562.jpg
    photo261562.jpg
    141 KB · Views: 0
  • photo261563.jpg
    photo261563.jpg
    122.2 KB · Views: 0
  • photo261564.jpg
    photo261564.jpg
    111 KB · Views: 0
Top