Mercruiser 5.7/Bravo 1 - Clanking Sound from Rear of Engine

WiredLlama

Cadet
Joined
May 22, 2012
Messages
21
Ok, update on my saga.

Good news: Pulled the drive off, shaft looks good. U-joints look good. No water in the bellows.

Bad news: Splines on the coupler are sharp and there is play in the gimbal bearing. ☹️

Ordering a new coupler and gimbal bearing. The gimbal bearing doesn't look bad (it's not rusty or anything). In general how difficult is that bearing to get out? I'm guessing a slide hammer to knock it out? Any tips or suggestions are very welcome.
 

Bt Doctur

Supreme Mariner
Joined
Aug 29, 2004
Messages
19,446
slide hammer/ bearing puller, etc but to install it you will need something like this


Bt Doctur

Supreme Mariner
Joined
Aug 29, 2004
Messages
19,446
There is no play in a gimbal bearing , it must turn freely and smooth as silk
 

WiredLlama

Cadet
Joined
May 22, 2012
Messages
21
Ok, so I am finding all kinds of couplers at a bunch of different price ranges. Can any of you guys point me in the right direction or have a part number for me? I am seeing both round couplers and triangular mount couplers that are confusing me.

I am thinking OEM part number 861523A
Sierra part number 1[FONT=Poppins, Tahoma, sans-serif]8-2412[/FONT]

1999 Mercruiser 5.7l 350 EFI: s/n OL087607
Bravo 1

I am also seeing on a bunch of websites that the tolerance ring for the gimbal bearing is no longer available? Anyone know anything about this? Can I reuse the old tolerance ring? Or is it included with the bearing?
 
Last edited:

WiredLlama

Cadet
Joined
May 22, 2012
Messages
21
Your coupler should be 18643A5 item 4 in link below
http://www.mercruiserparts.com/bam/subassembly/31867/2697/160

The gimbal bearing is 30-879194A02 and are now sealed bearings. The older style allowed bearing to be greased from the zerk on the housing, the new one can no longer be greased


This is where I am getting confused. The diagram shows number 4 (18643A5) as the coupler, however when I click on the part I'm not convinced that is what mine looks like. I haven't removed the bad one off my engine yet but to me it appears that coupler is recessed inside inside the rubber boot with two zerk fittings on it.

I notice on that diagram it says for carbuerated engines (2 bbl). Mine is EFI if that makes a difference?

Sorry I seem to be making this difficult but I just want to make sure this few hundred dollar part I order is the right one.
 

alldodge

Moderator
Staff member
Joined
Mar 8, 2009
Messages
43,231
Edit: there is another as item 9 and says for aluminum shaft and steel for work apps. You can use either of these and it may be that you have one of those, but doubt you have the steel (high torque).
 

WiredLlama

Cadet
Joined
May 22, 2012
Messages
21
Alright, well parts have been ordered. I'm crossing my fingers (sort or) that they are all the right ones and installation goes smoothly. I'll try to remember to take a few pics and update the thread when the project is finished to give some closure on the subject.

Thanks again for everyone's help
 

WiredLlama

Cadet
Joined
May 22, 2012
Messages
21
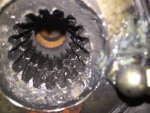
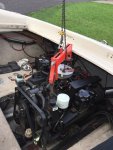
Project update: Was able to install a new coupler and new gimbal bearing last night. Unfortunately ran out of daylight before getting everything back together so haven't gotten to test it out yet. Fortunately I have a lot of room in the back of the boat once I removed the back seat and engine cover. I didn't have to completely pull the engine. I was able to just disconnect the exhaust, water inlet hose, and a few wires to slide the engine forward. There was ample room to remove the bell housing and switch out the engine coupler. Below is a picture of the old coupler. Splines weren't in terrible condition but in my opinion certainly worn enough to change. Easy enough.

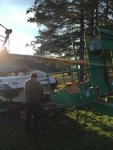
The gimbal bearing was a bear.... Snap-On 5# slide hammer for about a half hour with three different guys hammering on it. Didn't budge. Say what you will about the following method but it worked with minimal effort: Attached a come-a-long to a piece of heavy equipment to hold tension on the slide hammer. After we had constant tension on the slide hammer it only took a small hit to pop the bearing out. I wish I would have taken a picture of the setup because it was quite the show. Anyway, 3" piece of shc. 40 PVC with a few healthy whacks from a mini sledge and the new bearing was in.

Hopefully finish putting the rest back together tonight, lining up the engine and should be good to go.
Coupler_768.JPG Lift_768.JPG
setup_768.JPG
 

Rick Stephens

Admiral
Joined
Aug 13, 2013
Messages
6,118
You definitely caught the coupler before it caught you. Cool move on the slide hammer. Last is hope you have a pleasant test drive.

Rick
 

WiredLlama

Cadet
Joined
May 22, 2012
Messages
21
Ok, got the engine back in place, everything greased up and the outdrive back on. Fired up and the noise is gone. During install however I wasn't the most pleased with how well we could get the engine lined up. Could not find the perfect spot where the tool went very easily in and out. Pretty much bottomed out the motor mount adjustments and it still showed heavier contact on the top of the alignment bar. So that's another issue I'm going to have to look more into... I am thinking maybe the rear mounts are sitting too low. Looking at the diagram in the manual perhaps the double lock washers fell out without me noticing while banging on the gimbal bearing to get it out. The fiber washers looked fine to me but may require a little more attention.
 

WiredLlama

Cadet
Joined
May 22, 2012
Messages
21
I think I am screwed.... The thought of this was eating at me all night so I was out in the boat early this morning and I found one of the double lock washers in the bilge area. Who knows if the other is back there jostling around somewhere else or if it stayed in place on mount upon installation. :blue:

Maybe a dumb question but here goes: It should be possible to take out the rear mount bolts, loosen the front bolts and slightly lift the engine enough to slide the double lock washer in, correct? Of course will require removal of the outdrive again and realignment with the alignment bar. So frustrating. Supposed to be taking the boat for a long weekend leaving tomorrow...
 

Rick Stephens

Admiral
Joined
Aug 13, 2013
Messages
6,118
Agree. You should be OK just lifting the back to gain access. Be nice to have the alignment perfect.
 

WiredLlama

Cadet
Joined
May 22, 2012
Messages
21
Well, the weather forecast for central PA took a big dump (high of 67 degrees with am rain and pm clouds...) so at least I am no longer time crunched to get this completed. I can't for the life of me find the second double lock washer anywhere in the boat and I don't believe it stuck in place while banging to get the gimbal bearing out. I ordered two new lock washers and two new fiber washers.

At least I didn't have the interior put back together before realizing my mistake....
 

WiredLlama

Cadet
Joined
May 22, 2012
Messages
21
Final update I believe to bring this thread to a close. I was able to loosen all the motor mounts and the exhaust clamps to lift the rear of the engine and insert the double lock washers. Engine alignment was pretty much a breeze after that. Got out on the water over the weekend and everything seemed to go smoothly!

Thanks for all the help and advice everyone!
 
Top