Re: mercruiser 888 lower shift cable kit.
1) Where does that cable terminate inside the boat?
Look for the plate with two cables terminating on the back of the engine. One's to the control and the other is the lower shift cable...easy to trace.
Never heard of trying to lubricate a failing cable.
Replacement is not the easiest job you'll ever do. Get a manual and have a helper.
REPLACEMENT OF SHIFT CABLE KIT
1) Remove outdrive (see help o/d r&r)
2)Tilt the bell housing up an to the far left.
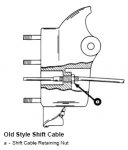
3)Locate the shift cable where it exits the rear of the bell housing and cable cut it tight against the bell.
4)Grab the slide pertruding from the rear of the cable and pull it out (discard)
5)With screwdriver loosten and remove the clamp on the tip of the bellows.
6)From inside the boat , disconect the shift cable tip hold down nut and the cotter pin over the adj barrell.
7)Pull on the cable and the cable willpull thru the bellows and come free (discard)
8)The only piece left is a small piece of cable screwed into the bell, remove it with a deep 9/16 with 3/8 drive socket.
9)If the socket was on the rear (transom side) of the bell it is old style--front (drive side) it is new style.
10)since the hole goes thru either old or new can be reinstalled but the same one you took out is easier.
11)If the old cable was frozen and had to be drilled and the bell was damaged in the thread reverse the cable.
12)Clean out the bell housing and clean and lubricate the u-jounts.
13)Check the u-j bellows for holes or cracks especially if water was in the bellows when o/d was removed.
14)Chech the gimble bearing by turning it it should be free and feel no grit while turning.
15)Check the u-joints, they should moove free not stiff and have no side play.
16)REMOVE THE CLAMP AND REMOVE THE CABLE BELLOWS.
REPLACEMENT OF CABLE FROM KIT
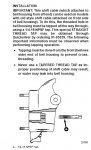
17)Determine from (9) which cable you need and purchase the kit old-im723 or new-im519.
18)Lightly screw the threaded portion of the cable into the threaded hole in the bell housing by turning the cable(no force).
19)Slide a 9/16 deep socket over the cable to the hex fitting to tighten , If the drive will not fit use plyers to turn the socket.
20)Get the fitting as tight as possible and in new cables there can be no threads left showing between the hex and bell.
21)If the new cable will not tighten enough to use all of the threads use a tap to widen hole (do not over tap)
22) 21 is important because if the hole is too small the slide will not be able to get to reverse too big it leaks in the thread.
23)Place the Bellows on the transom plate and clamp--lubricate cable and push it thru into the boat, this takes some effort.
24)Let the bell down and check that the shift arm and roller are free to turn fully.
25)Put inside cable thru slide and anchor with set screw, remove slack but slide must be able to rotate on cable freely.
26)Use lower unit oil as lubricant no greese, and slide the cable thru the outer cable until it bottoms out.
27)Move the cable in and out and be sure it is free to slide.
28)Interlock the roller of the shift arm with the two arms on top of the slide and position so track on bottom is straight.
29)Someone must hold the cable from moving during the outdrive installation.(see o/d r&r)
30)With o/d on, screw the s.s. tip of cable down and anchor it with nut.
31)Put plastic tip over the core wire and anchor it with the sleve and two set screws.
32)Slide the cable in and out and verify that the cable is free and smooth and goes into both gears.
33)Adjust the brass barrell on the s.s.tip to have a 6" distance from the center of the hole in the tip to the barrell center.
34)The above measurement is made with the cable fully compressed(fwd gear) and the prop locked ccw.
35)The barrell is not to be moves to adjust the shifting, that adjustment is done elsewhere.
36)affix the barrell under the cotter pin and put the tip under the nut on the stud, do not tighten nut down, just locked.
37)For adjustment of shift cable and easy shift switch return to main help menu.


")