Mercury 650 Won't Start

The Force power

Commander
Joined
Feb 3, 2019
Messages
2,350
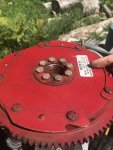
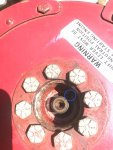
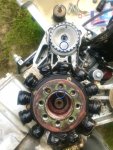
I'm still not convinced that the Fly wheel is in the right position on the hub.
Use a thin rod or Screw driver in the #1 spark plug hole to find TDC align the Fly wheel decal to it (8 bolts removed)

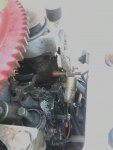
Keep in mind the timing mark on the distributor is for #1 spark and is not going to line up with TDC but before TDC.

I don't remember the degrees of BTDC

hopefuly someone tunes in
 

GA_Boater

Honorary Moderator Emeritus
Joined
May 24, 2011
Messages
49,038
Without Merc's TDC tool, the easiest way to check that the timing belt is on the right teeth is the pulley arrow will point exactly at the flywheel key. It's easiest to do this with the flywheel off to see the key and arrow. A 1st grader (me) drew a guide below. When my flywheel nut was off I used a marker so I knew where the key is when the nut is on.

key.png

Open the idle screws to about 1 1/2 open, 1 turn is still pretty lean. Then do the idle screw adjustment. Other than the initial setting, I don't count turns. I get motor running and close, CW, the idle screw until the motor stumbles, then open, CCW, until it stumbles. Set the screw in the middle of the two stumbles. Then do the other carb. I do this two or three times because one mis-adjusted carb makes the motor run poorly.

One thing missing in Merc's adjustment, the motor has to be in the water. You can do it on the trailer by backing down a ramp, leaving the boat tied down on the trailer, start the motor and let it warm up and put it in forward at idle. Don't rev past idle.

You can do idle screw adjustment on muffs to get the motor running, but the final must be in the water in gear at idle.

Don't touch the three screws on the plate except maybe the idle stop screw for the right idle RPMs. The other two screws should never be turned.
 

scottwoodward

Petty Officer 3rd Class
Joined
May 27, 2020
Messages
78
Thanks for the tips guys. I'm not convinced the flywheel is in the correct position either, but I did the screwdriver test several times and also did it with an engineer friend of mine who is much more experienced and knowledgeable than I am. We both confirmed that the flywheel alignment to the pulley arrow was generally correct when #1 was in the out position, that as the flywheel rotated, the screwdriver went in and out at the right place. That said, however, I have not checked that the alignment of the pulley arrow lines up with the key on the hub. When I removed the flywheel, I used a Mercury flywheel removal tool and removed it as a unit. When I put the flywheel back on, I assumed it could only go on one way with the key in the right position. Should I still do this test?
 

GA_Boater

Honorary Moderator Emeritus
Joined
May 24, 2011
Messages
49,038
As long as the key isn't missing or broken, the flywheel can only go on in the right position.

Sometime people remove the flywheel by taking out the eight bolts if they don't have the puller. Raises hand. :doh: If the flywheel isn't marked before removal there are eight ways to reinstall the flywheel and only one is right to keep the timing marks in the right place. Looking at your flywheel it seems those bolts have been removed seeing what look like tool marks. You can remove the flywheel nut to see the key without removing the flywheel.
 

The Force power

Commander
Joined
Feb 3, 2019
Messages
2,350
Thanks for the tips guys. I'm not convinced the flywheel is in the correct position either, but I did the screwdriver test several times When I removed the flywheel, I used a Mercury flywheel removal tool and removed it as a unit. When I put the flywheel back on, I assumed it could only go on one way with the key in the right position. Should I still do this test?


THE HUB only goes on one way but the fly wheel with the 8 bolt can go in any position AND affect everything
If....... you never had this motor running then yes (I don't know the history/what been done to it)
Also...as GA boater mentioned; the Screws on the the plate, has anybody messed with them???? These are you primary & secondary pick up for the Carburetors
 
Last edited:

scottwoodward

Petty Officer 3rd Class
Joined
May 27, 2020
Messages
78
I don't know the history and if anyone ever removed the eight bolts, but given the scratch on the flywheel, I would assume you guys are correct that the eight bolts were removed at some point in the past. I have not removed them because I didn't want to deal with having to figure out the alignment. I thought by using the flywheel remover that that would avoid that issue and that I'd drop the flywheel back into the correct position after putting on the new timing belt.

The fuel system was definitely dirty -- screens, bowls. etc. (see attached example photos). Before cleaning the fuel system and changing gaskets, I was able to get the engine started and running for about 20 seconds by pouring fuel in all four cylinders, even with the carbs in the condition you see in the photo. The propeller would start to turn, but then it would die. I'm having less luck now with the fuel system clean than I did before, which makes me think there's something simple I'm missing in the setup. I was convinced it was bad fuel (there was surely water and decomposing fuel in the gas can), but after cleaning the gas can and confirming I've got clean gas to the carbs, I'm back to square one thinking I've got some kind of timing issue. Not sure what else it could be.
 

Attachments

  • photo337239.jpg
    photo337239.jpg
    1.6 MB · Views: 0
  • photo337240.jpg
    photo337240.jpg
    1.4 MB · Views: 0

GA_Boater

Honorary Moderator Emeritus
Joined
May 24, 2011
Messages
49,038
That's a lot of crud!

Have you replaced the fuel pump diaphragm? I would still remove the flywheel nut and verify the the key and pulley arrow are pointing directly at each other. The will only take a few minutes.
 

scottwoodward

Petty Officer 3rd Class
Joined
May 27, 2020
Messages
78
Yes, replaced the fuel pump diagram too.

Here's the scoop on the positioning of the key -- not even close. The key position is about 2/3rds of a flywheel turn to the rear of the pulley arrow (see attached photos). The key is circled in blue in the last photo and I'm pointing to the position of the key relative to the TDC alignment marks on the flywheel in the second photo. You can see the position of the pulley arrow to TDC vs. the "WARNING" sticker where the key is pointing.
 

Attachments

  • photo337246.jpg
    photo337246.jpg
    1.8 MB · Views: 0
  • photo337247.jpg
    photo337247.jpg
    1.9 MB · Views: 0
  • photo337248.jpg
    photo337248.jpg
    1.8 MB · Views: 0

GA_Boater

Honorary Moderator Emeritus
Joined
May 24, 2011
Messages
49,038
Turn the flywheel until the key is pointing to the pulley, pop off the flywheel and reset the belt so the pulley arrow and key are in line. Put the flywheel back on without moving the crankshaft and leave the nut off. Finally undo the 8 bolts and spin the flywheel until the warning sticker or timing marks are over the pulley , the pulley arrow and key are still lined up and button everything up. Squeeze the bulb, choke it and crank 'er up. Ezy peezy. LOL

Use some thread locker on the 8 bolts. Don't want them to get undone while screaming up the lake or river.
 

scottwoodward

Petty Officer 3rd Class
Joined
May 27, 2020
Messages
78
GA Boater -- operation complete. Thanks for the instructions. See attached photo before I put the flywheel back on. I actually moved the key position a smidge counter-clockwise. When I got the flywheel back on and bolted down, the arrow on the pulley lined up nicely with the alignment marks on the flywheel as well as the key. But, the engine still didn't start. I only tried starting it one time before we got rain. Will revisit tomorrow, but as for this particular issue, I think I've got it right?
 

Attachments

  • photo337348.jpg
    photo337348.jpg
    1.6 MB · Views: 0

GA_Boater

Honorary Moderator Emeritus
Joined
May 24, 2011
Messages
49,038
It looks right. When you get back to the motor, use the screwdriver in #1 to make sure it's at TDC. It should be.

It was running OK before the belt broke, wasn't it? Since you were working on the carbs when the belt broke, the idle screws may need to be adjusted.
 

scottwoodward

Petty Officer 3rd Class
Joined
May 27, 2020
Messages
78
I could at least start it before, but it wouldn't stay running for more than 10-20 seconds. I'll do the screwdriver test tomorrow and will check the idle screws. Top carb out one turn and bottom lightly seated to start? I think I've got a choke adjustment to do as well. The manual choke/choke rod isn't extending all the way up when fully choked.

Thanks kindly for your assistance.
 

SteveVT

Petty Officer 2nd Class
Joined
Jul 31, 2017
Messages
163
Hate to jump back 3 pages, but RacerOne asked in post #3 "Verify plug leads are on the correct posts on the distributor"
 

scottwoodward

Petty Officer 3rd Class
Joined
May 27, 2020
Messages
78
Steve, no problem going back to the leads. All the basics are worth checking. The cap isn't numbered, so I can't confirm 100%, but the leads are actually part of the distributor cap housing -- the leads can't be unplugged. I did confirm that the leads are in a star formation -- one across from two and three across from four -- and that they are plugged into the correct cylinder plug. I did notice that a piece of plastic chipped off above the magneto (see photo). Don't know if the corrosion inside the housing is an issue. As noted before, I've got good spark jumping the gap on a tester on all four cylinders.
 

Attachments

  • photo337409.jpg
    photo337409.jpg
    1.8 MB · Views: 0
  • photo337410.jpg
    photo337410.jpg
    1.5 MB · Views: 0

SteveVT

Petty Officer 2nd Class
Joined
Jul 31, 2017
Messages
163
I'm unfamiliar with your engine so forgive me if I'm asking something that doesn't apply, but is it possible that the distributor body was removed and then put back in? And if so, is it possible with these particular distributors to re-mesh the distributor drive gear in a different position than stock?

I've worked on a farmer friend's old Ford tractor that had had this problem -- that's why I ask. In that case timing can be way off, and the distributor body would need to be re-positioned with the drive gear aligned. BTW, absolutely DO NOT pull the distributor if you had definitely NOT done so earlier. There is a specific procedure for resetting distributor gear position if it has been disturbed.

Second, can you verify that when timing pointer is at 0 degrees that the rotor is pointing toward number 1 cylinder's distributor post, and the wire feeding that post is attached to the number one spark plug at the cylinder head? And verify as the rotor turns in its normal direction, it follows the manual's listed firing order?

Third, the section of rotor that is broken off is a high voltage shield. I would replace the rotor for sure.

Edit: That broken section also looks like it normally would have the rotor's key molded-into it. If that rotor isn't keyed to the distributor drive shaft, that would be a problem.

Finally, you may want to investigate why that rotor broke as it did, and what happened to the broken piece.
 
Last edited:

SteveVT

Petty Officer 2nd Class
Joined
Jul 31, 2017
Messages
163
Hmm, realizing that the "timing belt" is maybe the thing that drives the distributor on this outboard, not a timing gear as in automotive engines. So everyone has already covered the distributor "gearing" already. Apologies!

That still leaves the spark wire check method I mentioned above, and the broken rotor as possibilities.
 

GA_Boater

Honorary Moderator Emeritus
Joined
May 24, 2011
Messages
49,038
Just clear up a few things

The drive shaft from the timing pulley down to the rotor is keyed with a missing spline and is impossible to install other than the correct way.

The chipped rotor shouldn't be a problem. The key is internal, not on the broken section. Don't try to remove it without reading the manual as some are not removable and cost lots of bucks to replace. Looked at a parts diagram, your cap is not removable, so don't try.

Don't the plug wires have the numbered collars on them? The cap is numbered, see below. Press on the carbon button to see if it's still free, they stick sometimes. Clean the cap and rotor contacts and look at the rotor contact strip for a shiny spot where the button rubs. You are getting good spark, these steps are to ensure you keep getting a good spark.


I don't remember if I asked about checking distributor bearings. If any are dragging or locking, the belt breaks.

650cap.png
 
Top