Need advise on how I should put a new deck on a 16' starcraft

thegipper

Petty Officer 1st Class
Joined
Jul 16, 2015
Messages
236
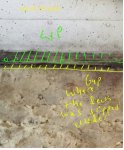
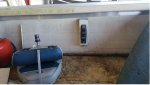
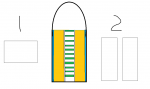
please excuse my crude drawing but I made it to better communicate my question. I have a 82 startcraft 16' that I am redoing. I have the old floor completely torn out and cleaned up. The old floor was installed from the factory like option 1 in my drawing. In my picture, the green "boards" are not installed yet but something I was thinking of doing. There is no support in the center of the floor, there was originally a removable wood cover that let you put skis or whatever in this area. I will not need that and was planning on just removing that opening on the new floor. My plan was to put brackets every 10" or so and screw down pieces of 2 x 4's to help support the center. This would have to be done if I went with option 2 for my flooring.

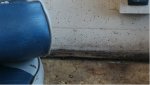
My dilemma is I don't know how to go about putting the floor in. In my picture the "blue" areas is the riveted lip that goes over the 1/2" plywood. My concern is if I try to put the wood in using option 1, it will be nearly impossible to get the wood underneath this lip, especially closer to the front of the boat. I have no clue how the factory did it or maybe they put the floor in, then installed the lips, then tightened it all down? In option two, I would cut the board the long way (PS boat is about 60" wide) which I believe would be easier to slip underneath those lips. Again, if I went with this option, I would have to put the green support boards in.

I guess a third option would be to just use a angle grinder with a cut off wheel and remove the lips. I would then just screw the floor down to the joists.

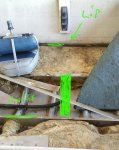
The orange area is where the foam is (poured in from the factory). The grey area is the aluminum joists running the length of the boat.

Thoughts?
attach10342651.png
 

Attachments

  • photo258935.png
    photo258935.png
    21.3 KB · Views: 3
Last edited:

thegipper

Petty Officer 1st Class
Joined
Jul 16, 2015
Messages
236
Weird, it looks fine on my computer and on my phone. The picture I drew up is also attached if its not displaying in the post.

The boat is a 1982 16' starcraft (aluminum hull, wood deck).

I was thinking about using aluminum instead of 2 x 4 pieces but I don't know how I would attach it to the joists other than welding them in place.
 

jbcurt00

Moderator
Staff member
Joined
Oct 25, 2011
Messages
25,142
Rivet the aluminum angle to the stringers. Thats how they're attached to the hull or ribs, correct? Its a rivetted Starcraft, not welded, right?

Did you post 1 or 2 different pix?

1 pix is showing up as an attachment, but there's no orange color and no details about a lip. Plus I dont see what you're trying to show w the 2 pieces labelled 1 and 2 in the 1 pix that's attached
 

fishin98

Chief Petty Officer
Joined
Nov 28, 2009
Messages
521
Pictures (photo) are worth a 1000 words...Please post a picture(s) of the bottom of your boat layout.....you'll get better replies.
 

thegipper

Petty Officer 1st Class
Joined
Jul 16, 2015
Messages
236
No Title

I took a quick picture of what I'm talking about. Here it is. The more I think about it, the more I am just leaning towards using 5/8" marine plywood (1/2" was what was in there) and just prying up the lip to slip and slipping it under. When I screw it down, it should pull it all back down. I would scrap the center support pieces all together if using 5/8" wood.

Any tips on how to get the wood underneath the lips since there are lips on both sides?

Many years ago I decided I would never redo a boat ever again. This boat has been a total PITA so far, I should have taken my own advise.
 

Attachments

  • photo258936.jpg
    photo258936.jpg
    307.6 KB · Views: 1
Last edited:

jbcurt00

Moderator
Staff member
Joined
Oct 25, 2011
Messages
25,142
I think thats the inside of the chine rail, not a lip......

The deck (floor) should run just to it not actually under it. The deck pieces were laid 4ft from transom towards the bow, the width of the boat. No way for it to be tucked under/into that space.

Have you samples the foam to make sure its not been compromised. Dry to the touch on the surface can be extremely deceiving.

Look thru some of builds in the owners forum I linked. Lots of great info in there. Lots of answers to questions, probably some you havent thought to ask.

Most use wide flange rivets to install a new floor deck.

Going up to 5/8ths minimizes the fitment problems of fittimg the comsoles and windshield back, only slightly thicker then the factory 1/2in. 3/4 would make fitment more difficult. 5/8s will stiffen up the deck under foot.

You probably dont need any new cross braces over the original ski locker area.

Run the new decking left and right across the entire deck area, opposite the way its shown in your pix. Each peice of ply starts at the port side, runs across both longitudinal stringers to the starboard side, in 4ft sections as you move forward.

The seams between 2sheets needs to be supported. Most boats have aluminum strips under the deck from the factory at each seam. That ties the 2 sheets together. If you dont have tbe original strips, you can use flat aluminum stock or pieces of plywood.

The terms you use suggest some wood framing experience. The aluminum strips (or ply pieces) act similar to the tongue and groove on 3/4 home decking or half lapping plywood butt joints over a floor joist.

Make sense?

As an aside, what are you using to seal your new marine deck?

True marine plywood, and NOT pressure treated ply, correct?
 

GA_Boater

Honorary Moderator Emeritus
Joined
May 24, 2011
Messages
49,038
I lost my original long message about what not to do. :blue:

In a nutshell - Don't use Option 2. Stay with #1, the factory method gives the structure needed to keep these boats together. #2 will allow the hull to flex and you don't want that. I also changed from 1/2" to a 5/8" deck and it's a rock.

Don't understand the under lip stuff. Do look at some builds in the Starcraft section for good deck replacement examples. You will see joiners are used to tie the deck sheets together.
 

thegipper

Petty Officer 1st Class
Joined
Jul 16, 2015
Messages
236
Thanks for the feedback JB. I was under the impression that the wood had to go at least an inch under those "lips" around the boat. There were screws that went through these "lips" into the wood, I assumed that is what held the edges of the deck in place. If i just ran the wood slightly under these lips, would I still use screws or whatever on the edges of the deck? I would assume I would have to anchor it to whatever is underneath these lips and obviously not through the bottom of the boat.

I did take a foam sample and it is completely dry. The pictures make the foam look worse than it is, the boat doesn't leak a drop of water and the foam sample was bone dry. I pushed a tissue into the hole in the foam I made and pushed it against the foam for a few seconds, the tissue didn't show any signs of moisture (thank god).

There is no windshield in the boat, it's an "open" concept fishing boat with a small console on the starboard side of the boat. It has a raised deck in the front with a seat post.

It did have thin aluminum strips where the wood seams joined so I will put those back in. I'm not sure how much they actually do since they are so thin and floppy.

My plan was to put the wood in exactly how you described. 48" (width of the wood) moving forward. Each sheet would be cut to the length of the width of the boat (man that sounds confusing to say). My biggest headache was trying to figure out how on earth I am supposed to get the wood under these lips that are on both sides of the boat. If I only have to barely get them under, I should be able to make it work.

I would be buying true marine plywood (5/8" for added support). What would you suggest for sealing it (honestly didn't know I had to if I was using marine wood). Do some simple deck sealing product work? The plan is to use outdoor carpet adhesive to glue to carpet down on top of the wood deck after the floor is in.

Thanks for the help btw!
 

jbcurt00

Moderator
Staff member
Joined
Oct 25, 2011
Messages
25,142
Take a better pix of the lip, maybe more then 1, I cant see any lip in the pix you posted. Perhaps there's something I'm missing (GA is too though)
 

thegipper

Petty Officer 1st Class
Joined
Jul 16, 2015
Messages
236
No Title

I lost my original long message about what not to do. :blue:

In a nutshell - Don't use Option 2. Stay with #1, the factory method gives the structure needed to keep these boats together. #2 will allow the hull to flex and you don't want that. I also changed from 1/2" to a 5/8" deck and it's a rock.

Don't understand the under lip stuff. Do look at some builds in the Starcraft section for good deck replacement examples. You will see joiners are used to tie the deck sheets together.


Around the perimeter of the boat, there is a rived "lip" where the original deck was slipped under. There were screws that went through this lip and into the wood deck. My guess is this is how they secured the wood deck around the perimeter of the boat.
 

Attachments

  • photo258937.jpg
    photo258937.jpg
    190.6 KB · Views: 1

thegipper

Petty Officer 1st Class
Joined
Jul 16, 2015
Messages
236
the lip is a piece of aluminum riveted to the side of the boat on both sides. Its essentially a piece of aluminum with a bend in it creating a lip that hangs over the wood deck about an inch and a half. The wood deck was slipped under this "lip" and rivets/screws were put though the lip into the wood deck. I'm assuming they did this to secure the wood deck around the edges (sides) of the boat.

I hope this make sense now. I've seen it on many other boats. In fact, it was the biggest problem we had we when redid the floor on my friends boat. How on earth do you slip the wood deck under this lip since the lip is on both sides. That is biggest concern/question I have. Other than bending this lip up, sliding the wood under, and hammering it back down, I don't know how else to do it.
 

jbcurt00

Moderator
Staff member
Joined
Oct 25, 2011
Messages
25,142
1st time I"ve seen that angle along the edge of a deck.

Some have a similar angle, but its upright sitting on the deck, and attached to a plywood side panel, not turned down and riveted to the hull below the deck

Is the aluminum angle continious from bow to stern along the edge of the deck?

If so, I wonder how SC did it originally.

I guess you're left w little choice but to bend it up, install the deck and bend it back down to rivet it to the deck.

Certainly a mystery to me.....
 

thegipper

Petty Officer 1st Class
Joined
Jul 16, 2015
Messages
236
Whats weird is the only other boat I redid (I believe it was a Lund) had the same "lip" on it.

It goes about 2/3rds the way up the boat and ends as the bow just begins to taper in. I think I'm just going to bend it up, slide the wood underneath, and do my best to beat it all back down and re-secure it.

The only way I could see that SC did it originally was to install the floor then rivet these panels on and then rivet the lips to the deck. That is the only way you could get the deck in without having to bend the lips up. These definitely came from the factory this way and were not added afterwards.

I'll know more tonight, I'm going to try to get my first board in. Wish me luck, I hope it goes well.
 

GA_Boater

Honorary Moderator Emeritus
Joined
May 24, 2011
Messages
49,038
The lip you are referring is nonexistent, that is the chine joint. There is only way to fit wood under the chine is laying the wood in long ways. The side to side factory layout may have the wood close to the chine, but physically it is impossible to fit wood inside the chine.

Someone had a drawing in one of their threads showing a cutaway of a Starcraft hull with the relationship of the ribs, chine joint and deck. I need to find it.

Wait a sec - You aren't talking about the side panel mounting are you? I don't see it in the pics. Hang on a bit before cutting any wood. Lets get this figured out before wasting wood.
 

thegipper

Petty Officer 1st Class
Joined
Jul 16, 2015
Messages
236
I'll go out and take some more pictures and show you exactly what it is. BRB
 

GA_Boater

Honorary Moderator Emeritus
Joined
May 24, 2011
Messages
49,038
I think I'm just going to bend it up, slide the wood underneath, and do my best to beat it all back down and re-secure it.

STOP - You are about make a grave error.

Show us a couple of pics without the artwork.
 

thegipper

Petty Officer 1st Class
Joined
Jul 16, 2015
Messages
236
No Title

Ok here are the pictures. I would have never thought this was so confusing, sorry if I've made it that way. The wood deck is simply slid underneath an aluminum bracket that is riveted to the side of the boat. I cannot think of any other way to explain it. This is how it came from the factory, the aluminum bracket (what i was calling the lip) runs about 10 feet up the boat. Both sides has this bracket (lip).
 

Attachments

  • photo258956.jpg
    photo258956.jpg
    175.4 KB · Views: 2
  • photo258957.jpg
    photo258957.jpg
    151.4 KB · Views: 2

thegipper

Petty Officer 1st Class
Joined
Jul 16, 2015
Messages
236
The wood sits on top of the foam but slides underneath this bracket (but on both sides which is why it is impossible to get in once the bracket or "lips" are in place). There was screws/rivets through the top of the aluminum bracket into the wood.

In my opinion, the rivet brackets must have been put on AFTER the wood floor was laid on top of the foam. This is my whole dilemma. As of right now the only solution I can come up with is to bend one side of the bracket up, slide the wood in and then bend the "lip" back down. Or, cut the wood short enough so it doesn't go under these brackets at all and say heck w it, which is what I'm leaning towards because I have no clue on any other way to get it done.
 
Last edited by a moderator:
Top