New Starcraft Supersport V16 Project

Watermann

Starmada Splash of the Year 2014
Joined
Jan 12, 2013
Messages
13,827
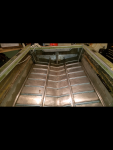
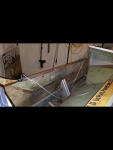
Decking, most don't use marine grade due to the cost. A good exterior grade fir plywood sealed up will last many decades if cared for properly.

A lot of the 16'rs came with the 85 Johnny, strong motors that like fuel.

You're welcome on the rivet thread, I had to do the rivets sticky as I was answering the same questions weekly. :lol:
 

mbroughton02

Petty Officer 2nd Class
Joined
Jan 17, 2015
Messages
198
I went with a good quality 5/8" plywood for my floor. I think it was A-B softwood ply. Had to special order from the lumberyard but not terribly expensive. Think I paid around $40 a sheet. Sealed with 3 coats of spar varnish.

At this point I'd strongly encourage you to pull the transom as watermann said, and leak test the boat. Fill it with water at least to the level of the bottom of the floor and mark any leaky rivets. I found a shocking amount of leaky rivets on mine; probably over 100. To get the water out after the test I just set up a siphon with a garden hose, since I was also inside a garage.
 

Randyhutch10

Seaman Apprentice
Joined
Nov 17, 2014
Messages
30
Yeah if we get a little warmer weather I will attempt a leak test and pressure wash the in inside.

Made a little progress today. Cleaned the inside of the hull and got to the transom. Any advice on how to get the transom out? It's still pretty solid but might as well replace it now, it will make a good template.

Also made a air compressor purchase today and got rivets and rivet tools.
 

Attachments

  • photo282962.png
    photo282962.png
    722.9 KB · Views: 1
  • photo282963.png
    photo282963.png
    486.1 KB · Views: 1
  • photo282964.png
    photo282964.png
    523.2 KB · Views: 1
  • photo282965.png
    photo282965.png
    480.1 KB · Views: 2
  • photo282966.png
    photo282966.png
    742.8 KB · Views: 0

Watermann

Starmada Splash of the Year 2014
Joined
Jan 12, 2013
Messages
13,827
It's pretty straight forward removing the transom wood.

Okay it looks like you've got it under control. Have you removed the transom now?

fetch
 
Last edited:

Randyhutch10

Seaman Apprentice
Joined
Nov 17, 2014
Messages
30
Yeah finally worked it out. I have the new transom together with adhesive drying now.

Also have the boat filling up with water to check for leaks.
 

Watermann

Starmada Splash of the Year 2014
Joined
Jan 12, 2013
Messages
13,827
Mark the leakers with a sharpee but be careful going under there, water weighs way more than you think. Put something solid like a jack stand under the tongue and do not rely on just the old cheap jack.
 

Decker83

Commander
Joined
Apr 5, 2011
Messages
2,593
Happy New Year!!
Your making some great progress.
I'll be tagging along..
 

Randyhutch10

Seaman Apprentice
Joined
Nov 17, 2014
Messages
30
Yeah the more the merrier. Had about a dozen slow leakers all marked up ready to be replaced. Should be able to cut the transom tomorrow and set in place to pre-drill all holes and then apply sealer.

Had small crack in transom cap that I JB Welded and sanded.
 

Randyhutch10

Seaman Apprentice
Joined
Nov 17, 2014
Messages
30
Well got the transom put together, all holes pre-drilled, and two coats of sealer applied. Going to try to get two more coats tomorrow then reinstall transom. Also, worked a little bit on the fabrication of what will be the center console. Still a lot of work to do but its been fun so far
 

Attachments

  • photo283029.png
    photo283029.png
    869.9 KB · Views: 0
  • photo283030.png
    photo283030.png
    846.8 KB · Views: 0

Randyhutch10

Seaman Apprentice
Joined
Nov 17, 2014
Messages
30
Was able to get the transom back in. Overall it will do but its not perfect. Should be plenty strong and stay dry which is the important part.

Making my first attempts at rivets tommorow and hope to get the boat turned over.
 

Attachments

  • photo283086.png
    photo283086.png
    947.8 KB · Views: 2

Watermann

Starmada Splash of the Year 2014
Joined
Jan 12, 2013
Messages
13,827
You're putting your SS back together as a Mariner type center console?

I see the transom wood you made 3 piece like the factory did but it looks pretty raw, what did you use to seal it up?


fetch
 

Randyhutch10

Seaman Apprentice
Joined
Nov 17, 2014
Messages
30
Hey Watermann, yeah I used 3/4" oak plywood sealed up with 5 coats of SPAR clear semi-gloss finish. Issues?
 

Watermann

Starmada Splash of the Year 2014
Joined
Jan 12, 2013
Messages
13,827
Must be the semi gloss then why it looks raw rather than having a shine like the gloss spar but 3 coats should be just fine.

Personally I paint the inner transom skin after cleaning the corrosion / repair anything pitted / fill any unneeded holes. I also like to paint the transom wood as well after sealing it with good oil based primer / paint just as another layer of protection. I also fill any voids showing in the plywood on the edges before painting with the top edge being most important so water doesn't have a place to sit.

What sealer are you using on the through the transom wood hardware? Reason I ask is most guys me included make a mess with 5200 and it's very noticeable, your stern eyes look too clean around the washers. :lol:

The plywood you used looked to me like it was fir rather than oak. If oak, it's likely interior grade meaning the glue used during the lamination process isn't waterproof.
 

Randyhutch10

Seaman Apprentice
Joined
Nov 17, 2014
Messages
30
Yea used 5200 on the outside and yes made a big mess. Sounds like I need to add more on the inside. You may be right about the interior grade oak plywood.
 
Top