Power Steering Cylinder Replacement

GMTK

Petty Officer 2nd Class
Joined
May 27, 2016
Messages
175
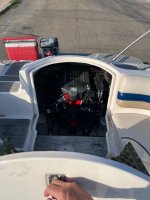
Welp, found out why my power steering pump burned up...leak on the power steering cylinder. Had the boat out on the water and noticed I couldn't keep the pump fluid at a constant level. Then saw the dreaded drip. I'm going to replace the power steering cylinder and not try and have it rebuilt (due to the boat being 3 hours from me, don't want to make multiple trips).

I've watched two good videos already about it, and believe my issue is going to be physcially getting back to the cylinder to get it in/out. REALLY hoping I don't have to pull the engine because I will have to pay a shop if that is the case. Looking for any tips/tricks/comments on how to make this slightly less miserable. Also, seeing some differences of opinion online of what fluid to actually use - volvo fluid trim/steering vs. atf, didn't know if it really made a difference.
 

Attachments

  • IMG_5811.jpg
    IMG_5811.jpg
    492.4 KB · Views: 14

Lou C

Supreme Mariner
Joined
Nov 10, 2002
Messages
13,630
Unless that rear engine enclosure is removable you’re pulling the engine. I did this job a few years ago on my OMC Cobra, my boat is old school so it all comes apart. Had to pull the rear seats & remove the exhaust on both sides. Removing the cotter pins for the mounting bolts was very difficult. But, got ‘er done!
 

Scott Danforth

Grumpy Vintage Moderator still playing with boats
Staff member
Joined
Jul 23, 2011
Messages
51,631
Rebuild kit is cheap. You can rebuild it on your tailgate.

New pump insert is $50, just insert into your current reservoir
 

Lou C

Supreme Mariner
Joined
Nov 10, 2002
Messages
13,630
The other alternative to pulling the engine is to see if you can find a fiberglass shop that could make the rear enclosure removable with quick disconnect fasteners like race cars and small airplanes use. Pulling an engine just to change a starter or a steering actuator is a big insult from whoever that boat builder is.
 

Donald0039

Chief Petty Officer
Joined
Jun 11, 2022
Messages
472
I feel for you with that engine hatch. On my Chaparral I have full access to everything with the engine hatch up. I can sit next to the engine down in the engine area. And I often do.
 

GMTK

Petty Officer 2nd Class
Joined
May 27, 2016
Messages
175
So I was able to get it out, of course parts of my body now hurt that I didn't know existed. The cotter pins are the biggest PITA. I decided to send the unit off to be professionally rebuilt, I don't have time since school has started and I want it done right before I contort my body again.

I have the manual that details how to re-install. Looking to see if yall have any other tricks or tips. Also, instead of cotter pins I was thinking about using "hitch clips" instead. Any thoughts on that?


Scott Danforth

Grumpy Vintage Moderator still playing with boats
Staff member
Joined
Jul 23, 2011
Messages
51,631
I would not buy clips from harbor freight. the stainless cotter pins worked for 20 some years
 

GMTK

Petty Officer 2nd Class
Joined
May 27, 2016
Messages
175
Wanted to update this for anyone who might venture down this path and do the removal/install themself. I did it myself because I got quotes from $4500-$7000 for to replace the steering arm. Seeing as how the boat is 21 years old, it didn't make financial sense to spend that.
Took me about 2.5 hours due to their being very limited room to work in the engine bay. I did not remove the engine. I followed the workshop manual (starting on page 187) but have a few things I would do differently. Some tips for the install:
I should have inserted the steering cable ram first. There was basically no room to move the steering cable round in the engine bay. I also didn't know this needs to be lubed yearly. What a PITA.
The cotter pins are the biggest pain in this entire thing. Take forever to get them re-installed and bent. I actually had the wrong sizes so for a temp fix I have stainless c-clamps on the lower pin and lower anchor screw.
Pro tip - take the two pins with you to the store when buying new cotter pins. I took the old cotter pins and tried to match them by site - bad idea. One's I bought were too thick (1/8") and I need one size down from that. While I think the c-clamps will be fine, I will replace them before next season with cotter pins.
As for the two pins - mark a line on top showing where the holes are, this will help you hit the hole with the cotter pin. When installing the steering cable ram, it can be tough to get it to line up perfectly in the steering cylinder clevis. Helps to have someone to move the steering wheel slightly and remember - the ram also rotates so it too needs to be perfectly aligned.
I sent my steering arm off to five star marine in Florida for the rebuild. Shipping was fast and has a two year warranty.
Hope this helps someone who has to tackle this project.
 

Lou C

Supreme Mariner
Joined
Nov 10, 2002
Messages
13,630
Agreed the cotter pins are a pain, I used a cotter pin extractor…the ones on the mounting bolts took me a long time to get out. The ones on the steering arm were easier to get out but a pain to access. I greased all of em up with Evinrude Triple Guard (blue snot) best water proof grease I ever used!
 
Last edited:
Top