Question re: repairing composite/VEC hulls?

CWKboat

Petty Officer 1st Class
Joined
Jul 9, 2008
Messages
243
Re: Question re: repairing composite/VEC hulls?

So looks like I need to get in there and cut out the top of the floor in the bilge area, and add some of those braces or reconfigure as needed? And then also tab/reinforce the area on the bottom and around the sides?

I'll give the hull extension thread a good read as well in the applicable sections.
 

oops!

Supreme Mariner
Joined
Oct 18, 2007
Messages
12,932
Re: Question re: repairing composite/VEC hulls?

So looks like I need to get in there and cut out the top of the floor in the bilge area, and add some of those braces or reconfigure as needed? And then also tab/reinforce the area on the bottom and around the sides?

I'll give the hull extension thread a good read as well in the applicable sections.

When replacing any transom the deck and stringers must be cut back to allow for tabbing to the hull and stringers......This is not the case with Seacast...or the Nida bond you were looking at (just dig out the rotten carp and pour some new stuff in and put the lid on ! )........However, because your boat did not have the proper stringer, tabbing for the transom.....yes, you need to.

This will make a world of difference with the longevity of the hull, weight , and power you can put on it.

If you look at any outboard situation ,especially in the tinny section. you will always see reinforcements from the bottom of the hull to the transom.

As far as the hull thread......Just pay particular attention to the transom area and stringers where they meet the transom.. I built the boat transom area with the strength needed for a set of large outboards to go on the back of it.
 

oops!

Supreme Mariner
Joined
Oct 18, 2007
Messages
12,932
Re: Question re: repairing composite/VEC hulls?

This is an excerpt from my thread. This was before the stringers were added

These are picks of the transom being tabbed in.....first with a 1.5 oz csm...then the 24 oz biax the biax is on the sides.....and you can see the chopped strand on the bottom of the resin whetted transom

picgroup21001.jpg


You can see the six inch overlap to the hull and transom

picgroup21002.jpg
 

zopperman

Lieutenant Commander
Joined
Jun 22, 2011
Messages
1,551
Re: Question re: repairing composite/VEC hulls?

it will probably cost 1000+ in seacast, JFYI.
 

CWKboat

Petty Officer 1st Class
Joined
Jul 9, 2008
Messages
243
Re: Question re: repairing composite/VEC hulls?

This is an excerpt from my thread. This was before the stringers were added

These are picks of the transom being tabbed in.....first with a 1.5 oz csm...then the 24 oz biax the biax is on the sides.....and you can see the chopped strand on the bottom of the resin whetted transom

picgroup21001.jpg


You can see the six inch overlap to the hull and transom

picgroup21002.jpg

Thanks! Those really give a good visual - almost persuadeth me to go the traditional wood route, LOL.

How many layers of the CSM and biax did you use for the tabbing? (I'm sure I'll find out in the thread)
 

NSBCraig

Lieutenant Commander
Joined
Aug 21, 2007
Messages
1,907
Re: Question re: repairing composite/VEC hulls?

Wow, how about that crazy marketing B.S.!

Man it's a cool thing you posted this on here for anyone thinking about buying one of these boats.
 

CWKboat

Petty Officer 1st Class
Joined
Jul 9, 2008
Messages
243
Re: Question re: repairing composite/VEC hulls?

Although I don't have pictures yet (will take tomorrow hopefully), found out some interesting things today when I cut the stringers and floor back from the transom skins.

The stringers and floor system "floats" about 1/4" off the hull and is attached only on the sides of the hull. The stringers are not bonded to the hull bottom, and the floor/stringer system was glued to the transom with the hard green sealant that failed. The floor is not tabbed to the sides of the hull, but glued - just like it was glued and not tabbed to the transom. It's filled with foam and floats off the hull bottom. Is this a standard industry practice?

I'm guessing that the entire stringer/floor system is lowered into the hull and set into the glue on the inside sides/perimeter of the hull during the manufacturing process - or at least the early VEC days. As this case illustrates, not a particularly good setup for the stresses of a V-6 OB. But, obviously quick for the bottom line.

I cut it back 10" to prepare for tabbing the fiberglass skins before I conceivably pour the Nida Bond. But now I have all of this exposed foam I will need to figure out how to cap to keep the bilge water from saturating it. I may think about just cutting it back even further, but will post the pics and solicit some advice and opinions on where to go from here.

Thanks!

Will try and post pics in the next day or two.

OK, here are the photos. The first one shows the floor and stringers cut back 10". As noted, the stringers float over the hull bottom app 1/4".

http://www.flickr.com/photos/69637194@N06/6496694179/in/photostream

Here's the lowest stringer near the bilge area. Again, these were not bonded to the transom other than the glue/sealant that failed under the motor stresses.

http://www.flickr.com/photos/69637194@N06/6496732949/in/photostream

Here's an overall view of the cutout. The transom cavity has been cleared of foam completely and would be ready for a pour after the biaxial tabbing reinforcement that has been suggested earlier in the thread.

http://www.flickr.com/photos/69637194@N06/6496732949/in/photostream

http://www.flickr.com/photos/69637194@N06/6496694257/in/photostream

http://www.flickr.com/photos/69637194@N06/6496694287/in/photostream

Here's how the floor assembly was secured to the sides. Not by cloth/fiberglass, but the floor was set down in the green sealant all the way around the perimeter:

http://www.flickr.com/photos/69637194@N06/6496694323/in/photostream

So, at this point I'm wondering how to cap the exposed foam once stringers/knees are conceivably put in the bilge? It floats off the bottom and allows water to make its way to the bilge. I'm concerned about sealing it off from waterlogging. Some of the foam under the floor at the transom was wet, but not heavy.

Getting back to the overall repair, I should tab around the transom skin with layers of 1708? Then pour the Nidabond. What would the suggestions be for cutting back the floor further and adding stringers for additional strength? Then there's the issue of sealing the exposed cutout foam in and avoiding waterlog/intrusion. I'm in the planning stages, so all input welcomed and appreciated!
 

oops!

Supreme Mariner
Joined
Oct 18, 2007
Messages
12,932
Re: Question re: repairing composite/VEC hulls?

i really dont like the design.....any major work means a liner hull seperation. however....the compressed fiberglass is a thing of beauty.

as far as capping the exposed foam....since you dont like wood....i would pre make some flat glass panels...even one layer of 1708.....let them fully cure....glass them into place....then inject the foam after.

you could also use a cardboard mock up of the gap area......just use the cardboard as a bridge form the existing and the transom....and glass over that....3 layers of 1708 with csm between the layers.

as for the knees...i would use the vertical surface from the motor bay.....(in the bilge) and make a vertical triangular shaped glass wall on each side.

as for the tabbing.....just make sure the transom cavity is liquid tight before pouring....you can pour at just about any time....it wont make a difference. just as long as the goop does not leak out the bottom of the transom.

but i would build up the side hull, transom area ....make it stiffer, as the force of the outboard is strictly on the exterior hull at this point.
 

CWKboat

Petty Officer 1st Class
Joined
Jul 9, 2008
Messages
243
Re: Question re: repairing composite/VEC hulls?

i really dont like the design.....any major work means a liner hull seperation. however....the compressed fiberglass is a thing of beauty.

as far as capping the exposed foam....since you dont like wood....i would pre make some flat glass panels...even one layer of 1708.....let them fully cure....glass them into place....then inject the foam after.

you could also use a cardboard mock up of the gap area......just use the cardboard as a bridge form the existing and the transom....and glass over that....3 layers of 1708 with csm between the layers.

as for the knees...i would use the vertical surface from the motor bay.....(in the bilge) and make a vertical triangular shaped glass wall on each side.

as for the tabbing.....just make sure the transom cavity is liquid tight before pouring....you can pour at just about any time....it wont make a difference. just as long as the goop does not leak out the bottom of the transom.

but i would build up the side hull, transom area ....make it stiffer, as the force of the outboard is strictly on the exterior hull at this point.


Oops, thanks for the help. Would you cut the floor back further than the 10" or so that's already cut out? I'd need the knees longer?
 

oops!

Supreme Mariner
Joined
Oct 18, 2007
Messages
12,932
Re: Question re: repairing composite/VEC hulls?

nope.....the gap you have is fine....just great actually.

the big thing is the form from the deck to the transom......either the card board way....or glass panels......you susy need a shape to glass to....then fill the under side with foam like they did.

the knees will be mostly vetrical. if you glass them to the inside of the motor/bilge compartment ...it will be plenty strong

you might even make side knees....from the transom to the side of the hull....kinda a flange.....very very strong
 

CWKboat

Petty Officer 1st Class
Joined
Jul 9, 2008
Messages
243
Re: Question re: repairing composite/VEC hulls?

nope.....the gap you have is fine....just great actually.

the big thing is the form from the deck to the transom......either the card board way....or glass panels......you susy need a shape to glass to....then fill the under side with foam like they did.

the knees will be mostly vetrical. if you glass them to the inside of the motor/bilge compartment ...it will be plenty strong

you might even make side knees....from the transom to the side of the hull....kinda a flange.....very very strong

Oops, thanks again. It's becoming clearer. One point of needed clarification for me is the liner beneath the foam? So with the cardboard way, I would just slide it under the cutout on the bottom liner to provide rigidity to the cut and extend the carboard back to the transom as a bridge. Glass over it and leave enough of a gap to pull the cardboard out from the very back before tabbing into the transom? I was wondering how to make a seamless connection to the bottom liner that is only 1/4" or so off the hull bottom. When I cut it, it also kind of lost it's rigidity all the way across a little. Assuming I could bridge the bottom with the cardboard method, I would then cap the top and inject the foam?

I was under the impression that I couldn't leave the foam underneath exposed to water and would need a bottom liner? The only thing that really had me preplexed somewhat was duplicating that bottom liner since it's so close to the hull with only a 1/4" gap or so, with this gap being the outlet for drainage water beneath the liner.

With the knees, I'll have to carefully check what clearance the splashwell will give me as it's very large extending down into the bilge, but will get as vertical as I can.

Also, any recommendations on the foam or where to get it? The home improvement places sell the stuff that hardens up to fill gaps, but it might take quite a few cans to fill it all in. Let me know if you know of a better source?

Thanks again, you have been a huge help in figuring out what to do and making this less intimidating.
 

CWKboat

Petty Officer 1st Class
Joined
Jul 9, 2008
Messages
243
Re: Question re: repairing composite/VEC hulls?

This is an update on this thread as I have now completed the Arjay 6011 Transom pour. Unfortunately, I do not have pictures of the transom tabbing, knee additions, and pour itself, but I want to give a rundown of what steps were taken. I hope that this will also provide some useful information for anyone considering Arjay/Nidabond ceramic pourable transoms.

To make a long story short, other responsibilities and time commitments led me to finally decide to sub out the glass work pre-pour and reinforcement that Oops suggested. I have a local guy in his late 60s who retired from Glassmaster who is very reasonable, and he added knees in the bilge on either side. He added several layers of mat and woven roving around the entire perimeter of the transom. I realize that 1708 would have been more bang for the buck from what I've read here, but woven is the school that he comes from I guess. In any event, he really stiffened up the transom all the way around and also reglassed the delamination on the outer portion of the inner skin. We decided to simply glass over the exposed foam from the cutout, and not bridge and inject foam back to the transom as originally it served no structural purpose, especially given the poor original design and lack of reinforcement. I figure this will keep the weight down a little as the poured transom is 75-80 lbs, whereas the original foam core was much less.

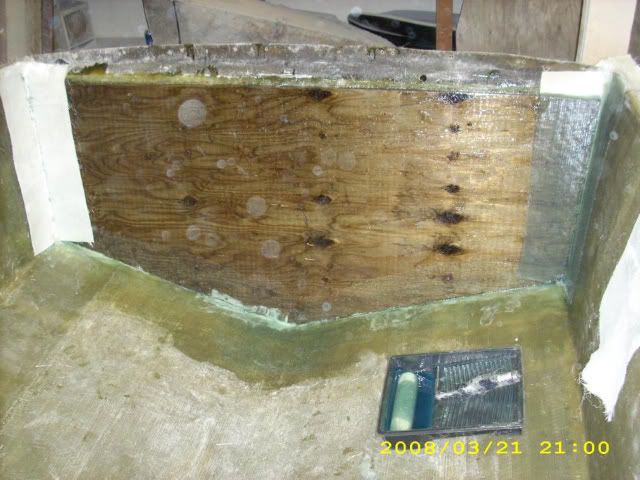
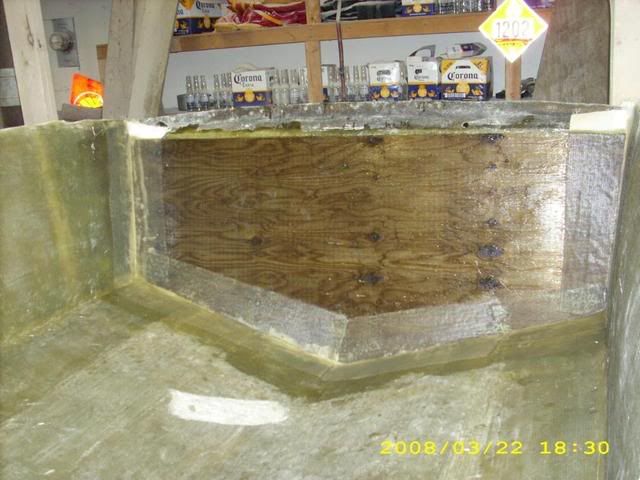
On the outer skin, I glassed in a piece of 1708 on the inside in order to seal all the holes from the inside. I had the advantage of no wood rot to deal with, so I took a 4 ft long piece of 1X4 and added stick on 40 grit sandpaper to each end was amazed at the leverage and scouring that I was able to give the inner skins in the cavity. The dust was really flying. I shop vac'd it out and found that a section of broom handle with 2 automotive rags rolled around the end length-wise and zip tied served as a great way to wipe with acetone and clean the surface.

After much reading here and on the Net, I decided to pre-apply polyester resin to the skins prior to the pour. I then used gorilla tape to dam the top of the mid transom and all the way up the sides. I used an old piece of the foam core to provide the proper cavity opening when taping. I overlapped and weaved the tape and once the pour started had zero leaks from any taped sections.

I used a road cone as a funnel. It worked great! I had a more narrow opening at the high point on top of the wing, so it fit in perfectly.

Now onto the Arjay. I bought two 5 gallon pails. I bought the square, paddle type joint compuond mixer blade from Lowes to mix with a 1/2 inch 7 amp drill. My brother helped and he added the MEKP-925 while I stirred each pail for 4-5 minutes. I mixed slightly on the slow side with 7 oz per 5 gallons at about 78 deg. I decided to stand up in the boat and pour it while my brother (with chemical goggles, gloves, and respirator) held the funnel. It poured into the cavity very fast and was only 6 inches or so from the top of the lower mid-part of the transom after the first pail. I mixed the second batch while my brother tapped on the transom with a rubber mallet to negate air pockets.

The second pail quickly brought the level up to the top of the wing I was pouring into. The other wing was still 6 inches from full, so we simply moved the funnel to the other side and filled up to the top. I "topped off" each side several times until the final settling occured.
I finished with about 1/2 inch of putty left in the bucket, and at $176 per bucket + shipping I was THRILLED at my good fortune!

It took about 45-50 minutes for the lower part of the transom to start warming. It was a very gradual and controlled exotherm. Eventually after 75-90 mins the entire transom was cooking to the point of feeling the heat radiating off the skins. You could touch it and keep your hand on a few seconds or so. It was late at night, so I put it to bed still hot after 3 hours. The Arjay was tremendously simple to pour and had the viscosity of gear lube basically. The old adage of all the work being in the prep is so true.

After thinking more about this, Arjay was the ideal solution for my boat as the floor and stringers are enclosed foam/composite. I had no old wood to remove, so it was just a matter of adding the knees and structural tabbing, and then pouring. Still, a lot of work even with sanding, cleaning, and damming the pour area!

But for ease of use for the backyard repairer, I do not see how one could beat the pourable, ceramic transom. It's really a great product. The transom today feels like concrete!

Having said that, if I had a previously wooden core transom, I wouldn't feel great about the "chainsaw method" only with the pourable concept. I've read where many remove the inner skin to properly grind and prep both surfaces, and if I was going to do that, I would just put wood back in as it would assuredly outlast particular interest in the boat. In my situation, the absence of old wood enabled me to just sand and prep the existing skins, add fresh resin, and then pour.

Hope this helps anyone debating the option of using Arjay or Nidabond.

Thanks again to Oops for guiding me through the process of options. I'll be refitting the cap in the next week or two, so let the fun continue. It's good to know that the boat will now be appreciably stronger than it was when it came from Larson. I'm still surpised I didn't lose my motor!
 
Top