Shift shaft carrier bushing assembly install diy?

Nextelbuddy

Petty Officer 2nd Class
Joined
May 4, 2020
Messages
156
So I just finished reassembling my upper and lower units for the outdrive alpha 1 Gen 2.

I replaced the water pump impeller kit, input shaft carrier assembly underneath the water pump, and I pressure test the entire system at 12 psi for 20 minutes with zero pressure loss after everything was assembled.

I checked my box of OEM mercruiser parts that I ordered and in that box was a brand new shift shaft carrier assembly that I forgot I bought.

I have the original shift shaft seal and assembly it is white in color currently installed, someone saw it and said that I should change that out because it's quite old and original. Again I had zero pressure loss in my pressure test with the original shift shaft carrier assembly. Sometimes I feel like it's one of those if it ain't broke don't fix it but on the other hand I have the outdrive off and I can pull it back apart and just replace it it's already there.

The main thing is holding me back is that I can't find a good DIY article or a YouTube video that shows that carrier assembly for the shift shaft...

And what forum posts I do find on the iboat forum when somebody asks how to do it other people mention be very careful when you pull it off because of something shifts at a place you're screwed.... I can only imagine how difficult it is to pull an assembly off of a shaft carefully and straight up when it's the original part and never been removed before so that adds anxiety to the fire.

In all honesty how hard of a job and how scary Is it replacing that carrier assembly for the shift shaft?

PXL_20210629_234654327.jpg

PXL_20210630_231522023.jpg
 

dubs283

Vice Admiral
Joined
Jul 27, 2005
Messages
5,335
place lower in FWD gear (shaft foot facing forward). remove two screws holding busing assy in place. remove assy. remove e clip from shaft and slide bushing assy off. apply grease to new bushing assy seal and install on shaft. install e clip. use a suitable sealer on o-rings and install bushing with shaft foot facing forward. install two screws and test shifting. pressure test. replace old style speedo connector at bell housing with new style
 

Nextelbuddy

Petty Officer 2nd Class
Joined
May 4, 2020
Messages
156
place lower in FWD gear (shaft foot facing forward). remove two screws holding busing assy in place. remove assy. remove e clip from shaft and slide bushing assy off. apply grease to new bushing assy seal and install on shaft. install e clip. use a suitable sealer on o-rings and install bushing with shaft foot facing forward. install two screws and test shifting. pressure test. replace old style speedo connector at bell housing with new style
So what exactly are people talking about that messes up if you don't keep something straight when you pull up on the assembly?
 

dubs283

Vice Admiral
Joined
Jul 27, 2005
Messages
5,335
So what exactly are people talking about that messes up if you don't keep something straight when you pull up on the assembly?
my guess would be they're referring to the shift actuator that rides in the spool groove forward of the gear in the lower. just ensure the drive (lower) is in FWD gear (shift shaft foot facing forward) when you remove the bushing/shaft assy. make sure the shaft foot is facing forward when you install it and you should be fine.

even if by some strange instance the lower isn't in FWD gear after assembly rotate the shaft clockwise to fully engage FWD gear, then remove the shaft/bushing assy and reinstall with the foot facing forward, pretty simple task in all. don't understand why folks would be so leery of replacing the bushing
 

Nextelbuddy

Petty Officer 2nd Class
Joined
May 4, 2020
Messages
156
my guess would be they're referring to the shift actuator that rides in the spool groove forward of the gear in the lower. just ensure the drive (lower) is in FWD gear (shift shaft foot facing forward) when you remove the bushing/shaft assy. make sure the shaft foot is facing forward when you install it and you should be fine.

even if by some strange instance the lower isn't in FWD gear after assembly rotate the shaft clockwise to fully engage FWD gear, then remove the shaft/bushing assy and reinstall with the foot facing forward, pretty simple task in all. don't understand why folks would be so leery of replacing the bushing
So I recently replaced the speedometer fitting last year... I bought a brand new mercruiser one it was white or clear...

Can I still use that with this new updated shift shaft carrier assembly or do I have to buy a new updated speedometer fitting?
 

Nextelbuddy

Petty Officer 2nd Class
Joined
May 4, 2020
Messages
156
So I recently replaced the speedometer fitting last year... I bought a brand new mercruiser one it was white or clear...

Can I still use that with this new updated shift shaft carrier assembly or do I have to buy a new updated speedometer fitting?
This is what I bought last year.. speedometer coupling kit 815956A1

Screenshot_20210630-233557.png

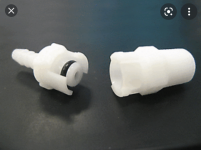
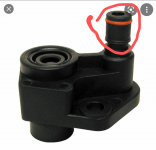
looking at the new bushing carrier assembly, it doesn't look like the Speedo coupler will plug into the new port on the new bushing carrier assembly.


Screenshot_20210630-234021.png

So do I need an updated speedo coupler now as well?


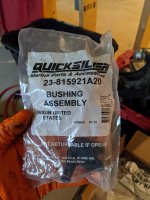
Well after searching some more looks like I ordered the wrong part. I was supposed to order 23-815921A21 which looks like the same part but comes with the hose end coupler where as I ordered 23-815921A20 which doesn't come with the hose end coupler.

hopefully they are the same part? Just one missing a coupler and one isn't?
 
Last edited:

Nextelbuddy

Petty Officer 2nd Class
Joined
May 4, 2020
Messages
156
This gets confusing

If I go to mercruiserparts.com and input my drive serial # 0F693018, I can find the shift shat carrier assembly and it shows the new updated part of 23-815921A21 which comes with the new updated hose end coupler.... however if I search for my transom serial # 0F650239 and look at the bell housing, it doesn't show or offer the new updated hose end coupler... instead it still offers the older clear/white 815956A1 part...

I did find the new updated hose end coupler by itself which is 22-860382 but if I search that part#, it shows that it only comes on alpha 1 Gen 2 1998 and up which is why it didn't show under my 1996 serial range.


So my question is why the heck is is the new updated carrier shift shaft assembly with updated hose end coupler offered for my drive....yet not just the hose end coupler? What if I installed it and broke just the hose end coupler. How the heck would I get just the coupler on it own or do they expect me to order a entire assembly just for the coupler in the future lol
 

Nextelbuddy

Petty Officer 2nd Class
Joined
May 4, 2020
Messages
156
place lower in FWD gear (shaft foot facing forward). remove two screws holding busing assy in place. remove assy. remove e clip from shaft and slide bushing assy off. apply grease to new bushing assy seal and install on shaft. install e clip. use a suitable sealer on o-rings and install bushing with shaft foot facing forward. install two screws and test shifting. pressure test. replace old style speedo connector at bell housing with new style
So I'm curious if you loosen and remove the two bolts holding the assembly in, You mentioned to remove the assembly and then remove the e clip

Is the e clip on top of the assembly or below the assembly? Does the assembly and the shaft come out as one unit? Or do I slide the assembly up and around the foot? I'm just curious if the assembly slides off of the shaft and off of the foot or does the assembly and shaft get removed and then you remove the assembly and slide the new assembly on and then reinstall the shaft with the new assembly?
 

dubs283

Vice Admiral
Joined
Jul 27, 2005
Messages
5,335
1. below
2. yes
3. just remove the shaft and assy, once you have it out and see it will make sense

like i said earlier, this is not a difficult process - no need to overthink it before you perform the work
 

Nextelbuddy

Petty Officer 2nd Class
Joined
May 4, 2020
Messages
156
1. below
2. yes
3. just remove the shaft and assy, once you have it out and see it will make sense

like i said earlier, this is not a difficult process - no need to overthink it before you perform the work
Thank you for the straight forward instructions sir !!
 

Nextelbuddy

Petty Officer 2nd Class
Joined
May 4, 2020
Messages
156
1. below
2. yes
3. just remove the shaft and assy, once you have it out and see it will make sense

like i said earlier, this is not a difficult process - no need to overthink it before you perform the work
Done and done, very easy like you said thank you very much again.
 
Top