Starcraft Restoration

Tim S.

Cadet
Joined
Mar 21, 2010
Messages
21
Re: Starcraft Restoration

Wow,

Another day in. One thing these resto threads don't tell you is how long this all takes!!

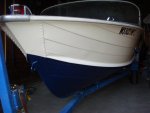
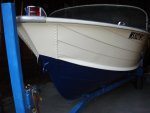
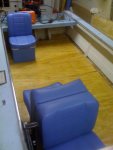
Well one coat Chromite, 2 coats primer, 2 coats paint, 1 coat ummm to thick gluvit, registration numbers, the hull is finally done.....except for the transom.

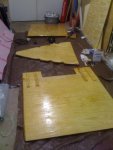
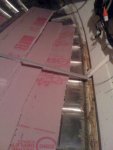
Now I need some help, again. I want to install my new deck. I ended up going with 3/4 exterior grade ply. Thinking that lining the rivets back up to the same holes in the ribs would be impossible I went out and bought Stainless steel screws. I bought 1'' and 1 1/4'' number 10 screws. I'm thinking the 1 1/4'' for the bow area and the 1'' for the transom. Thought I'd put the screws in about 1'' closer to the center line than the old rivet holes. Is there any any magic or tips/tricks you guys can share when reinstalling???

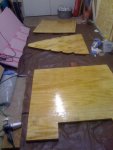
I've sanded the deck pieces down and will coat the bottom and sides with epoxy. Then install, and coat the top side with epoxy. I'm not planning on any glass, just want to seal the ply.

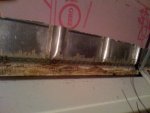
Also I'm noticing some oxidation on the inside of my recently super clean hull. Do you guys coat the bare aluminum with anything or just let it happen.

Does the deck provide support for the hull, or could you run the boat without any deck? Just wondering how much stability the deck actually adds? Any thoughts here?

Thanks again!!!
 

Tim S.

Cadet
Joined
Mar 21, 2010
Messages
21
Re: Starcraft Restoration

Couple pics...
 

Attachments

  • DSC08411.jpg
    DSC08411.jpg
    133.9 KB · Views: 0
  • DSC08419.jpg
    DSC08419.jpg
    136.5 KB · Views: 0

Tim S.

Cadet
Joined
Mar 21, 2010
Messages
21
Re: Starcraft Restoration

More Pics...

Our boat is named Charlotte after picking her up in Charlovoix MI, along the side of the highway. We trailered her back to Madison and she even caught the high speed ferry across Lake Michigan.
 

Attachments

  • DSC08416.jpg
    DSC08416.jpg
    140 KB · Views: 0
  • DSC08418.jpg
    DSC08418.jpg
    140.7 KB · Views: 0
  • DSC08412.jpg
    DSC08412.jpg
    134 KB · Views: 0

Tim S.

Cadet
Joined
Mar 21, 2010
Messages
21
Re: Starcraft Restoration

As I'm reading through the threads on replacing the decking, some people are using deck screws, rivits and stainless steel screws? Is one method better than another? Is a 1'' screw going to bite into the ribs enough once it passes through 3/4 inch ply that it will secure the deck properly?

Also on the Nassau when you go to install the carpet how do you maintain a good edge. It looks as if the carpet continues from the deck to a kind of lip or edge on the inside of the boat. Do most glue the carpet down to the deck and this lip? Is there any trick in doing this so that the edge looks good? Originally I thought about wrapping the wood with the carpet but if I do that the edge will be exposed which has some old brown glue on it.

Our seats also arrived. We are using the Wise economy back to back lounge seats as well as the Wise jump seats. As the boat is rated for 7 and is going to be mostly a cruiser we thought we would load up on the seats. After laying it out I think they are going to fit good and even be able to recline fully. Can't wait to get the floor and seats in and hit the water.....
 

Tim S.

Cadet
Joined
Mar 21, 2010
Messages
21
Re: Starcraft Restoration

All right you Starcraft gurus. I'm hoping to screw the floor boards to the ribs tomorrow with SS screws. Any tips??

Also the carpeting....what do I do about the 2'' flat area to the left and right of the decking. The area of the hull that has the left over original vinyl glue on it. Should I just cut the carpet carefully and glue right to the hull/old glue. Or do I wrap the carpet around the floor boards and paint the hull where the brown glue is???? See pics below for the dilemma

Again thank you for the help!!!! It is sooo appreciated.
 

Attachments

  • IMG_0654.jpg
    IMG_0654.jpg
    144.9 KB · Views: 0
  • IMG_0656.jpg
    IMG_0656.jpg
    144.4 KB · Views: 0
  • IMG_0650.jpg
    IMG_0650.jpg
    144 KB · Views: 0

ezmobee

Supreme Mariner
Joined
Mar 26, 2007
Messages
23,767
Re: Starcraft Restoration

Most of us have side panels that cover that area.
 

Tim S.

Cadet
Joined
Mar 21, 2010
Messages
21
Re: Starcraft Restoration

Thanks for all of the help EZ. I've looked at your resto I think a hundred times to get ideas. You sure did a great job!

Got the pink foam glued together and put into place under the deck today. The process was not very pretty, but was actually pretty simple. We just kept cutting, fitting, cutting, fitting. Then we just glued the package together. Hope we have enough to float her...(hope to never find out) We also got the deck installed today. Used 1'' and 1" 1/4" SS screws and hit the ribs as best we could. Seemed like all of the screws found there mark as the deck is down very securely. Put the seats on just to see how they would look. We are having a debate about trying to match the topside paint to the seats or painting leaving the topside baby blue. I think baby blue may be the way to go.

Sometime this week we'll cut the carpet and glue the carpet down to the deck. Than install the seats.

Interesting about the side panels. I looked all over today and just could not envision where they would go. There are two screw holes on the port side that look like they may have held some sort of side panel at one point, but than there are no screw holes on the port side. Also looking at some of the other Nassau restorations, from the pics that I can see it looks as if there may have been a suspended side panel, and not one that went down to the deck.

I think were just going to try and glue the carpet down to the aluminum and cut as straight a line as we can. Any thoughts?? Maybe we should just leave it wood...that looks pretty cool too.
 

Attachments

  • IMG_0658.jpg
    IMG_0658.jpg
    147.3 KB · Views: 0
  • IMG_0657.jpg
    IMG_0657.jpg
    145.8 KB · Views: 0

ezmobee

Supreme Mariner
Joined
Mar 26, 2007
Messages
23,767
Re: Starcraft Restoration

Ah yes I see that you don't have the little ledge on the sides that a side panel would attach too. Hmmm I don't think I have a good suggestion on how to finish that deck edge. I wouldn't sweat matching the seats too much. My exterior paint doesn't really match my seating and it looks fine.
 
Top