Thermostat replacement on 86 Force 125

fmt2bx

Petty Officer 1st Class
Joined
May 27, 2015
Messages
217
1. what did the garage do to get the bolts out?
2.Where is you overheat sender to the horn/buzzer. I see the orange wire coming out the hole,what does it go to?
3. Are those BUHX plugs?
4.Do all the maintance, go through everything before you fire it up.

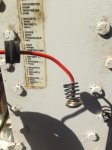
Here is a picture of my overheat sensor. It seems from what I have seen on some other setup that there must be different types:

Screen Shot 2016-03-29 at 6.40.20 PM.jpg
 

Attachments

  • Screen Shot 2016-03-29 at 6.40.20 PM.jpg
    Screen Shot 2016-03-29 at 6.40.20 PM.jpg
    111.5 KB · Views: 2

jerryjerry05

Supreme Mariner
Joined
May 7, 2008
Messages
18,090
The older style was mounted on the surface.
​It was real easy to break off and the new works better.
Key on, ground out the orange lead and the buzzer should sound off.
 

fmt2bx

Petty Officer 1st Class
Joined
May 27, 2015
Messages
217
The older style was mounted on the surface.
​It was real easy to break off and the new works better.
Key on, ground out the orange lead and the buzzer should sound off.

Thanks Jerry05,
In addition to the horn I installed a red light on the dash as well. The sensor , once grounded works fine. I also ran a small test and even though my testing equipment wasn't the best it seems that 115F is the temp at which the thermoswitch sounds the alarm. Seems a bit low but I couldn't find any specs on that.
 

tommarvin

Ensign
Joined
Nov 22, 2015
Messages
999
We have a screw in thermo switch overheat sensor part # A311449-1 in the Force Factory service manual,and the orange wire connects to the end of it.
Our thermoswith shows resistance in warming water at 120 F.
How did you wire in the red light for overheat thermoswitch, we want to do that too?
 

fmt2bx

Petty Officer 1st Class
Joined
May 27, 2015
Messages
217
We have a screw in thermo switch overheat sensor part # A311449-1 in the Force Factory service manual,and the orange wire connects to the end of it.
Our thermoswith shows resistance in warming water at 120 F.
How did you wire in the red light for overheat thermoswitch, we want to do that too?

Thanks for the info. Yeah my testing technic was so so, I had to hold the laser temp (red dot on video) and the heat gun (at low setting and pointed at clamps not sensor). I got a reading at 115F when the alarm went off, so close to the 120F.

For the light, I just connected the the + and - from the alarm to a light. Drilled an 1/2 inch hole and connected. I'll take some pictures. It's just that the audible alarm is kinda funky, don't really trust it that much. Just for piece of mind.

Video: https://youtu.be/oUn3s3pzABE

Cheers.

Fmt
 

jerryjerry05

Supreme Mariner
Joined
May 7, 2008
Messages
18,090
The thermostats are rated at 110d to 130d.
​The 85 needs the 110 the 125 uses the 130
The 50 uses a different one too.
 

iwaterdave

Petty Officer 2nd Class
Joined
Jun 8, 2012
Messages
109
I broke two off into the head and tried to use channel locks to remove the post and it sheered off clean. I was forced to drill it out. Made the mistake of not staging the bits and the correct size bit slid to the softer metal and now I have a useless head. Take your time and do it right. :)
 

fmt2bx

Petty Officer 1st Class
Joined
May 27, 2015
Messages
217
I broke two off into the head and tried to use channel locks to remove the post and it sheered off clean. I was forced to drill it out. Made the mistake of not staging the bits and the correct size bit slid to the softer metal and now I have a useless head. Take your time and do it right. :)

Thanks for the info and sorry for the outcome. I was about to do it by myself but didn't feel confident enough (never done it before). I am glad I seeked help from a local garage. I am gonna have to practice the art of drilling out broken studs, seems like a very useful skill.
 

pnwboat

Rear Admiral
Joined
Oct 8, 2007
Messages
4,251
Not too difficult to drill the bolts out. Really helps if the end of the broken bolt is flat and even without jagged peaks and valleys. Most important thing is to use good quality drill bits....I prefer solid cobalt as they are harder and more heat resistant than high speed steel ones or the high speed steel that are coated. Also important to take a center punch and a hammer to put a dimple right in the center of the broken bolt. The dimple will help guide the drill bit so it doesn't wander off to one side.
 

fmt2bx

Petty Officer 1st Class
Joined
May 27, 2015
Messages
217
Not too difficult to drill the bolts out. Really helps if the end of the broken bolt is flat and even without jagged peaks and valleys. Most important thing is to use good quality drill bits....I prefer solid cobalt as they are harder and more heat resistant than high speed steel ones or the high speed steel that are coated. Also important to take a center punch and a hammer to put a dimple right in the center of the broken bolt. The dimple will help guide the drill bit so it doesn't wander off to one side.

Thanks. I just didn't feel confident enough and thought that if I had messed up, i would have been in a world of pain considering the location of the issue.
I have a riding lawn mower with a broken bolt, I'll practice on that.:D
But thanks again for all the good info.
Cheers
 
Top